Usage Guide
Summary
This section describes usage guidance.
This section describes usage guidance.
This page is a work in progress and will be updated as we improve & finalize the content. Please check back regularly for updates.
When developing an Azure solution using AVM modules, there are several aspects to consider. This page covers important concepts and provides guidance the technical decisions. Each concept/topic referenced here will be further detailed in the corresponding Bicep or Terraform specific guidance.
Topics/concepts that are relevant and applicable for both Bicep and Terraform.
Leveraging the public registries (i.e., the Bicep Public Registry or the Terraform Public Registry) is the most common and recommended approach.
This allows you to leverage the latest and greatest features of the AVM modules, as well as the latest security updates. While there aren’t any prerequisites for using the public registry - no extra software component or service needs to be installed and no configuration is needed - the client machine the deployment is initiated from will need to have access to the public registry.
A private registry - that is hosted in your own environment - can store modules originating from the public registry. Using a private registry still grants you the latest version of AVM modules while allowing you to review each version of each module before admitting them to your private registry. You also have control over who can access your own private registry. Note that using a private registry means that you’re still using each module as is, without making any changes.
Inner-sourcing AVM means maintaining your own, synchronized copy of AVM modules in your own internal private registry, repositories or other storage option. Customers normally look to inner-source AVM modules when they have strict security and compliance requirements, or when they want to publish their own lightly wrapped versions of the modules to meet their specific needs; for example changing some allowed or default values for parameter or variable inputs.
This is a more complex approach and requires more effort to maintain, but it can be beneficial in certain scenarios, however, it should not be the default approach as it can lead to a lot of overhead and maintenance and requires significant skills and resources to set up and maintain.
There are many ways to approach inner-sourcing AVM modules for both Bicep and Terraform. The AVM team will be publishing guidance on this topic, based on customer experience and learnings.
You can see the AVM team talking about inner-sourcing on the AVM February 2025 community call on YouTube.
This section provides advanced guidance for developing solutions using Azure Verified Modules (AVM). It covers technical decisions and concepts that are important for building and deploying Azure solutions using AVM modules.
When implementing infrastructure in Azure leveraging IaaS and PaaS services, there are multiple options for Azure deployments. In this article we assume that a decision has been made to implement your solution, using Infrastructure-as-Code (IaC). This is best suited to allow programmatic declarative control of the target infrastructure and is ideal for projects that require repeatability and idempotency.
There are multiple language choices when implementing your solution using IaC in Azure. The Azure Verified Modules project currently supports Bicep and Terraform. The following guidance summarizes considerations that can help choose the option that best suits your requirements.
Bicep is the Microsoft 1st party offering for IaC deployments. It supports Generally Available (GA) and preview features for all Azure resources and allows for modular composition of resources and solution templates. The use of simplified syntax makes IaC development intuitive and the use of the Bicep extension for VSCode provides IntelliSense and syntax validation to assist with coding. Finally, Bicep is well suited for infrastructure projects and teams that don’t require management of other cloud platforms or services outside of Azure. For a more detailed read on reasons to choose Bicep, read this article from the Bicep documentation.
HashiCorp’s Terraform is an extensible 3rd party platform that can be used across multiple cloud and on-premises platforms using multiple provider plugins. It has widespread adoption due to its simplified human-readable configuration files, common functionality, and the ability to allow a project to span multiple provider spaces.
In Azure, support is provided through two primary providers — AzAPI (developed by Microsoft) and AzureRM (co-developed between Microsoft and HashiCorp). AzAPI is the standard provider for AVM Terraform modules because it talks directly to the Azure Resource Manager REST API. This gives day-zero access to new resource types, properties and API versions, brings built-in retry and pre-flight validation, and keeps Terraform AVM modules conceptually aligned with their Bicep counterparts. See Why AVM Terraform modules favor AzAPI for the full rationale. AzureRM is only permitted under the narrow exception described in TFFR3 (resources that have no AzAPI equivalent, e.g. some data-plane resources).
Projects typically choose Terraform when they bridge multiple cloud infrastructure platforms or when the development team has previous experience coding in Terraform. Modern Integrated Development Environments (IDE) - such as Visual Studio Code - include extension support for Terraform features as well as additional Azure specific extensions. These extensions enable syntax validation and highlighting as well as code formatting and HashiCorp Cloud Platform (HCP) integration for HashiCorp Cloud customers. For a more detailed read on reasons to choose Terraform, read this article from the Terraform on Azure documentation.
Before starting the process of codifying infrastructure, it is important to develop a detailed architecture of what will be created. This should include details for:
For a production grade solution, you need to
Once the architecture is agreed upon, it is time to plan the development of your IaC code. There are several key decision points that should be considered during this phase.
The two primary methods used to create your solutions module are:
The trade-off between the two options is primarily around control vs. speed. AVM works to provide the best of both options by providing modules with opinionated and recommended practice defaults while allowing for more detailed configuration as needed. In our sample exercise we’ll be using AVM modules to demonstrate building the example solution.
When using AVM modules for your solution, there is an additional choice that should be considered. The AVM library includes both pattern and resource module types. If your architecture includes or follows a well-known pattern then a pattern module may be the right option for you. If you determine this is the case, then search the module index for pattern modules in your chosen language to see if an option exists for your scenario. Otherwise, using resource modules from the library will be your best option.
In cases where an AVM resource or pattern module isn’t available for use, review the Bicep or Terraform provider documentation to identify how to augment AVM modules with standalone resources. If you feel that additional resource or pattern modules would be useful, you can also request the creation of a pattern or resource module by creating a module proposal issue on the AVM github repository.
Once the decision has been made to use AVM modules to help accelerate solution development, a decision about where those modules will be sourced from is the next key decision point. A detailed exploration of the different sourcing options can be found in the Module Sourcing section of the Concepts page. Take a moment to review the options discussed there.
For our solution we will leverage the Public Registry option by sourcing AVM modules directly from the respective Terraform and Bicep public registries. This will avoid the need to fork copies of the modules for private use.
Azure Verified Modules (AVM) for Bicep are a powerful tool that leverage the Bicep domain-specific language (DSL), industry knowledge, and an Open Source community, which altogether enable developers to quickly deploy Azure resources that follow Microsoft’s recommended practices for Azure.
In this article, we will walk through the Bicep specific considerations and recommended practices on developing your solution leveraging Azure Verified Modules. We’ll review some of the design features and trade-offs and include sample code to illustrate each discussion point.
In this tutorial, we will:
After completing this tutorial, you’ll have a working knowledge of:
Let’s get started!
You will need the following tools and components to complete this guide:
Before you begin, make sure you have these tools installed in your development environment.
Before we begin coding, it is important to have details about what the infrastructure architecture will include. For our example, we will be building a solution that will host a simple application on a Linux virtual machine (VM). The solution must be secure and auditable. The VM must not be accessible from the internet and its logs should be easily accessible. All Azure services should utilize logging tools for auditing purposes.
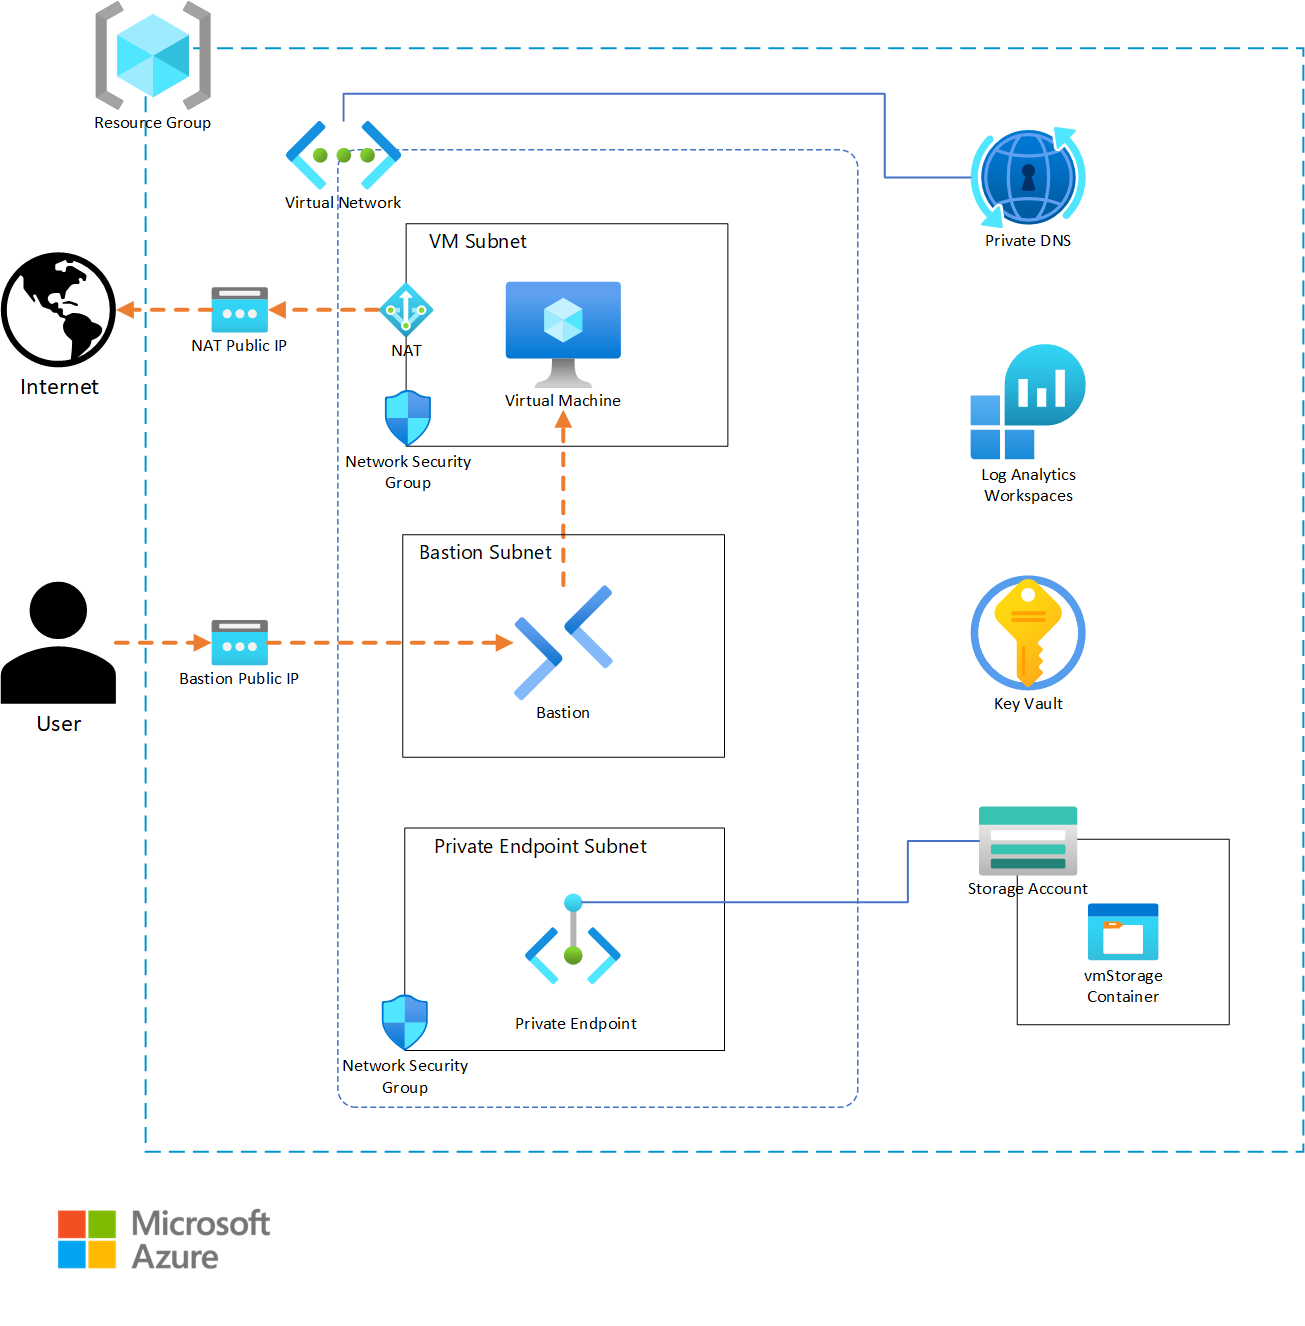
The architecture diagram shows all components needed for a successful solution deployment. Rather than building the complete solution at once, this tutorial takes an incremental approach building the Bicep file piece-by-piece and testing the deployment at each stage. This approach allows for discussion of each design decision along the way.
The development will start with core platform components: first the backend logging services (Log Analytics) and then the virtual network.
Let’s begin by creating our folder structure along with a main.bicep file. Your folder structure should be as follows:
VirtualMachineAVM_Example1/
└── main.bicep
After you have your folder structure and main.bicep file, we can proceed with our first AVM resources!
Let’s start by adding a logging service to our main.bicep since all other deployed resources will use this service for their logs.
Always begin template development by adding resources that create dependencies for other downstream services. This approach simplifies referencing these dependencies within your other modules as you develop them. For example, starting with Logging and Virtual Network services makes sense since all other services will depend on these.
The logging solution depicted in our Architecture Diagram shows we will be using a Log Analytics workspace. Let’s add that to our template! Open your main.bicep file and add the following:
Always click on the “Copy to clipboard” button in the top right corner of the Code sample area in order not to have the line numbers included in the copied code.
You now have a fully functional Bicep template that will deploy a working Log Analytics workspace! If you would like to try it, run the following in your console:
For keeping the example below simple, we are using the traditional deployment commands, e.g., az deployment group create or New-AzResourceGroupDeployment. However, we encourage you to look into using Deployment Stacks instead by simply replacing the previous commands with az stack group create or New-AzResourceGroupDeploymentStack as well as the other required input parameters as shown here.
Deployment Stacks allow you to deploy a Bicep file as a stack, which is a collection of resources that are deployed together. This allows you to manage the lifecycle of the stack as a single unit, making it easier to deploy, update, and now even delete resources via Bicep. You can also implement RBAC Deny Assignments on your stacks deployed resources to prevent changes to the resources or specific actions on the resources to all but an excluded list of users, groups or other principals.
# Log in to Azure
Connect-AzAccount

# Select your subscription
Set-AzContext -SubscriptionId '<subscriptionId>'

# Deploy a resource group
New-AzResourceGroup -Name 'avm-bicep-vmexample1' -Location '<location>'

# Invoke your deployment
New-AzResourceGroupDeployment -DeploymentName 'avm-bicep-vmexample1-deployment' -ResourceGroupName 'avm-bicep-vmexample1' -TemplateFile '/<path-to>/VirtualMachineAVM_Example1/main.bicep'
# Log in to Azure
az login
# Select your subscription
az account set --subscription '<subscriptionId>'
# Deploy a resource group
az group create --name 'avm-bicep-vmexample1' --location '<location>'
# Invoke your deployment
az deployment group create --name 'avm-bicep-vmexample1-deployment' --resource-group 'avm-bicep-vmexample1' --template-file '/<path-to>/VirtualMachineAVM_Example1/main.bicep'The above commands will log you in to your Azure subscription, select a subscription to use, create a resource group, then deploy the main.bicep template to your resource group.
AVM Makes the deployment of Azure resources incredibly easy. Many of the parameters you would normally be required to define are taken care of by the AVM module itself. In fact, the location parameter is not even needed in your template—when left blank, by default, all AVM modules will deploy to the location in which your target Resource Group exists.
Now we have a Log Analytics workspace in our resource group which doesn’t do a whole lot of good on its own. Let’s take our template a step further by adding a Virtual Network that integrates with the Log Analytics workspace.
We will now add a Virtual Network to our main.bicep file. This VNet will contain subnets and Network Security Groups (NSGs) for any of the resources we deploy that require IP addresses.
In your main.bicep file, add the following:
Again, the Virtual Network AVM module requires only two things: a name and an addressPrefixes parameter.
There is an additional parameter available in most AVM modules named diagnosticSettings. This parameter allows you to configure your resource to send its logs to any suitable logging service. In our case, we are using a Log Analytics workspace.
Let’s update our main.bicep file to have our VNet send all of its logging data to our Log Analytics workspace:
Notice how the diagnosticsSettings parameter needs a workspaceResourceId? All you need to do is add a reference to the built-in logAnalyticsWorkspaceId output of the logAnalyticsWorkspace AVM module. That’s it! Our VNet now has integrated its logging with our Log Analytics workspace. All AVM modules come with a set of built-in outputs that can be easily referenced by other modules within your template.
All AVM modules have built-in outputs which can be referenced using the <moduleName>.outputs.<outputName> syntax.
When using plain Bicep, many of these outputs require multiple lines of code or knowledge of the correct object ID references to get at the desired output. AVM modules do much of this heavy lifting for you by taking care of these complex tasks within the module itself, then exposing them to you through the module’s outputs. Find out more about Bicep Outputs.
We can’t use a Virtual Network without subnets, so let’s add a subnet next. According to our Architecture, we will have three subnets: one for the Virtual Machine, one for the Bastion host, and one for Private Endpoints. We can start with the VM subnet for now. While we’re at it, let’s also add the NAT Gateway, the NAT Gateway’s Public IP, the attach the NAT Gateway to the VM subnet.
Add the following to your main.bicep:
The modification adds a subnets property to our virtualNetwork module. The AVM network/virtual-network module supports the creation of subnets directly within the module itself. We can also link our NAT Gateway directly to the subnet within this submodule.
A nice feature within Bicep are the various functions available. We use the cidrSubnet() function to declare CIDR blocks without having to calculate them on your own.
See how we are reusing the same CIDR block 10.0.0.0/16 in multiple locations? You may have noticed we are defining the same location in two different spots as well. We’re now at a point in the development where we should leverage one of our first recommended practices: using parameters and variables!
Use Bicep variables to define values that will be constant and reused with your template; use parameters anywhere you may need a modifiable value.
Let’s enhance the template by adding variables for the CIDR block and prefix, then use a location parameter with a default value. We’ll then reference those in the module:
We now have a good basis for the infrastructure to be utilized by the rest of the resources in our Architecture. We will come back to our networking in a future step, once we are ready to create some Network Security Groups. For now, let’s move on to other modules.
Key Vaults are one of the key components in most Azure architectures as they create a place where you can save and reference secrets in a secure manner (“secrets” in the general sense, as opposed to the secret object type in Key Vaults). The Key Vault AVM module makes it very simple to store secrets generated in your template. In this tutorial, we will use one of the most secure methods of storing and retrieving secrets by leveraging this Key Vault in our Bicep template.
The first step is easy: add the Key Vault AVM module to our main.bicep file. In addition, let’s also ensure it’s hooked into our Log Analytics workspace (we will do this for every new module from here on out).
The name of the Key Vault we will deploy uses the uniqueString() Bicep function. Key Vault names must be globally unique. We will therefore deviate from our standard naming convention thus far and make an exception for the Key Vault. Note how we are still adding a suffix to the Key Vault name, so its name remains recognizable; you can use a combination of concatenating unique strings, prefixes, or suffixes to follow your own naming standard preferences.
When we generate our unique string, we will pass in the resourceGroup().id as the seed for the uniqueString() function so that every time you deploy this main.bicep to the same resource group, it will use the same randomly generated name for your Key Vault (since resourceGroup().id will be the same).
Bicep has many built-in functions available. We used two here: uniqueString() and resourceGroup(). The resourceGroup(), subscription(), and deployment() functions are very useful when seeding uniqueString() or guid() functions. Just be cautious about name length limitations for each Azure service! Visit this page to learn more about Bicep functions.
We will use this Key Vault later on when we create a VM and need to store its password. Now that we have it, a Virtual Network, Subnet, and Log Analytics prepared, we should have everything we need to deploy a Virtual Machine!
In the future, we will update this guide to show how to generate and store a certificate in the Key Vault, then use that certificate to authenticate into the Virtual Machine.
The AVM Virtual Machine module enables the EncryptionAtHost feature by default. You must enable this feature within your Azure subscription successfully deploy this example code. To do so, run the following:
# Wait a few minutes after running the command to allow it to propagate
Register-AzProviderFeature -FeatureName "EncryptionAtHost" -ProviderNamespace "Microsoft.Compute"
az feature register --namespace Microsoft.Compute --name EncryptionAtHost
# Propagate the change
az provider register --namespace Microsoft.ComputeFor our Virtual Machine (VM) deployment, we need to add the following to our main.bicep file:
The VM module is one of the more complex modules in AVM—behind the scenes, it takes care of a lot of heavy lifting that, without AVM, would require multiple Bicep resources to be deployed and referenced.
For example, look at the nicConfigurations parameter: normally, you would need to deploy a separate NIC resource, which itself also requires an IP resource, then attach them to each other, and finally, attach them all to your VM.
With the AVM VM module, the nicConfigurations parameter accepts an object, allowing you to create any number of NICs to attach to your VM from within the VM resource deployment itself. It handles all the naming, creation of other necessary dependencies, and attaches them all together, so you don’t have to. The osDisk parameter is similar, though slightly less complex. There are many more parameters within the VM module that you can leverage if needed, that share a similar ease-of-use.
Since this is the real highlight of our main.bicep file, we need to take a closer look at some of the other changes that were made.
VM Admin Password Parameter
First, we added a new parameter. The value of this will be provided when the main.bicep template is deployed. We don’t want any passwords stored as text in code; for our purposes, the safest way to do this is to prompt the end user for the password at the time of deployment.
The supplied password must be between 6-72 characters long and must satisfy at least 3 of password complexity requirements from the following: Contains an uppercase character; Contains a lowercase character; Contains a numeric digit; Contains a special character. Control characters are not allowed
Also note how we are using the @secure() decorator on the password parameter. This will ensure the value of the password is never displayed in any of the deployment logs or in Azure. We have also added the @description() decorator and started the description with “Required.” It’s a good habit and recommended practice to document your parameters in Bicep. This will ensure that VS Code’s built-in Bicep linter can provide end-users insightful information when deploying your Bicep templates.
Always use the @secure() decorator when creating a parameter that will hold sensitive data!
Add the VM Admin Password to Key Vault
The next thing we have done is save the value of our vmAdminPass parameter to our Key Vault. We have done this by adding a secrets parameter to the Key Vault module. Adding secrets to Key Vaults is very simple when using the AVM module.
By adding our password to the Key Vault, it will ensure that we never lose the password and that it is stored securely. As long as a user has appropriate permissions on the vault, the password can be fetched easily.
Reference the VM Subnet
 1    nicConfigurations: [
 2      {
 3        ipConfigurations: [
 4          {
 5            name: 'ipconfig01'
 6            subnetResourceId: virtualNetwork.outputs.subnetResourceIds[0] // VMSubnet
 7          }
 8        ]
 9        nicSuffix: '-nic-01'
10      }
11    ]
Here, we reference another built-in output, this time from the AVM Virtual Network module. This example shows how to use an output that is part of an array. When the Virtual Network module creates subnets, it automatically creates a set of pre-defined outputs for them, one of which is an array that contains each subnet’s subnetResourceId. Our VM Subnet was the first one created which is position [0] in the array.
Other AVM modules may make use of arrays to store outputs. If you are unsure what type of outputs a module provides, you can always reference the Outputs section of each module’s README.md.
The last major component we need to add is a Storage Account. Because this Storage Account will be used as a backend storage to hold blobs for the hypothetical application that runs on our VM, we’ll also create a blob container within it using the same AVM Storage Account module.
We now have all the major components of our Architecture diagram built!
The last steps we need to take to meet our requirements is to ensure our networking resources are secure and that we are using least privileged access by leveraging Role-Based Access Control (RBAC). Let’s get to it!
We’ll add a Network Security Group (NSG) to our VM subnet. This will act as a layer 3 and layer 4 firewall for networked resources. This implementation includes an appropriate inbound rule to allow SSH traffic from the Bastion host:
Since the Storage Account serves as a backend resource exclusively for the Virtual Machine, it will be secured as much as possible. This involves adding a Private Endpoint and disabling public internet access. AVM makes creation and assignment of Private Endpoints to resources incredibly easy. Take a look:
This implementation adds a dedicated subnet for Private Endpoints following the recommended practice of isolating Private Endpoints in their own subnet.
The addition of just a few lines of code in the privateEndpoints parameter handles the complex tasks of creating the Private Endpoint, associating it with the VNet, and attaching it to the resource. AVM drastically simplifies the creation of Private Endpoints for just about every Azure Resource that supports them.
The implementation also disables all public network connectivity to the Storage Account, ensuring it only accepts traffic via the Private Endpoint.
Finally, a Private DNS zone is added and linked to the VNet, enabling the VM to resolve the Private IP address associated with the Storage Account.
To securely access the Virtual Machine without exposing its SSH port to the public internet, we’ll create an Azure Bastion host. The Bastion Host requires a subnet with the exact name AzureBastionSubnet which cannot contain anything other than Bastion Hosts.
This simple addition of the bastion-host AVM module completes the secure access component of our architecture. You can now access the Virtual Machine by way of the Bastion Host in the Azure Portal.
To complete our solution, we have one final task: to apply Role-Based Access Control (RBAC) restrictions on our services, namely the Key Vault and Storage Account. The goal is to explicitly allow only the Virtual Machine to have Create, Read, Update, or Delete (CRUD) permissions on these two services.
This is accomplished by enabling a System-assigned Managed Identity on the Virtual Machine, then granting the VM’s Managed Identity appropriate permissions on the Storage Account and Key Vault:
The Azure Subscription owner will have CRUD permissions for the Storage Account but not for the Key Vault. The Key Vault requires explicit RBAC permissions assigned to a user to grant them access: Provide access to Key Vaults using RBAC. Important!: at this point, you will only be able to access the Storage Account from the Bastion Host. Remember, public internet access has been disabled!
The RBAC policies have been successfully applied using a System-assigned Managed Identity on the Virtual Machine. This identity has been granted permissions on both the Key Vault and Storage Account. Now the VM can read secrets from the Key Vault and Read, Create, or Delete blobs in the Storage Account.
In a real production environment, the principle of least privileged access should be applied, providing only the exact permissions each service needs to carry out its functions. Learn more about Microsoft’s recommendations for identity and access management.
In this tutorial, we’ve explored how to leverage Azure Verified Modules (AVM) to build a secure, well-architected solution in Azure. AVM modules significantly simplify the deployment of Azure resources by abstracting away much of the complexity involved in configuring individual resources.
Your final, deployable Bicep template file should now look like this:
AVM modules provide several key advantages over writing raw Bicep templates:
As you continue your journey with Azure and AVM, remember that this approach can be applied to more complex architectures as well. The modular nature of AVM allows you to mix and match components to build solutions that meet your specific needs while adhering to Microsoft’s Well-Architected Framework.
By using AVM modules as building blocks, you can focus more on your solution architecture and less on the intricacies of individual resource configurations, ultimately leading to faster development cycles and more reliable deployments.
When you are ready, you can remove the infrastructure deployed in this example. Key Vaults are set to a soft-delete state so you will also need to purge the one we created in order to fully delete it. The following commands will remove all resources created by your deployment:
# Delete the resource group
Remove-AzResourceGroup -Name "avm-bicep-vmexample1" -Force

# Purge the Key Vault
Remove-AzKeyVault -VaultName "<keyVaultName>" -Location "<location>" -InRemovedState -Force
# Delete the resource group
az group delete --name 'avm-bicep-vmexample1' --yes --no-wait
# Purge the Key Vault
az keyvault purge --name '<keyVaultName>' --no-waitCongratulations, you have successfully leveraged AVM Bicep modules to deploy resources in Azure!
We welcome your contributions and feedback to help us improve the AVM modules and the overall experience for the community!
Azure Verified Modules (AVM) for Terraform are a powerful tool that leverage the Terraform domain-specific language (DSL), industry knowledge, and an Open Source community, which altogether enable developers to quickly deploy Azure resources that follow Microsoft’s recommended practices for Azure.
In this article, we will walk through the Terraform specific considerations and recommended practices on developing your solution leveraging Azure Verified Modules. We’ll review some of the design features and trade-offs and include sample code to illustrate each discussion point.
This lab demonstrates older AVM Terraform modules built on the AzureRM provider. AVM Terraform modules MUST use the AzAPI provider, expose parent_id instead of resource_group_name (per TFRMFR1), name their primary resource this (per TFRMNFR2), and source the AzAPI resource type from var.resource_types (per TFFR6). The high-level patterns shown below (architecture, composition, dependency wiring) carry over, but the per-module call surface differs on current AzAPI-based modules. For the current call shape see the Terraform quickstart and Why AVM Terraform modules favor AzAPI.
You will need the following tools and components to complete this guide:
Before you begin, ensure you have these tools installed in your development environment.
Good module development should start with a good plan. Let’s first review the architecture and module design prior to developing our solution.
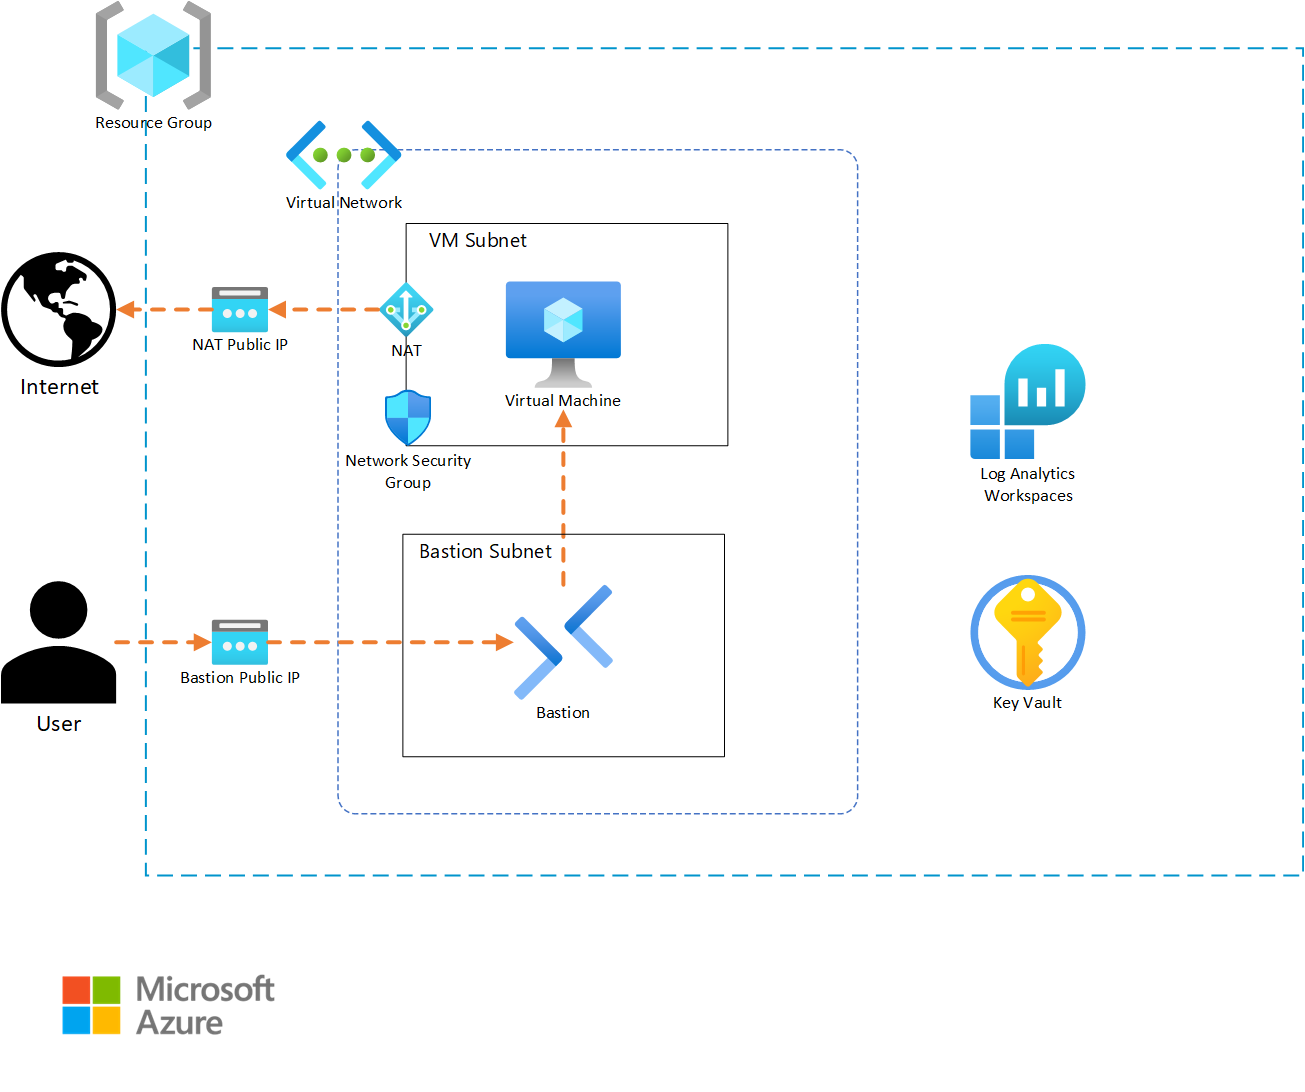
Before we begin coding, it is important to have details about what the infrastructure architecture will include. For our example, we will be building a solution that will host a simple application on a Linux virtual machine (VM).
In our design, the resource group for our solution will require appropriate tagging to comply with our corporate standards. Resources that support Diagnostic Settings must also send metric data to a Log Analytics workspace, so that the infrastructure support teams can get metric telemetry. The virtual machine will require outbound internet access to allow the application to properly function. A Key Vault will be included to store any secrets and key artifacts, and we will include a Bastion instance to allow support personnel to access the virtual machine if needed. Finally, the VM is intended to run without interaction, so we will auto-generate an SSH private key and store it in the Key Vault for the rare event of someone needing to log into the VM.
Based on this narrative, we will create the following resources:
Since our solution template (root module) is intended to be deployed multiple times, we want to develop it in a way that provides flexibility while minimizing the amount of input necessary to deploy the solution. For these reasons, we will create our module with a small set of variables that allow for deployment differentiation while still populating solution-specific defaults to minimize input. We will also separate our content into variables.tf, outputs.tf, terraform.tf, and main.tf files to simplify future maintenance.
Based on this, our file system will take the following structure:
terraform.tf - This file holds the provider definitions and versions.variables.tf - This file contains the input variable definitions and defaults.outputs.tf - This file contains the outputs and their descriptions for use by any external modules calling this root module.main.tf - This file contains the core module code for creating the solutions infrastructure.development.tfvars - This file will contain the inputs for the instance of the module that is being deployed. Content in this file will vary from instance to instance.Terraform will merge content from any file ending in a .tf extension in the module folder to create the full module content. Because of this, using different files is not required. We encourage file separation to allow for organizing code in a way that makes it easier to maintain. While the naming structure we’ve used is common, there are many other valid file naming and organization options that can be used.
In our example, we will use the following variables as inputs to allow for customization:
location - The location where our infrastructure will be deployed.name_prefix - This will be used to preface all of the resource naming.virtual_network_prefix - This will be used to ensure IP uniqueness for the deployment.tags - The custom tags to use for each deployment.Finally, we will export the following outputs:
resource_group_name - This will allow for finding this deployment if there are multiples.virtual_machine_name - This can be used to find and login to the vm if needed.Now that we’ve determined our architecture and module configurations, we need to see what AVM modules exist for use in our solution. To do this, we will open the AVM Terraform pattern module index and check if there are any existing pattern modules that match our requirement. In this case, no pattern modules fit our needs. If this was a common pattern, we could open an issue on the AVM github repository to get assistance from the AVM project to create a pattern module matching our requirements. Since our architecture isn’t common, we’ll continue to the next step.
When a pattern module fitting our needs doesn’t exist for a solution, leveraging AVM resource modules to build our own solution is the next best option. Review the AVM Terraform published resource module index for each of the resource types included in your architecture. For each AVM module, capture a link to the module to allow for a review of the documentation details on the Terraform Registry website.
Some of the published pattern modules cover multi-resource configurations that can sometimes be interpreted as a single resource. Be sure to check the pattern index for groups of resources that may be part of your architecture and that don’t exist in the resource module index. (e.g., Virtual WAN)
For our sample architecture, we have the following AVM resource modules at our disposal. Click on each module to explore its documentation on the Terraform Registry.
We can now begin coding our solution. We will create each element individually, to allow us to test our deployment as we build it out. This will also allow us to correct any bugs incrementally, so that we aren’t troubleshooting a large number of resources at the end.
Let’s begin by configuring the provider details necessary to build our solution. Since this is a root module, we want to include any provider and Terraform version constraints for this module. We’ll periodically come back and add any needed additional providers if our design includes a resource from a new provider.
Open up your development IDE (Visual studio code in our example) and create a file named terraform.tf in your root directory.
Add the following code to your terraform.tf file:
Always click on the “Copy to clipboard” button in the top right corner of the Code sample area in order not to have the line numbers included in the copied code.
This specifies that the required Terraform binary version to run your module can be any version between 1.9 and 2.0. This is a good compromise for allowing a range of binary versions while also ensuring support for any required features that are used as part of the module. This can include things like newly introduced functions or support for new key words.
Since we are developing our solution incrementally, we should validate our code. To do this, we will take the following steps:
cd and then the path to the module. As an example, if the module directory was named example we would run cd example.terraform init to initialize your provider file.You should now see a message indicating that Terraform has been successfully initialized. This indicates that our code is error free and we can continue on. If you get errors, examine the provider syntax for typos, missing quotes, or missing brackets.
Because our module is intended to be reusable, we want to provide the capability to customize each module call with those items that will differ between them. This is done by using variables to accept inputs into the module. We’ll define these inputs in a separate file named variables.tf.
Go back to the IDE, and create a file named variables.tf in the working directory.
Add the following code to your variables.tf file to configure the inputs for our example:
Note that each variable definition includes a type definition to guide module users on how to properly define an input. Also note that it is possible to set a default value. This allows module consumers to avoid setting a value if they find the default to be acceptable.
We should now test the new content we’ve created for our module. To do this, first re-run terraform init on your command line. Note that nothing has changed and the initialization completes successfully. Since we now have module content, we will attempt to run the plan as the next step of the workflow.
Type terraform plan on your command line. Note that it now asks for us to provide a value for the var.virtual_network_cidr variable. This is because we don’t provide a default value for that input so Terraform must have a valid input before it can continue. Type 10.0.0.0/22 into the input and press enter to allow the plan to complete. You should now see a message indicating that Your infrastructure matches the configuration and that no changes are needed.
There are multiple ways to provide input to the module we’re creating. We will create a tfvars file that can be supplied during plan and apply stages to minimize the need for manual input. tfvars files are a nice way to document inputs as well as allow for deploying different versions of your module. This is useful if you have a pipeline where infrastructure code is deployed first for development, and then is deployed for QA, staging, or production with different input values.
In your IDE, create a new file named development.tfvars in your working directory.
Now add the following content to your development.tfvars file.
Note that each variable has a value defined. Although, only inputs without default values are required, we include values for all of the inputs for clarity. Consider doing this in your environments so that someone looking at the tfvars files has a full picture of what values are being set.
Re-run the terraform apply, but this time, reference the .tfvars file by using the following command: terraform plan -var-file=development.tfvars. You should get a successful completion without needing to manually provide inputs.
Now that we’ve created the supporting files, we can start building the actual infrastructure code in our main file. We will add one AVM resource module at a time so that we can test each as we implement them.
Return to your IDE and create a new file named main.tf.
In Azure, we need a resource group to hold any infrastructure resources we create. This is a simple resource that typically wouldn’t require an AVM module, but we’ll include the AVM module so we can take advantage of the Role-Based Access Control (RBAC) interface if we need to restrict access to the resource group in future versions.
First, let’s visit the Terraform registry documentation page for the resource group and explore several key sections.
Provision Instructions box on the right-hand side of the page. This contains the module source and version details which allows us to copy the latest version syntax without needing to type everything ourselves.Readme tab in the middle of the page. It contains details about all required and optional inputs, resources that are created with the module, and any outputs that are defined. If you want to explore any of these items in detail, each element has a tab that you can review as needed.Examples that contains functioning examples for the AVM module. These showcase a good example of using copy/paste to bootstrap module code and then modify it for your specific purpose.Now that we’ve explored the registry content, let’s add a resource group to our module.
First, copy the content from the Provision Instructions box into our main.tf file.
On the modules documentation page, go to the inputs tab. Review the Required Inputs tab. These are the values that don’t have defaults and are the minimum required values to deploy the module. There are additional inputs in the Optional Inputs section that can be used to configure additional module functionality. Review these inputs and determine which values you would like to define in your AVM module call.
Now, replace the # insert the 2 required variables here comment with the following code to define the module inputs. Our main.tf code should look like the following:
Note how we’ve used the prefix variable and Terraform interpolation syntax to dynamically name the resource group. This allows for module customization and re-use. Also note that even though we chose to use the default module name of avm-res-resources-resourcegroup, we could modify the name of the module if needed.
After saving the file, we want to test our new content. To do this, return to the command line and first run terraform init. Notice how Terraform has downloaded the module code, as well as providers that the module requires. In this case, you can see the azurerm, random, and modtm providers were downloaded.
Let’s now deploy our resource group. First, let’s run a plan operation to review what will be created. Type terraform plan -var-file=development.tfvars and press enter to initiate the plan.
Notice that we get an error indicating that we are Missing required argument and that for the azurerm provider, we need to provide a features argument. The addition of the resource group AVM resource requires that the azurerm provider be installed to provision resources in our module. This provider requires a features block in its provider definition that is missing in our configuration.
Return to the terraform.tf file and add the following content to it. Note how the features block is currently empty. If we needed to activate any feature flags in our module, we could add them here.
Re-run terraform plan -var-file=development.tfvars now that we have updated the features block.
Note that we once again get an error. This time, the error indicates that subscription_id is a required provider property for plan/apply operations. This is a change that was introduced as part of the version 4 release of the AzureRM provider. We need to supply the ID of the deployment subscription where our resources will be created.
First, we need to get the subscription ID value. We will use the portal for this exercise, but using the Azure CLI, PowerShell, or the resource graph will also work to retrieve this value.
Subscriptions in the search field at the top middle of the page.Subscriptions from the services menu in the search drop-down.Subscription ID field on the overview page and click the copy button to copy it to the clipboard.Secondly, we need to update Terraform so that it can use the subscription ID. There are multiple ways to provide a subscription ID to the provider including adding it to the features block or using environment variables. For this scenario we’ll use environment variables to set the values so that we don’t have to re-enter them on each run. This also keeps us from storing the subscription ID in our code since it is considered a sensitive value. Select a command from the list below based on your operating system.
export ARM_SUBSCRIPTION_ID=<your ID here>set ARM_SUBSCRIPTION_ID=<your ID here>Finally, we should now be able to complete our plan operation by re-running terraform plan -var-file=development.tfvars. Note that the plan will create three resources, two for telemetry and one for the resource group.
We can complete testing by implementing the resource group. Run terraform apply -var-file="development.tfvars" and type yes and press enter when prompted to accept the changes. Terraform will create the resource group and notify you with a Apply complete message and a summary of the resources that were added, changed, and destroyed.
We can now continue by adding the Log Analytics Workspace to our main.tf file. We will follow a workflow similar to what we did with the resource group.
Provision Instructions portion of the page into the main.tf file.This time, instead of manually supplying module inputs, we will copy module content from one of the examples to minimize the amount of typing required. In most examples, the AVM module call is located at the bottom of the example.
Examples drop-down menu in the documentation and select the default example from the menu. You will see a fully functioning example code which includes the module and any supporting resources. Since we only care about the workspace resource from this example, we can scroll to the bottom of the code block and find the module "log_analytics_workspace" line.../..) for the module source value which will not work in our module call. To work around this, we copied those values from the provision instructions section of the module documentation in a previous step.The Log Analytics module content should look like the following code block. For simplicity, you can also copy this directly to avoid multiple copy/paste actions.
Again, we will need to run terraform init to allow Terraform to initialize a copy of the AVM Log Analytics module.
Now, we can deploy the Log Analytics workspace by running terraform apply -var-file="development.tfvars", typing yes and pressing enter. Note that Terraform will only create the new Log Analytics resources since the resource group already exists. This is one of the key benefits of deploying using Infrastructure as Code (IAC) tools like Terraform.
Note that we ran the terraform apply command without first running terraform plan. Because terraform apply runs a plan before prompting for the apply, we opted to shorten the instructions by skipping the explicit plan step. If you are testing in a live environment, you may want to run the plan step and save the plan as part of your governance or change control processes.
Our solution calls for a simple Key Vault implementation to store virtual machine secrets. We’ll follow the same workflow for deploying the Key Vault as we used for the previous resource group and Log Analytics workspace resources. However, since Key Vaults require data roles to manage secrets and keys, we will need to use the RBAC interface and a data resource to configure Role-Based Access Control (RBAC) during the deployment.
For this exercise, we will provision the deployment user with data rights on the Key Vault. In your environment, you will likely want to either provide additional roles as inputs or statically assign users, or groups to the Key Vault data roles. For simplicity we also set the Key Vault to have public access enabled due to us not being able to dictate a private deployment environment. In your environment where your deployment machine will be on a private network it is recommended to restrict public access for the Key Vault.
Before we implement the AVM module for the Key Vault, we want to use a data resource to read the client details about the user context of the current Terraform deployment.
Add the following line to your main.tf file and save it.
Key vaults use a global namespace which means that we will also need to add a randomization resource to allow us to randomize the name to avoid any potential name intersection issues with other Key Vault deployments. We will use Terraform’s random provider to generate the random string which we will append to the Key Vault name. Add the following code to your main module to create the random_string resource we will use for naming.
Now we can continue with adding the AVM Key Vault module to our solution.
Provision Instructions portion of the page into the main.tf file.Create secret example to fill out our module.name, location, enable_telemetry, resource_group_name, tenant_id, and role_assignments value content from the example and paste it into the new Key Vault module in your solution."${var.prefix}-kv-${random_string.name_suffix.result}"location and resource_group_name values to the same implicit resource group module references we used in the Log Analytics workspace.enable_telemetry value to true.tenant_id and role_assignments values to the same values that are in the example.Our architecture calls for us to include a diagnostic settings configuration for each resource that supports it. We’ll use the diagnostic-settings example to copy this content.
diagnostic-settings option from the examples drop-down.diagnostic_settings value and paste it into the Key Vault module block we’re building in main.tf.workspace_resource_id value to be an implicit reference to the output from the previously implemented Log Analytics module (module.avm-res-operationalinsights-workspace.resource_id in our code).Finally, we will allow public access, so that our deployer machine can add secrets to the Key Vault. If your environment doesn’t allow public access for Key Vault deployments, locate the public IP address of your deployer machine (this may be an external NAT IP for your network) and add it to the network_acls.ip_rules list value using CIDR notation.
network_acls input to null in your module block for the Key Vault.Your Key Vault module definition should now look like the following:
One of the core values of AVM is the standard configuration for interfaces across modules. The Role Assignments interface we used as part of the Key Vault deployment is a good example of this.
Continue the incremental testing of your module by running another terraform init and terraform apply -var-file="development.tfvars" sequence.
Our architecture calls for a NAT Gateway to allow virtual machines to access the internet. We will use the NAT Gateway resource_id output in future modules to link the virtual machine subnet.
Provision Instructions card from the module main page.default example excluding the subnet associations map, as we will do the association when we build the vnet.location and resource_group_nameusing implicit references from our resource group module.name_prefix variables.Review the following code to see each of these changes.
Continue the incremental testing of your module by running another terraform init and terraform apply -var-file="development.tfvars" sequence.
Our architecture calls for a Network Security Group (NSG) allowing SSH access to the virtual machine subnet. We will use the NSG AVM resource module to accomplish this task.
Provision Instructions card from the module main page.example_with_NSG_rule example.location and resource_group_nameusing implicit references from our resource group module.name_prefix variable interpolation as we did with the other modules.rule02 from the locals nsg_rules map and paste it between two curly braces to create the security_rules attribute in the NSG module we’re building."rule01" from "rule02".destination_port_ranges list to be ["22"].Upon completion the code for the NSG module should be as follows:
Continue the incremental testing of your module by running another terraform init and terraform apply -var-file="development.tfvars" sequence.
We can now continue the build-out of our architecture by configuring the virtual network (vnet) deployment. This will follow a similar pattern as the previous resource modules, but this time, we will also add some network functions to help us customize the subnet configurations.
Provision Instructions card from the module main page.complete example as a source to copy our content.resource_group_name, location, name, and address_space lines and replace their values with our deployment specific variables or module references.subnets map and duplicate the subnet0 map for each subnet.name values for each subnet so that they are unique.cidrsubnet function to dynamically generate the CIDR range for each subnet. You can explore the function documentation for more details on how it can be used.nat_gateway object on subnet0 with the resource_id output from our NAT Gateway module.network_security_group attribute to the subnet0 definition and replace the value with the resource_id output from the NSG module.After making these changes our virtual network module call code will be as follows:
Note how the Log Analytics workspace reference ends in resource_id. Each AVM module is required to export its Azure resource ID with the resource_id name to allow for consistent references.
Continue the incremental testing of your module by running another terraform init and terraform apply -var-file="development.tfvars" sequence.
We want to allow for secure remote access to the virtual machine for configuration and troubleshooting tasks. We’ll use Azure Bastion to accomplish this objective following a similar workflow to our other resources.
Provision Instructions card from the module main page.Simple Deployment example.location and resource_group_nameusing implicit references from our resource group module.name_prefix variable interpolation as we did with the other modules.subnet_id value to include an implicit reference to the bastion keyed subnet from our virtual network module.Our architecture calls for diagnostic settings to be configured on the Azure Bastion resource. In this case, there aren’t any examples that include this configuration. However, since the diagnostic settings interface is one of the standard interfaces in Azure Verified Modules, we can just copy the interface definition from our virtual network module.
diagnostic_settings value from it.diagnostic_settings value into the code for our Bastion module.The new code we added for the Bastion resource will be as follows:
Pay attention to the subnet_id syntax. In the virtual network module, the subnets are created as a sub-module allowing us to reference each of them using the map key that was defined in the subnets input. Again, we see the consistent output naming with the resource_id output for the sub-module.
Continue the incremental testing of your module by running another terraform init and terraform apply -var-file="development.tfvars" sequence.
The final step in our deployment will be our application virtual machine. We’ve had good success with our workflow so far, so we’ll use it for this step as well.
Provision Instructions card from the module main page.linux_default example.location and resource_group_nameusing implicit references from our resource group module.name_prefix variable interpolation as we did with the other modules and include the output from the random_string.name_suffix resource to add uniqueness.account_credentials.key_vault_configuration.resource_id value to reference the resource_id output from the Key Vault module.private_ip_subnet_resource_id value to an implicit reference to the subnet0 subnet output from the virtual network module.Because the default Linux example doesn’t include diagnostic settings, we need to add that content in a different way. Since the diagnostic settings interface has a standard schema, we can copy the diagnostic_settings input from our virtual network module.
diagnostic_settings map from it.diagnostic_settings content into your virtual machine module code.name value to reflect that it applies to the virtual machine.The new code we added for the virtual machine resource will be as follows:
Continue the incremental testing of your module by running another terraform init and terraform apply -var-file="development.tfvars" sequence.
The final piece of our module is to export any values that may need to be consumed by module users. From our architecture, we’ll export the resource group name and the virtual machine resource name.
outputs.tf file in your IDE.resource_group_name and set the value to an implicit reference to the resource group modules name output. Include a brief description for the output.virtual_machine_name and set the value to an implicit reference to the virtual machine module’s name output. Include a brief description for the output.The new code we added for the outputs will be as follows:
Because no new modules were created, we don’t need to run terraform init to test this change. Run terraform apply -var-file="development.tfvars" to see the new outputs that have been created.
It is a recommended practice to define the required versions of the providers for your module to ensure consistent behavior when it is being run. In this case we are going to be slightly permissive and allow increases in minor and patch versions to fluctuate, since those are not supposed to include breaking changes. In a production environment, you would likely want to pin on a specific version to guarantee behavior.
terraform init to review the providers and versions that are currently installed.terraform.tf file’s required providers field for each provider listed in the downloaded providers.The updated code we added for the providers in the terraform.tf file will be as follows:
Congratulations on successfully implementing a solution using Azure Verified Modules! You were able to build out our sample architecture using module documentation and taking advantage of features like standard interfaces and pre-defined defaults to simplify the development experience.
This was a long exercise and mistakes can happen. If you’re getting errors or a resource is incomplete and you want to see the final main.tf, expand the following code block to see the full file.
AVM modules provide several key advantages over writing raw Terraform templates:
As you continue your journey with Azure and AVM, remember that this approach can be applied to more complex architectures as well. The modular nature of AVM allows you to mix and match components to build solutions that meet your specific needs while adhering to Microsoft’s Well-Architected Framework.
By using AVM modules as building blocks, you can focus more on your solution architecture and less on the intricacies of individual resource configurations, ultimately leading to faster development cycles and more reliable deployments.
For additional learning, it can be helpful to experiment with modifying this solution. Here are some ideas you can try if you have time and would like to experiment further.
managed_identities interface to add a system assigned managed identity to the virtual machine and give it Key Vault Administrator rights on the Key Vault.tags interface to assign tags directly to one or more resources.tfvars files to match.Once you have completed this set of exercises, it is a good idea to clean up your resources to avoid incurring costs for them. This can be done typing terraform destroy -var-file=development.tfvars and entering yes when prompted.
To be covered in separate, future articles.
To make this solution enterprise-ready, you need to consider the following:
This QuickStart guide offers step-by-step instructions for integrating Azure Verified Modules (AVM) into your solutions. It includes the initial setup, essential tools, and configurations required to deploy and manage your Azure resources efficiently using AVM.
The AVM Key Vault resource module, used as an example in this chapter, simplifies the deployment and management of Azure Key Vaults, ensuring secure storage and access to your secrets, keys, and certificates.
Using AVM ensures that your infrastructure-as-code deployments follow Microsoft’s best practices and guidelines, providing a consistent and reliable foundation for your cloud solutions. AVM helps accelerate your development process, reduce the risk of misconfigurations, and enhance the security and compliance of your applications.
The default values provided by AVM are generally safe, as they follow best practices and ensure a secure and reliable setup. However, it is important to review these values to ensure they meet your specific requirements and compliance needs. Customizing the default values may be necessary to align with your organization’s policies and the specific needs of your solution.
You can find examples and detailed documentation for each AVM module in their respective code repository’s README.MD file, which details features, input parameters, and outputs. The module’s documentation also provides comprehensive usage examples, covering various scenarios and configurations. Additionally, you can explore the module’s source code repository. This information will help you understand the full capabilities of the module and how to effectively integrate it into your solutions.
This guide explains how to use an Azure Verified Modules (AVM) in your Bicep workflow. By leveraging AVM modules, you can rapidly deploy and manage Azure infrastructure without having to write extensive code from scratch.
In this guide, you will deploy a Key Vault resource and a Personal Access Token as a secret.
This article is intended for a typical ‘infra-dev’ user (cloud infrastructure professional) who has a basic understanding of Azure and Bicep but is new to Azure Verified Modules and wants to learn how to deploy a module in the easiest way using AVM.
For additional Bicep learning resources use the Bicep documentation on the Microsoft Learn platform, or leverage the Fundamentals of Bicep learning path.
You will need the following tools and components to complete this guide:
Make sure you have these tools set up before proceeding.
In this scenario, you need to deploy a Key Vault resource and some of its child resources, such as a secret. Let’s find the AVM module that will help us achieve this.
There are two primary ways for locating published Bicep Azure Verified Modules:
main.bicep.module, then give your module a symbolic name, such as myModule.br/public.The Bicep VSCode extension is reading metadata through this JSON file. All modules are added to this file, as part of the publication process. This lists all the modules marked as Published or Orphaned on the AVM Bicep module index pages.
Go to definition or hit F12 to see the module’s source code. You can toggle between the Bicep and the JSON view.Searching the Azure Verified Modules indexes is the most complete way to discover published as well as planned (proposed) modules. As shown in the video above, use the following steps to locate a specific module on the AVM website:
Since the Key Vault module used as an example in this guide is published as an AVM resource module, it can be found under the resource modules section in the AVM Bicep module index.
CTRL + F keyboard shortcut.In the module’s documentation, you can find detailed information about the module’s functionality, components, input parameters, outputs and more. The documentation also provides comprehensive usage examples, covering various scenarios and configurations.
Explore the Key Vault module’s documentation for usage examples and to understand its functionality, input parameters, and outputs.
Note the mandatory and optional parameters in the Parameters section.
Review the Usage examples section. AVM modules include multiple tests that can be found under the tests folder. These tests are also used as the basis of the usage examples ensuring they are always up-to-date and deployable.
In this example, you will deploy a secret in a new Key Vault instance with minimal input. AVM provides default parameter values with security and reliability being core principles. These settings apply the recommendations of the Well Architected Framework where possible and appropriate.
Note how Example 2 does most of what you need to achieve.
In this section, you will develop a Bicep template that references the AVM Key Vault module and its child resources and features. These include secret and role based access control configurations that grant permissions to a user.
main.bicep and a dev.bicepparam file, which will hold parameters for your Key Vault deployment.main.bicep file. We have included comments to distinguish between the two different occurrences of the names attribute.module myKeyVault 'br/public:avm/res/key-vault/vault:0.11.0' = {
name: // the name of the module's deployment
params: {
name: '<keyVaultName>' // the name of the Key Vault instance - length and character limits apply
}
}For Azure Key Vaults, the name must be globally unique. When you deploy the Key Vault, ensure you select a name that is alphanumeric, twenty-four characters or less, and unique enough to ensure no one else has used the name for their Key Vault. If the name has been previously taken, you will get an error.
After setting the values for the required properties, the module can be deployed. This minimal configuration automatically applies the security and reliability recommendations of the Well Architected Framework where possible and appropriate. These settings can be overridden if needed.
It is recommended to create a bicepconfig.json file, and enable use-recent-module-versions, which warns you to use the latest available version of the AVM module.
// This is a Bicep configuration file. It can be used to control how Bicep operates and to customize
// validation settings for the Bicep linter. The linter relies on these settings when evaluating your
// Bicep files for best practices. For further information, please refer to the official documentation at:
// https://learn.microsoft.com/en-us/azure/azure-resource-manager/bicep/bicep-config
{
  "analyzers": {
    "core": {
      "rules": {
        "use-recent-module-versions": {
          "level": "warning",
          "message": "The module version is outdated. Please consider updating to the latest version."
        }
      }
    }
  }
}In this scenario - and every other real-world setup - there is more that you need to configure. You can open the module’s documentation by hovering over its symbolic name to see all of the module’s capabilities - including supported parameters.
The Bicep extension facilitates code-completion, enabling you to easily locate and utilize the Azure Verified Module. This feature also provides the necessary properties for a module, allowing you to begin typing and leverage IntelliSense for completion.
main.bicep file to customize your configuration. These parameters are used for passing in the Key Vault name and enabling purge protection. You might not want to enable the latter in a non-production environment, as it makes it harder to delete and recreate resources.The main.bicep file will now look like this:
// the scope, the deployment deploys resources to
targetScope = 'resourceGroup'

// parameters and default values
param keyVaultName string

@description('Disable for development deployments.')
param enablePurgeProtection bool = true

// the resources to deploy
module myKeyVault 'br/public:avm/res/key-vault/vault:0.11.0' = {
  name: 'key-vault-deployment'
  params: {
    name: keyVaultName
    enablePurgeProtection: enablePurgeProtection
    // more properties are not needed, as AVM provides default values
  }
}
Note that the Key Vault instance will be deployed within a resource group scope in our example.
dev.bicepparam file (this is optional) and set parameter values for your environment. You can now pass these values by referencing this file at the time of deployment (using PowerShell or Azure CLI).using 'main.bicep'
// environment specific values
param keyVaultName = '<keyVaultName>'
param enablePurgeProtection = falseAdd a secret to the Key Vault instance and grant permissions to a user to work with the secret. Sample role assignments can be found in Example 3: Using large parameter set. See Parameter: roleAssignments for a list of pre-defined roles that you can reference by name instead of a GUID. This is a key benefit of using AVM, as the code is easy to read and increases the maintainability.
You can also leverage User-defined data types and simplify the parameterization of the modules instead of guessing or looking up parameters. Therefore, first import UDTs from the Key Vault and common types module and leverage the UDTs in your Bicep and parameter files.
For a role assignment, the principal ID is needed, that will be granted a role (specified by its name) on the resource. Your own ID can be found out with az ad signed-in-user show --query id.
// the scope, the deployment deploys resources to
targetScope = 'resourceGroup'
// parameters and default values
param keyVaultName string
// the PAT token is a secret and should not be stored in the Bicep(parameter) file.
// It can be passed via the commandline, if you don't use a parameter file.
@secure()
param patToken string = newGuid()
@description('Enabled by default. Disable for development deployments')
param enablePurgeProtection bool = true
import { roleAssignmentType } from 'br/public:avm/utl/types/avm-common-types:0.4.0'
// the role assignments are optional in the Key Vault module
param roleAssignments roleAssignmentType[]?
// the resources to deploy
module myKeyVault 'br/public:avm/res/key-vault/vault:0.11.0' = {
name: 'key-vault-deployment'
params: {
name: keyVaultName
enablePurgeProtection: enablePurgeProtection
secrets: [
{
name: 'PAT'
value: patToken
}
]
roleAssignments: roleAssignments
}
}The secrets parameter references a UDT (User-defined data type) that is part of the Key Vault module and enables code completion for easy usage. There is no need to look up what attributes the secret object might have. Start typing and tab-complete what you need from the content offered by the Bicep extension’s integration with AVM.
The bicep parameter file now looks like this:
// reference to the Bicep file to set the context
using 'main.bicep'

// environment specific values
param keyVaultName = '<keyVaultName>'
param enablePurgeProtection = false
// for security reasons, the secret value must not be stored in this file.
// You can change it later in the deployed Key Vault instance, where you also renew it after expiration.
param roleAssignments = [
{
principalId: '<principalId>'
// using the name of the role instead of looking up the GUID (which can also be used)
roleDefinitionIdOrName: 'Key Vault Secrets Officer'
}
]The display names for roleDefinitionIdOrName can be acquired the following two ways:
builtInRoleNames variable in the module’s source code. To get there, hit F12 while the cursor is on the part of the module path starting with br/public:.Leverage the IntelliSense feature in VS Code to speed up your development process. IntelliSense provides code completion, possible parameter values and structure. It helps you write code more efficiently by providing context-aware suggestions as you type.
Here is how quickly you can deliver the solution detailed in this section:
Now that your template and parameter file is ready, you can deploy your solution to Azure. Use PowerShell or the Azure CLI to deploy your solution.
# Log in to Azure
Connect-AzAccount

# Select your subscription
Set-AzContext -SubscriptionId '<subscriptionId>'

# Deploy a resource group
New-AzResourceGroup -Name 'avm-quickstart-rg' -Location 'germanywestcentral'

# Invoke your deployment
New-AzResourceGroupDeployment -DeploymentName 'avm-quickstart-deployment' -ResourceGroupName 'avm-quickstart-rg' -TemplateParameterFile 'dev.bicepparam' -TemplateFile 'main.bicep'
# Log in to Azure
az login
# Select your subscription
az account set --subscription '<subscriptionId>'
# Deploy a resource group
az group create --name 'avm-quickstart-rg' --location 'germanywestcentral'
# Invoke your deployment
az deployment group create --name 'avm-quickstart' --resource-group 'avm-quickstart-rg' --template-file 'main.bicep' --parameters 'dev.bicepparam'Use the Azure portal, Azure PowerShell, or the Azure CLI to verify that the Key Vault instance and secret have been successfully created with the correct configuration.
When you are ready, you can remove the infrastructure deployed in this example. The following commands will remove all resources created by your deployment:
# Delete the resource group
Remove-AzResourceGroup -Name "avm-quickstart-rg" -Force

# Purge the Key Vault
Remove-AzKeyVault -VaultName "<keyVaultName>" -Location "germanywestcentral" -InRemovedState -Force
# Delete the resource group
az group delete --name 'avm-quickstart-rg' --yes --no-wait
# Purge the Key Vault
az keyvault purge --name '<keyVaultName>' --no-waitCongratulations, you have successfully leveraged an AVM Bicep module to deploy resources in Azure!
We welcome your contributions and feedback to help us improve the AVM modules and the overall experience for the community!
For developing a more advanced solution, please see the lab titled “Introduction to using Azure Verified Modules for Bicep”.
This guide explains how to use an Azure Verified Modules (AVM) in your Terraform workflow. With AVM modules, you can quickly deploy and manage Azure infrastructure without writing extensive code from scratch.
In this guide, you will deploy a Key Vault resource and generate and store a key.
This article is intended for a typical ‘infra-dev’ user (cloud infrastructure professional) who is new to Azure Verified Modules and wants to learn how to deploy a module in the easiest way using AVM. The user has a basic understanding of Azure and Terraform.
For additional Terraform resources, try a tutorial on the HashiCorp website or study the detailed documentation.
You will need the following tools and components to complete this guide:
Before you begin, ensure you have these tools installed in your development environment.
In this scenario, you need to deploy a Key Vault resource and some of its child resources, such as a key. Let’s find the AVM module that will help us achieve this.
There are two primary ways for locating published Terraform Azure Verified Modules:
The easiest way to find published AVM Terraform modules is by searching the Terraform Registry. Follow these steps to locate a specific module, as shown in the video above.
It is possible to discover other unofficial modules with avm in the name using this search method. Look for the Partner tag in the module title to determine if the module is part of the official set.
Searching the Azure Verified Modules indexes is the most complete way to discover published as well as planned modules - shown as proposed. As presented in the video above, use the following steps to locate a specific module on the AVM website:
Since the Key Vault module used as an example in this guide is published as an AVM resource module, it can be found under the resource modules section in the AVM Terraform module index.
CTRL + F keyboard shortcut).Once you have identified the AVM module in the Terraform Registry you can find detailed information about the module’s functionality, components, input parameters, outputs and more. The documentation also provides comprehensive usage examples, covering various scenarios and configurations.
Explore the Key Vault module’s documentation and usage examples to understand its functionality, input variables, and outputs.
In this example, you will deploy a secret in a new Key Vault instance without needing to provide other parameters. The AVM Key Vault resource module provides these capabilities and does so with security and reliability being core principles. The default settings of the module also apply the recommendations of the Well Architected Framework where possible and appropriate.
Note how the create-key example seems to do what you need to achieve.
Now that you have found the module details, you can use the content from the Terraform Registry to speed up your development in the following ways:
Each deployment method includes a section below so that you can choose the method which best fits your needs.
For Azure Key Vaults, the name must be globally unique. When you deploy the Key Vault, ensure you select a name that is alphanumeric, twenty-four characters or less, and unique enough to ensure no one else has used the name for their Key Vault. If the name has been used previously, you will get an error.
Leverage the following steps as a template for how to leverage examples for bootstrapping your new solution code. The Key Vault resource module is used here as an example, but in practice you may choose any module that applies to your scenario.
In your IDE - Visual Studio Code in our example - create the main.tf file for your new solution.
Paste the content from the clipboard into main.tf.
AVM examples frequently use naming and/or region selection AVM utility modules to generate deployment region and/or naming values as well as any default values for required fields. If you want to use a specific region name or other custom resource values, remove the existing region and naming module calls and replace example input values with the new desired custom input values.
Once supporting resources such as resource groups have been modified, locate the module call for the AVM module - i.e., module "keyvault".
AVM module examples use dot notation for a relative reference that is useful during module testing. However, you will need to replace the relative reference with a source reference that points to the Terraform Registry source location. In most cases, this source reference has been left as a comment in the module example to simplify replacing the existing source dot reference. Perform the following two actions to update the source:
source = "../../".# sign at the start of the commented source line - i.e., source = "Azure/avm-res-keyvault-vault/azure".If the module example does not include a commented Terraform Registry source reference, you will need to copy it from the module’s main documentation page. Use the following steps to do so:
source = from the code block - e.g., source = "Azure/avm-res-keyvault-vault/azure". Copy it onto the clipboard.source = "../../".AVM module examples use a variable to enable or disable the telemetry collection. Update the enable_telemetry input value to true or false. - e.g. enable_telemetry = true
Save your main.tf file changes and then proceed to the guide section for running your solution code.
module "avm-res-keyvault-vault" {
  source                        = "Azure/avm-res-keyvault-vault/azure"
  version                       = "1.0.0"
  name                          = "<custom_name_here>"
  parent_id                     = module.resource_group.resource_id
  location                      = module.resource_group.resource.location
  tenant_id                     = data.azapi_client_config.current.tenant_id

  keys = {
    cmk_for_storage_account = {
      key_opts = [
        "decrypt",
        "encrypt",
        "sign",
        "unwrapKey",
        "verify",
        "wrapKey"
      ]
      key_type: "RSA"
      name     = "cmk-for-storage-account"
      key_size = 2048
    }
  }
  role_assignments = {
    deployment_user_kv_admin = {
      role_definition_id_or_name = "Key Vault Administrator"
      principal_id               = data.azapi_client_config.current.object_id
    }
  }
  wait_for_rbac_before_key_operations = {
    create = "60s"
  }
}
Use the following steps as a guide for the custom implementation of an AVM Module in your solution code. This instruction path assumes that you have an existing Terraform file that you want to add the AVM module to.
name = "custom_name".After completing your solution development, you can move to the deployment stage. Follow these steps for a basic Terraform workflow:
Open the command line and login to Azure using the Azure cli
az loginIf your account has access to multiple tenants, you may need to modify the command to az login --tenant <tenant id> where “<tenant id>” is the guid for the target tenant.
After logging in, select the target subscription from the list of subscriptions that you have access to.
Change the path to the directory where your completed terraform solution files reside.
AVM Terraform modules use the AzAPI provider, which expects an authenticated Azure context (provided by az login above) and reads the active subscription from your environment. If you need to target a specific subscription, set ARM_SUBSCRIPTION_ID to its GUID. For Unix based systems (Linux or MacOS) you can configure this by running export ARM_SUBSCRIPTION_ID=<your subscription guid> on the command line. On Microsoft Windows, you can perform the same operation by running set ARM_SUBSCRIPTION_ID="<your subscription guid>" from the Windows command prompt or by running $env:ARM_SUBSCRIPTION_ID="<your subscription guid>" from a powershell prompt. Replace the “<your subscription id>” notation in each command with your Azure subscription’s unique id value.
Initialize your Terraform project. This command downloads the necessary providers and modules to the working directory.
terraform initBefore applying the configuration, it is good practice to validate it to ensure there are no syntax errors.
terraform validateCreate a deployment plan. This step shows what actions Terraform will take to reach the desired state defined in your configuration.
terraform planReview the plan to ensure that only the desired actions are in the plan output.
Apply the configuration and create the resources defined in your configuration file. This command will prompt you to confirm the deployment prior to making changes. Type yes to create your solution’s infrastructure.
terraform applyIf you are confident in your changes, you can add the -auto-approve switch to bypass manual approval: terraform apply -auto-approve
Once the deployment completes, validate that the infrastructure is configured as desired.
A local terraform.tfstate file and a state backup file have been created during the deployment. The use of local state is acceptable for small temporary configurations, but production or long-lived installations should use a remote state configuration where possible. Configuring remote state is out of scope for this guide, but you can find details on using an Azure storage account for this purpose in the Microsoft Learn documentation.
When you are ready, you can remove the infrastructure deployed in this example. Use the following command to delete all resources created by your deployment:
terraform destroyMost Key Vault deployment examples activate soft-delete functionality as a default. The terraform destroy command will remove the Key Vault resource but does not purge a soft-deleted vault. You may encounter errors if you attempt to re-deploy a Key Vault with the same name during the soft-delete retention window. If you wish to purge the soft-delete for this example you can run az keyvault purge -n <keyVaultName> -l <regionName> using the Azure CLI, or Remove-AzKeyVault -VaultName "<keyVaultName>" -Location "<regionName>" -InRemovedState using Azure PowerShell.
Congratulations, you have successfully leveraged Terraform and AVM to deploy resources in Azure!
We welcome your contributions and feedback to help us improve the AVM modules and the overall experience for the community!
For developing a more advanced solution, please see the lab titled “Introduction to using Azure Verified Modules for Terraform”.