Bicep Composition
Important
While this page describes and summarizes important aspects of the composition of AVM modules, it may not reference All of the shared and language specific requirements.
Therefore, this guide MUST be used in conjunction with the Bicep specifications. ALL AVM modules (Resource and Pattern modules) MUST meet the respective requirements described in these specifications!
Important
Before jumping on implementing your contribution, please review the AVM Module specifications, in particular the Bicep specification page, to make sure your contribution complies with the AVM module’s design and principles.
Directory and File Structure
Each Bicep AVM module of the Azure/bicep-registry-modules (BRM) repository must be implemented as per the structure described in BCPNFR23.
For new modules, the files can be created automatically, once the parent folder exists. This example shows how to create a res module res/compute/virtual-machine.
Set-Location -Path ".\avm\"
New-Item -ItemType Directory -Path ".\res\compute\virtual-machine"
Set-AVMModule -ModuleFolderPath .\res\compute\virtual-machine
Code Styling
This section points to conventions to be followed when developing a Bicep template.
Casing
Use camelCasing as per BCPNFR8.
Make sure to review all specifications of Category: Inputs/Outputs within the Bicep specification pages.
Tip
See examples in specifications SNFR14 and BCPNFR1.
Resources
Resources are primarily leveraged by resource modules to declare the primary resource of the main resource type deployed by the AVM module.
Make sure to review all specifications covering resource properties and usage.
Tip
See examples in specifications SFR1 and RMFR1.
Modules
Modules enable you to reuse code from a Bicep file in other Bicep files. As such, for resource modules they’re normally leveraged for deploying child resources (e.g., file services in a storage account), cross referenced resources (e.g., network interface in a virtual machine) or extension resources (e.g., role assignments in a key vault). Pattern modules, normally reuse resource modules combined together.
Make sure to review all specifications covering module properties and usage.
Tip
See examples in specifications BCPFR1 for resource modules and PMNFR2 for pattern modules.
Outputs
Make sure to review all specifications of Category: Inputs/Outputs within the Bicep specific pages.
Tip
See examples in specification RMFR7.
Interfaces
Note
This section is only relevant for contributions to resource modules.
To meet RMFR4 and RMFR5 AVM resource modules must leverage consistent interfaces for all the optional features/extension resources supported by the AVM module primary resource.
Please refer to the Bicep Interfaces page.
If the primary resource of the AVM resource module you are developing supports any of the listed features/extension resources, please follow the corresponding provided Bicep schema to develop them.
Deprecation
Breaking changes are sometimes not avoidable. The impact should be kept as low as possible. A recommendation is to deprecate parameters, instead of completely removing them for a couple of versions. The Semantic Versioning sections offers information about versioning AVM modules.
In case you need to deprecate an input parameter, this sample shows you how this can be achieved.
Note
Since all modules are versioned, nothing will change for existing deployments, as the parameter usage does not change for any existing versions.
Example-Scenario
An AVM module is modified, and the parameters will change, which breaks backward compatibility.
- parameters are changing to a custom type
- the parameter structure is changing
- backward compatibility will be maintained
Existing input parameters used to be defined as follows (reducing the examples to the minimum):
// main.bicep:
param item object?

// main.test.bicep:
name: 'name'
item:
  {
    variant: 'Large'
    osType: 'Windows'
  }
Testing
Before you begin to modify anything, it is recommended to create a new test case (e.g. deprecated), in addition to the already existing tests, to make sure that the changes are not breaking backward compatibility until you decide to finally remove the deprecated parameters (see BCPRMNFR1 - Category: Testing - Expected Test Directories for more details about the requirements).
module testDeployment '../../../main.bicep' = [
  for iteration in ['init', 'idem']: {
    scope: resourceGroup
    name: '${uniqueString(deployment().name, resourceLocation)}-test-${serviceShort}-${iteration}'
    params: {
      name: '${namePrefix}${serviceShort}001'
      item: {
        variant: 'Large'
        osType: 'Linux'
      }
    }
  }
]
The test should include all previously used parameters to make sure they are covered before any changes to the new parameter layout are done.
Code Changes
The new parameter structure requires a change to the used parameters and moves them to a different location and looks like:
// main.bicep:
param item itemType?

type itemtype: {
  name: string // the name parameter did not change

  properties ={
    osType: 'Linux' | 'Windows'? // the new place for the osType

    variant: {
      size: string? // the new place for the variant size
    }?
  }

  // keep these for backward compatibility in the new type
  @description('Optional. Note: This is a deprecated property, please use the corresponding `properties.osType` instead.')
  osType: string? // the old parameter location

  @description('Optional. Note: This is a deprecated property, please use the corresponding `properties.variant.size` instead.')
  variant: string? // the old parameter location
}
The original parameter item is of type object and does not give the user any clue of what the syntax is and what is expected to be added to it. The tests could bring light into the darkness, but this is not ideal. In order to retain backward compatibility, the previously used parameters need to be added to the new type, as they would be invalid otherwise. Now that the new type is in place, some logic needs to be implemented to make sure the module can handle the different sources of data (new and old parameters).
resource <modulename> 'Microsoft.xy/yz@2024-01-01' = {
  name: name
  properties: {
    osType: item.?properties.?osType ?? item.?osType ?? 'Linux' // add a default here, if needed
    variant: {
      size: item.?properties.?variant.?size ?? item.?variant
    }
  }
}
By choosing this order for the Coalesce operator, the new format takes precedence over the old syntax. Also note the safe-dereference ensures that no null reference exception will occure if the property has optional parameters.
The tests can now be changed to adapt the new parameter structure for the new version of the module. They will not cover the old parameter structure anymore.
module testDeployment '../../../main.bicep' = [
  for iteration in ['init', 'idem']: {
    scope: resourceGroup
    name: '${uniqueString(deployment().name, resourceLocation)}-test-${serviceShort}-${iteration}'
    params: {
      name: '${namePrefix}${serviceShort}001'
      location: resourceLocation
      item:{
        osType: 'Linux'
        variant: {
          size: 'Large'
        }
      }
    }
  }
]
Summary
Changes to modules (resource or pattern) can bei implemented in two ways.
Implement changes with backward compatibility
In this scenario, you need to make sure that the code does not break backward compatibility by:
- adding new parameters
- marking other parameters as deprecated
- create a test case for the old usage syntax
- increase the minor version number of the module (0.x)
Introduce breaking changes
The easier way to introduce a new major version requires fewer steps:
- adding new parameters
- create a test case for the usage
- increase the major version number of the module (
x.0.0)
Note
Be aware that currently no module has been released as 1.0.0 (or beyond), which lets you implement breaking changes without increasing the major version.
Bicep Contribution Flow
High-level contribution flow
---
config:
  nodeSpacing: 20
  rankSpacing: 20
  diagramPadding: 50
  padding: 5
  flowchart:
    wrappingWidth: 300
    padding: 5
  layout: elk
  elk:
    mergeEdges: true
    nodePlacementStrategy: LINEAR_SEGMENTS
---

flowchart TD
  A("1 - Fork the module source repository")
    click A "/Azure-Verified-Modules/contributing/bicep/bicep-contribution-flow/#1-fork-the-module-source-repository"
  B(2 - Configure a deployment identity in Azure)
    click B "/Azure-Verified-Modules/contributing/bicep/bicep-contribution-flow/#2-configure-a-deployment-identity-in-azure"
  C("3 - Configure CI environment for module tests")
    click C "/Azure-Verified-Modules/contributing/bicep/bicep-contribution-flow/#3-configure-your-ci-environment"
  D("4 - Implementing your contribution<br>(Refer to Gitflow Diagram below)")
    click D "/Azure-Verified-Modules/contributing/bicep/bicep-contribution-flow/#4-implement-your-contribution"
  E(5 - Workflow test completed successfully?)
    click E "/Azure-Verified-Modules/contributing/bicep/bicep-contribution-flow/#5-createupdate-and-run-tests"
  F(6 - Create a pull request to the upstream repository)
    click F "/Azure-Verified-Modules/contributing/bicep/bicep-contribution-flow/#6-create-a-pull-request-to-the-public-bicep-registry"
  G(7 - Get your pull request approved)
    click G "/Azure-Verified-Modules/contributing/bicep/bicep-contribution-flow/#7-get-your-pull-request-approved"
  A --> B
  B --> C
  C --> D
  D --> E
  E -->|yes|F
  E -->|no|D
  F --> G
GitFlow for contributors
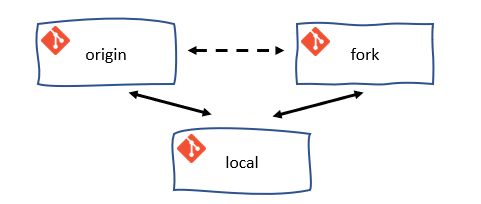
The GitFlow process outlined here introduces a central anchor branch. This branch should be treated as if it were a protected branch. It serves to synchronize the forked repository with the original upstream repository. The use of the anchor branch is designed to give contributors the flexibility to work on several modules simultaneous.
---

config:
  logLevel: debug
  gitGraph:
    rotateCommitLabel: false
---

gitGraph LR:
  commit id:"Fork Repo"
  branch anchor
  checkout anchor
  commit id:"Sync Upstream/main" type: HIGHLIGHT
  branch avm-type-provider-resource-workflow
  checkout avm-type-provider-resource-workflow
  commit id:"Add Workflow File for Resource/Pattern"
  branch avm-type-provider-resource
  checkout main
  merge avm-type-provider-resource-workflow id: "merge workflow for GitHub Actions Testing" type: HIGHLIGHT
  checkout avm-type-provider-resource
  commit id:"Init"
  commit id:"Patch 1"
  commit id:"Patch 2"
  checkout main
  merge avm-type-provider-resource
Tip
When implementing the GitFlow process as described, it is advisable to configure the local clone with a remote for the upstream repository. This will enable the Git CLI and local IDE to merge changes directly from the upstream repository. Using GitHub Desktop, this is configured automatically when cloning the forked repository via the application.
PowerShell Helper Script To Setup Fork & CI Test Environment
Now defaults to OIDC setup
The PowerShell Helper Script has recently added support for the OIDC setup and configuration as documented in detail on this page. This is now the default for the script.
The easiest way to get yourself set back up, is to delete your fork repository, including the local clone of it that you have and start over with the script. This will ensure you have the correct setup for the OIDC authentication method for the AVM CI.
Important
To simplify the setup of the fork, clone and configuration of the required GitHub Environments, Secrets, User-Assigned Managed Identity (UAMI), Federated Credentials and RBAC assignments in your Azure environment for the CI framework to function correctly in your fork, we have created a PowerShell script that you can use to do steps 1, 2 & 3 below.
The script performs the following steps:
- Forks the
Azure/bicep-registry-modules to your GitHub Account. - Clones the repo locally to your machine, based on the location you specify in the parameter:
-GitHubRepositoryPathForCloneOfForkedRepository. - Prompts you and takes you directly to the place where you can enable GitHub Actions Workflows on your forked repo.
- Disables all AVM module workflows, as per Enable or Disable Workflows.
- Creates an User-Assigned Managed Identity (UAMI) and federated credentials for OIDC with your forked GitHub repo and grants it the RBAC roles of
Owner at Management Group level, if specified in the -GitHubSecret_ARM_MGMTGROUP_ID parameter, and at Azure Subscription level if you provide it via the -GitHubSecret_ARM_SUBSCRIPTION_ID parameter. - Creates the required GitHub Environments & required Secrets in your forked repo as per step 3, based on the input provided in parameters and the values from resources the script creates and configures for OIDC. Also set the workflow permissions to
Read and write permissions as per step 3.3.
Pre-requisites
- You must have the Azure PowerShell Modules installed and you need to be logged with the context set to the desired Tenant. You must have permissions to create an SPN and grant RBAC over the specified Subscription and Management Group, if provided.
- You must have the GitHub CLI installed and need to be authenticated with the GitHub user account you wish to use to fork, clone and work with on AVM.
➕ New-AVMBicepBRMForkSetup.ps1 - PowerShell Helper Script
The New-AVMBicepBRMForkSetup.ps1 can be downloaded from here.
Once downloaded, you can run the script by running the below - Please change all the parameter values in the below script usage example to your own values (see the parameter documentation in the script itself)!:
.\<PATH-TO-SCRIPT-DOWNLOAD-LOCATION>\New-AVMBicepBRMForkSetup.ps1 -GitHubRepositoryPathForCloneOfForkedRepository "<pathToCreateForkedRepoIn>" -GitHubSecret_ARM_MGMTGROUP_ID "<managementGroupId>" -GitHubSecret_ARM_SUBSCRIPTION_ID "<subscriptionId>" -GitHubSecret_ARM_TENANT_ID "<tenantId>" -GitHubSecret_TOKEN_NAMEPREFIX "<unique3to5AlphanumericStringForAVMDeploymentNames>" -UAMIRsgLocation "<Azure Region/Location of your choice such as 'uksouth'>"
For more examples, see the below script’s parameters section.
[Diagnostics.CodeAnalysis.SuppressMessageAttribute("PSAvoidUsingWriteHost", "", Justification = "Coloured output required in this script")]

#Requires -PSEdition Core
#Requires -Modules @{ ModuleName="Az.Accounts"; ModuleVersion="2.19.0" }
#Requires -Modules @{ ModuleName="Az.Resources"; ModuleVersion="6.16.2" }

<#
.SYNOPSIS
This function creates and sets up everything a contributor to the AVM Bicep project should need to get started with their contribution to a AVM Bicep Module.

.DESCRIPTION
This function creates and sets up everything a contributor to the AVM Bicep project should need to get started with their contribution to a AVM Bicep Module. This includes:

- Forking and cloning the `Azure/bicep-registry-modules` repository
- Creating a new SPN and granting it the necessary permissions for the CI tests and configuring the forked repositories secrets, as per: https://azure.github.io/Azure-Verified-Modules/contributing/bicep/bicep-contribution-flow/#2-configure-a-deployment-identity-in-azure
- Enabling GitHub Actions on the forked repository
- Disabling all the module workflows by default, as per: https://azure.github.io/Azure-Verified-Modules/contributing/bicep/bicep-contribution-flow/enable-or-disable-workflows/

Effectively simplifying this process to a single command, https://azure.github.io/Azure-Verified-Modules/contributing/bicep/bicep-contribution-flow/

.PARAMETER GitHubRepositoryPathForCloneOfForkedRepository
Mandatory. The path to the GitHub repository to fork and clone. Directory will be created if does not already exist. Can use either relative paths or full literal paths.

.PARAMETER GitHubSecret_ARM_MGMTGROUP_ID
Optional. The group ID of the management group to test-deploy modules in. Is needed for resources that are deployed to the management group scope. If not provided CI tests on Management Group scoped modules will not work and you will need to manually configure the RBAC role assignments for the SPN and associated repository secret later.

.PARAMETER GitHubSecret_ARM_SUBSCRIPTION_ID
Mandatory. The ID of the subscription to test-deploy modules in. Is needed for resources that are deployed to the subscription scope.

.PARAMETER GitHubSecret_ARM_TENANT_ID
Mandatory. The tenant ID of the Azure Active Directory tenant to test-deploy modules in. Is needed for resources that are deployed to the tenant scope.

.PARAMETER GitHubSecret_TOKEN_NAMEPREFIX
Mandatory. Required. A short (3-5 character length), unique string that should be included in any deployment to Azure. Usually, AVM Bicep test cases require this value to ensure no two contributors deploy resources with the same name - which is especially important for resources that require a globally unique name (e.g., Key Vault). These characters will be used as part of each resource’s name during deployment.

.PARAMETER SPNName
Optional. The name of the SPN (Service Principal) to create. If not provided, a default name of `spn-avm-bicep-brm-fork-ci-<GitHub Organization>` will be used.

.PARAMETER UAMIName
Optional. The name of the UAMI (User Assigned Managed Identity) to create. If not provided, a default name of `id-avm-bicep-brm-fork-ci-<GitHub Organization>` will be used.

.PARAMETER UAMIRsgName
Optional. The name of the Resource Group to create for the UAMI (User Assigned Managed Identity) to create. If not provided, a default name of `rsg-avm-bicep-brm-fork-ci-<GitHub Organization>-oidc` will be used.

.PARAMETER UAMIRsgLocation
Optional. The location of the Resource Group to create for the UAMI (User Assigned Managed Identity) to create. Also UAMI will be created in this location. This is required for OIDC deployments.

.PARAMETER UseOIDC
Optional. Default is `$true`. If set to `$true`, the script will use the OIDC (OpenID Connect) authentication method for the SPN instead of secrets as per https://azure.github.io/Azure-Verified-Modules/contributing/bicep/bicep-contribution-flow/#31-set-up-secrets. If set to `$false`, the script will use the Client Secret authentication method for the SPN and not OIDC.

.EXAMPLE
.\<PATH-TO-SCRIPT-DOWNLOAD-LOCATION>\New-AVMBicepBRMForkSetup.ps1 -GitHubRepositoryPathForCloneOfForkedRepository "D:\GitRepos\" -GitHubSecret_ARM_MGMTGROUP_ID "alz" -GitHubSecret_ARM_SUBSCRIPTION_ID "1b60f82b-d28e-4640-8cfa-e02d2ddb421a" -GitHubSecret_ARM_TENANT_ID "c3df6353-a410-40a1-b962-e91e45e14e4b" -GitHubSecret_TOKEN_NAMEPREFIX "ex123" -UAMIRsgLocation "uksouth"

Example Subscription & Management Group scoped deployments enabled via OIDC with default generated UAMI Resource Group name of `rsg-avm-bicep-brm-fork-ci-<GitHub Organization>-oidc` and UAMI name of `id-avm-bicep-brm-fork-ci-<GitHub Organization>`.

.EXAMPLE
.\<PATH-TO-SCRIPT-DOWNLOAD-LOCATION>\New-AVMBicepBRMForkSetup.ps1 -GitHubRepositoryPathForCloneOfForkedRepository "D:\GitRepos\" -GitHubSecret_ARM_MGMTGROUP_ID "alz" -GitHubSecret_ARM_SUBSCRIPTION_ID "1b60f82b-d28e-4640-8cfa-e02d2ddb421a" -GitHubSecret_ARM_TENANT_ID "c3df6353-a410-40a1-b962-e91e45e14e4b" -GitHubSecret_TOKEN_NAMEPREFIX "ex123" -UAMIRsgLocation "uksouth" -UAMIName "my-uami-name" -UAMIRsgName "my-uami-rsg-name"

Example with provided UAMI Name & UAMI Resource Group Name.

.EXAMPLE
.\<PATH-TO-SCRIPT-DOWNLOAD-LOCATION>\New-AVMBicepBRMForkSetup.ps1 -GitHubRepositoryPathForCloneOfForkedRepository "D:\GitRepos\" -GitHubSecret_ARM_SUBSCRIPTION_ID "1b60f82b-d28e-4640-8cfa-e02d2ddb421a" -GitHubSecret_ARM_TENANT_ID "c3df6353-a410-40a1-b962-e91e45e14e4b" -GitHubSecret_TOKEN_NAMEPREFIX "ex123" -UseOIDC $false

DEPRECATED - USE OIDC INSTEAD.
Example Subscription scoped deployments enabled only with default generated SPN name of `spn-avm-bicep-brm-fork-ci-<GitHub Organization>`.

.EXAMPLE
.\<PATH-TO-SCRIPT-DOWNLOAD-LOCATION>\New-AVMBicepBRMForkSetup.ps1 -GitHubRepositoryPathForCloneOfForkedRepository "D:\GitRepos\" -GitHubSecret_ARM_MGMTGROUP_ID "alz" -GitHubSecret_ARM_SUBSCRIPTION_ID "1b60f82b-d28e-4640-8cfa-e02d2ddb421a" -GitHubSecret_ARM_TENANT_ID "c3df6353-a410-40a1-b962-e91e45e14e4b" -GitHubSecret_TOKEN_NAMEPREFIX "ex123" -SPNName "my-spn-name" -UseOIDC $false

DEPRECATED - USE OIDC INSTEAD.
Example with provided SPN name.

#>

[CmdletBinding(SupportsShouldProcess = $false)]
param (
  [Parameter(Mandatory = $true)]
  [string] $GitHubRepositoryPathForCloneOfForkedRepository,

  [Parameter(Mandatory = $false)]
  [string] $GitHubSecret_ARM_MGMTGROUP_ID,

  [Parameter(Mandatory = $true)]
  [string] $GitHubSecret_ARM_SUBSCRIPTION_ID,

  [Parameter(Mandatory = $true)]
  [string] $GitHubSecret_ARM_TENANT_ID,

  [Parameter(Mandatory = $true)]
  [string] $GitHubSecret_TOKEN_NAMEPREFIX,

  [Parameter(Mandatory = $false)]
  [string] $SPNName,

  [Parameter(Mandatory = $false)]
  [string] $UAMIName,

  [Parameter(Mandatory = $false)]
  [string] $UAMIRsgName = "rsg-avm-bicep-brm-fork-ci-oidc",

  [Parameter(Mandatory = $false)]
  [string] $UAMIRsgLocation,

  [Parameter(Mandatory = $false)]
  [bool] $UseOIDC = $true
)

# Check if the GitHub CLI is installed
$GitHubCliInstalled = Get-Command gh -ErrorAction SilentlyContinue
if ($null -eq $GitHubCliInstalled) {
  throw 'The GitHub CLI is not installed. Please install the GitHub CLI and try again. Install link for GitHub CLI: https://github.com/cli/cli#installation'
}
Write-Host 'The GitHub CLI is installed...' -ForegroundColor Green

# Check if GitHub CLI is authenticated
$GitHubCliAuthenticated = gh auth status
if ($LASTEXITCODE -ne 0) {
  Write-Host $GitHubCliAuthenticated -ForegroundColor Red
  throw "Not authenticated to GitHub. Please authenticate to GitHub using the GitHub CLI command of 'gh auth login', and try again."
}
Write-Host 'Authenticated to GitHub with following details...' -ForegroundColor Cyan
Write-Host ''
gh auth status
Write-Host ''

# Ask the user to confirm if it's the correct GitHub account
do {
  Write-Host "Is the above GitHub account correct to coninue with the fork setup of the 'Azure/bicep-registry-modules' repository? Please enter 'y' or 'n'." -ForegroundColor Yellow
  $userInput = Read-Host
  $userInput = $userInput.ToLower()

  switch ($userInput) {
    'y' {
      Write-Host ''
      Write-Host 'User Confirmed. Proceeding with the GitHub account listed above...' -ForegroundColor Green
      Write-Host ''
      break
    }
    'n' {
      Write-Host ''
      throw "User stated incorrect GitHub account. Please switch to the correct GitHub account. You can do this in the GitHub CLI (gh) by logging out by running 'gh auth logout' and then logging back in with 'gh auth login'"
    }
    default {
      Write-Host ''
      Write-Host "Invalid input. Please enter 'y' or 'n'." -ForegroundColor Red
      Write-Host ''
    }
  }
} while ($userInput -ne 'y' -and $userInput -ne 'n')

# Fork and clone repository locally
Write-Host "Changing to directory $GitHubRepositoryPathForCloneOfForkedRepository ..." -ForegroundColor Magenta

if (-not (Test-Path -Path $GitHubRepositoryPathForCloneOfForkedRepository)) {
  Write-Host "Directory does not exist. Creating directory $GitHubRepositoryPathForCloneOfForkedRepository ..." -ForegroundColor Yellow
  New-Item -Path $GitHubRepositoryPathForCloneOfForkedRepository -ItemType Directory -ErrorAction Stop
  Write-Host ''
}
Set-Location -Path $GitHubRepositoryPathForCloneOfForkedRepository -ErrorAction stop
$CreatedDirectoryLocation = Get-Location
Write-Host "Forking and cloning 'Azure/bicep-registry-modules' repository..." -ForegroundColor Magenta

gh repo fork 'Azure/bicep-registry-modules' --default-branch-only --clone=true
if ($LASTEXITCODE -ne 0) {
  throw "Failed to fork and clone the 'Azure/bicep-registry-modules' repository. Please check the error message above, resolve any issues, and try again."
}

$ClonedRepoDirectoryLocation = Join-Path $CreatedDirectoryLocation 'bicep-registry-modules'
Write-Host ''
Write-Host "Fork of 'Azure/bicep-registry-modules' created successfully directory in $CreatedDirectoryLocation ..." -ForegroundColor Green
Write-Host ''
Write-Host "Changing into cloned repository directory $ClonedRepoDirectoryLocation ..." -ForegroundColor Magenta
Set-Location $ClonedRepoDirectoryLocation -ErrorAction stop

# Check is user is logged in to Azure
$UserLoggedIntoAzure = Get-AzContext -ErrorAction SilentlyContinue
if ($null -eq $UserLoggedIntoAzure) {
  throw 'You are not logged into Azure. Please log into Azure using the Azure PowerShell module using the command of `Connect-AzAccount` to the correct tenant and try again.'
}
$UserLoggedIntoAzureJson = $UserLoggedIntoAzure | ConvertTo-Json -Depth 10 | ConvertFrom-Json
Write-Host "You are logged into Azure as '$($UserLoggedIntoAzureJson.Account.Id)' ..." -ForegroundColor Green

# Check user has access to desired subscription
$UserCanAccessSubscription = Get-AzSubscription -SubscriptionId $GitHubSecret_ARM_SUBSCRIPTION_ID -ErrorAction SilentlyContinue
if ($null -eq $UserCanAccessSubscription) {
  throw "You do not have access to the subscription with the ID of '$($GitHubSecret_ARM_SUBSCRIPTION_ID)'. Please ensure you have access to the subscription and try again."
}
Write-Host "You have access to the subscription with the ID of '$($GitHubSecret_ARM_SUBSCRIPTION_ID)' ..." -ForegroundColor Green
Write-Host ''

# Get GitHub Login/Org Name
$GitHubUserRaw = gh api user
$GitHubUserConvertedToJson = $GitHubUserRaw | ConvertFrom-Json -Depth 10
$GitHubOrgName = $GitHubUserConvertedToJson.login
$GitHubOrgAndRepoNameCombined = "$($GitHubOrgName)/bicep-registry-modules"

# Create SPN if not using OIDC
if ($UseOIDC -eq $false) {
  if ($SPNName -eq '') {
    Write-Host "No value provided for the SPN Name. Defaulting to 'spn-avm-bicep-brm-fork-ci-<GitHub Organization>' ..." -ForegroundColor Yellow

    $SPNName = "spn-avm-bicep-brm-fork-ci-$($GitHubOrgName)"
  }
  $newSpn = New-AzADServicePrincipal -DisplayName $SPNName -Description "Service Principal Name (SPN) for the AVM Bicep CI Tests in the $($GitHubOrgName) fork. See: https://azure.github.io/Azure-Verified-Modules/contributing/bicep/bicep-contribution-flow/#2-configure-a-deployment-identity-in-azure" -ErrorAction Stop
  Write-Host "New SPN created with a Display Name of '$($newSpn.DisplayName)' and an Object ID of '$($newSpn.Id)'." -ForegroundColor Green
  Write-Host ''

  # Create RBAC Role Assignments for SPN
  Write-Host 'Starting 120 second sleep to allow the SPN to be created and available for RBAC Role Assignments (eventual consistency) ...' -ForegroundColor Yellow
  Start-Sleep -Seconds 120

  Write-Host "Creating RBAC Role Assignments of 'Owner' for the Service Principal Name (SPN) '$($newSpn.DisplayName)' on the Subscription with the ID of '$($GitHubSecret_ARM_SUBSCRIPTION_ID)' ..." -ForegroundColor Magenta
  New-AzRoleAssignment -ApplicationId $newSpn.AppId -RoleDefinitionName 'Owner' -Scope "/subscriptions/$($GitHubSecret_ARM_SUBSCRIPTION_ID)" -ErrorAction Stop
  Write-Host "RBAC Role Assignments of 'Owner' for the Service Principal Name (SPN) '$($newSpn.DisplayName)' created successfully on the Subscription with the ID of '$($GitHubSecret_ARM_SUBSCRIPTION_ID)'." -ForegroundColor Green
  Write-Host ''

  if ($GitHubSecret_ARM_MGMTGROUP_ID -eq '') {
    Write-Host "No Management Group ID provided as input parameter to '-GitHubSecret_ARM_MGMTGROUP_ID', skipping RBAC Role Assignments upon Management Groups" -ForegroundColor Yellow
    Write-Host ''
  }

  if ($GitHubSecret_ARM_MGMTGROUP_ID -ne '') {
    Write-Host "Creating RBAC Role Assignments of 'Owner' for the Service Principal Name (SPN) '$($newSpn.DisplayName)' on the Management Group with the ID of '$($GitHubSecret_ARM_MGMTGROUP_ID)' ..." -ForegroundColor Magenta
    New-AzRoleAssignment -ApplicationId $newSpn.AppId -RoleDefinitionName 'Owner' -Scope "/providers/Microsoft.Management/managementGroups/$($GitHubSecret_ARM_MGMTGROUP_ID)" -ErrorAction Stop
    Write-Host "RBAC Role Assignments of 'Owner' for the Service Principal Name (SPN) '$($newSpn.DisplayName)' created successfully on the Management Group with the ID of '$($GitHubSecret_ARM_MGMTGROUP_ID)'." -ForegroundColor Green
    Write-Host ''
  }
}

# Create UAMI if using OIDC
if ($UseOIDC) {
  if ($UAMIName -eq '') {
    Write-Host "No value provided for the UAMI Name. Defaulting to 'id-avm-bicep-brm-fork-ci-<GitHub Organization>' ..." -ForegroundColor Yellow

    $UAMIName = "id-avm-bicep-brm-fork-ci-$($GitHubOrgName)"
  }
  if ($UAMIRsgName -eq '') {
    Write-Host "No value provided for the UAMI Resource Group Name. Defaulting to 'rsg-avm-bicep-brm-fork-ci-<GitHub Organization>-oidc' ..." -ForegroundColor Yellow

    $UAMIRsgName = "rsg-avm-bicep-brm-fork-ci-$($GitHubOrgName)-oidc"
  }

  Write-Host "Selecting the subscription with the ID of '$($GitHubSecret_ARM_SUBSCRIPTION_ID)' to create Resource Group & UAMI in for OIDC ..." -ForegroundColor Magenta
  Select-AzSubscription -Subscription $GitHubSecret_ARM_SUBSCRIPTION_ID
  Write-Host ''

  if ($UAMIRsgLocation -eq '') {
    Write-Host "No value provided for the UAMI Location ..." -ForegroundColor Yellow
    $UAMIRsgLocation = Read-Host -Prompt "Please enter the location for the UAMI and the Resource Group to be created in for OIDC deployments. e.g. 'uksouth' or 'eastus', etc..."
    $UAMIRsgLocation = $UAMIRsgLocation.ToLower()

    $availableLocations = Get-AzLocation | Where-Object {$_.RegionType -eq 'Physical'} | Select-Object -ExpandProperty Location

    if ($availableLocations -notcontains $UAMIRsgLocation) {
      Write-Host "Invalid location provided. Please provide a valid location from the list below ..." -ForegroundColor Yellow
      Write-Host ''
      Write-Host "Available Locations: $($availableLocations -join ', ')" -ForegroundColor Yellow
      do {
        $UAMIRsgLocation = Read-Host -Prompt "Please enter the location for the UAMI and the Resource Group to be created in for OIDC deployments. e.g. 'uksouth' or 'eastus', etc..."
      } until (
        $availableLocations -icontains $UAMIRsgLocation
      )
    }
  }

  Write-Host "Creating Resource Group for UAMI with the name of '$($UAMIRsgName)' and location of '$($UAMIRsgLocation)'..." -ForegroundColor Magenta
  $newUAMIRsg = New-AzResourceGroup -Name $UAMIRsgName -Location $UAMIRsgLocation -ErrorAction Stop
  Write-Host "New Resource Group created with a Name of '$($newUAMIRsg.ResourceGroupName)' and a Location of '$($newUAMIRsg.Location)'." -ForegroundColor Green
  Write-Host ''

  Write-Host "Creating UAMI with the name of '$($UAMIName)' and location of '$($UAMIRsgLocation)' in the Resource Group with the name of '$($UAMIRsgName)..." -ForegroundColor Magenta
  $newUAMI = New-AzUserAssignedIdentity -ResourceGroupName $newUAMIRsg.ResourceGroupName -Name $UAMIName -Location $newUAMIRsg.Location -ErrorAction Stop
  Write-Host "New UAMI created with a Name of '$($newUAMI.Name)' and an Object ID of '$($newUAMI.PrincipalId)'." -ForegroundColor Green
  Write-Host ''

  # Create Federated Credentials for UAMI for OIDC
  Write-Host "Creating Federated Credentials for the User-Assigned Managed Identity Name (UAMI) for OIDC ... '$($newUAMI.Name)' for OIDC ..." -ForegroundColor Magenta
  New-AzFederatedIdentityCredentials -ResourceGroupName $newUAMIRsg.ResourceGroupName -IdentityName $newUAMI.Name -Name 'avm-gh-env-validation' -Issuer "https://token.actions.githubusercontent.com" -Subject "repo:$($GitHubOrgAndRepoNameCombined):environment:avm-validation" -ErrorAction Stop
  Write-Host ''

  # Create RBAC Role Assignments for UAMI
  Write-Host 'Starting 120 second sleep to allow the UAMI to be created and available for RBAC Role Assignments (eventual consistency) ...' -ForegroundColor Yellow
  Start-Sleep -Seconds 120

  Write-Host "Creating RBAC Role Assignments of 'Owner' for the User-Assigned Managed Identity Name (UAMI) '$($newUAMI.Name)' on the Subscription with the ID of '$($GitHubSecret_ARM_SUBSCRIPTION_ID)' ..." -ForegroundColor Magenta
  New-AzRoleAssignment -ObjectId $newUAMI.PrincipalId -RoleDefinitionName 'Owner' -Scope "/subscriptions/$($GitHubSecret_ARM_SUBSCRIPTION_ID)" -ErrorAction Stop
  Write-Host "RBAC Role Assignments of 'Owner' for the User-Assigned Managed Identity Name (UAMI) '$($newUAMI.Name)' created successfully on the Subscription with the ID of '$($GitHubSecret_ARM_SUBSCRIPTION_ID)'." -ForegroundColor Green
  Write-Host ''

  if ($GitHubSecret_ARM_MGMTGROUP_ID -eq '') {
    Write-Host "No Management Group ID provided as input parameter to '-GitHubSecret_ARM_MGMTGROUP_ID', skipping RBAC Role Assignments upon Management Groups" -ForegroundColor Yellow
    Write-Host ''
  }

  if ($GitHubSecret_ARM_MGMTGROUP_ID -ne '') {
    Write-Host "Creating RBAC Role Assignments of 'Owner' for the User-Assigned Managed Identity Name (UAMI) '$($newSpn.DisplayName)' on the Management Group with the ID of '$($GitHubSecret_ARM_MGMTGROUP_ID)' ..." -ForegroundColor Magenta
    New-AzRoleAssignment -ObjectId $newUAMI.PrincipalId -RoleDefinitionName 'Owner' -Scope "/providers/Microsoft.Management/managementGroups/$($GitHubSecret_ARM_MGMTGROUP_ID)" -ErrorAction Stop
    Write-Host "RBAC Role Assignments of 'Owner' for the User-Assigned Managed Identity Name (UAMI) '$($newUAMI.Name)' created successfully on the Management Group with the ID of '$($GitHubSecret_ARM_MGMTGROUP_ID)'." -ForegroundColor Green
    Write-Host ''
  }
}

# Set GitHub Repo Secrets (non-OIDC)
if ($UseOIDC -eq $false) {
  Write-Host "Setting GitHub Secrets on forked repository (non-OIDC) '$($GitHubOrgAndRepoNameCombined)' ..." -ForegroundColor Magenta
  Write-Host 'Creating and formatting secret `AZURE_CREDENTIALS` with details from SPN creation process (non-OIDC) and other parameter inputs ...' -ForegroundColor Cyan

  $FormattedAzureCredentialsSecret = "{ 'clientId': '$($newSpn.AppId)', 'clientSecret': '$($newSpn.PasswordCredentials.SecretText)', 'subscriptionId': '$($GitHubSecret_ARM_SUBSCRIPTION_ID)', 'tenantId': '$($GitHubSecret_ARM_TENANT_ID)' }"
  $FormattedAzureCredentialsSecretJsonCompressed = $FormattedAzureCredentialsSecret | ConvertFrom-Json | ConvertTo-Json -Compress

  if ($GitHubSecret_ARM_MGMTGROUP_ID -ne '') {
    gh secret set ARM_MGMTGROUP_ID --body $GitHubSecret_ARM_MGMTGROUP_ID -R $GitHubOrgAndRepoNameCombined
  }
  gh secret set ARM_SUBSCRIPTION_ID --body $GitHubSecret_ARM_SUBSCRIPTION_ID -R $GitHubOrgAndRepoNameCombined
  gh secret set ARM_TENANT_ID --body $GitHubSecret_ARM_TENANT_ID -R $GitHubOrgAndRepoNameCombined
  gh secret set AZURE_CREDENTIALS --body $FormattedAzureCredentialsSecretJsonCompressed -R $GitHubOrgAndRepoNameCombined
  gh secret set TOKEN_NAMEPREFIX --body $GitHubSecret_TOKEN_NAMEPREFIX -R $GitHubOrgAndRepoNameCombined

  Write-Host ''
  Write-Host "Successfully created and set GitHub Secrets (non-OIDC) on forked repository '$($GitHubOrgAndRepoNameCombined)' ..." -ForegroundColor Green
  Write-Host ''
}

# Set GitHub Repo Secrets & Environment (OIDC)
if ($UseOIDC) {
  Write-Host "Setting GitHub Environment (avm-validation) and required Secrets on forked repository (OIDC) '$($GitHubOrgAndRepoNameCombined)' ..." -ForegroundColor Magenta
  Write-Host "Creating 'avm-validation' environment on forked repository' ..." -ForegroundColor Cyan

  $GitHubEnvironment = gh api --method PUT -H "Accept: application/vnd.github+json" "repos/$($GitHubOrgAndRepoNameCombined)/environments/avm-validation"
  $GitHubEnvironmentConvertedToJson = $GitHubEnvironment | ConvertFrom-Json -Depth 10

  if ($GitHubEnvironmentConvertedToJson.name -ne 'avm-validation') {
    throw "Failed to create 'avm-validation' environment on forked repository. Please check the error message above, resolve any issues, and try again."
  }

  Write-Host "Successfully created 'avm-validation' environment on forked repository' ..." -ForegroundColor Green
  Write-Host ''

  Write-Host "Creating and formatting secrets for 'avm-validation' environment with details from UAMI creation process (OIDC) and other parameter inputs ..." -ForegroundColor Cyan
  gh secret set VALIDATE_CLIENT_ID --body $newUAMI.ClientId -R $GitHubOrgAndRepoNameCombined -e 'avm-validation'
  gh secret set VALIDATE_SUBSCRIPTION_ID --body $GitHubSecret_ARM_SUBSCRIPTION_ID -R $GitHubOrgAndRepoNameCombined -e 'avm-validation'
  gh secret set VALIDATE_TENANT_ID --body $GitHubSecret_ARM_TENANT_ID -R $GitHubOrgAndRepoNameCombined -e 'avm-validation'

  Write-Host "Creating and formatting secrets for repo with details from UAMI creation process (OIDC) and other parameter inputs ..." -ForegroundColor Cyan
  if ($GitHubSecret_ARM_MGMTGROUP_ID -ne '') {
    gh secret set ARM_MGMTGROUP_ID --body $GitHubSecret_ARM_MGMTGROUP_ID -R $GitHubOrgAndRepoNameCombined
  }
  gh secret set ARM_SUBSCRIPTION_ID --body $GitHubSecret_ARM_SUBSCRIPTION_ID -R $GitHubOrgAndRepoNameCombined
  gh secret set ARM_TENANT_ID --body $GitHubSecret_ARM_TENANT_ID -R $GitHubOrgAndRepoNameCombined
  gh secret set TOKEN_NAMEPREFIX --body $GitHubSecret_TOKEN_NAMEPREFIX -R $GitHubOrgAndRepoNameCombined

  Write-Host ''
  Write-Host "Successfully created and set GitHub Secrets in 'avm-validation' environment and repo (OIDC) on forked repository '$($GitHubOrgAndRepoNameCombined)' ..." -ForegroundColor Green
  Write-Host ''
}

Write-Host "Opening browser so you can enable GitHub Actions on newly forked repository '$($GitHubOrgAndRepoNameCombined)' ..." -ForegroundColor Magenta
Write-Host "Please select click on the green button stating 'I understand my workflows, go ahead and enable them' to enable actions/workflows on your forked repository via the website that has appeared in your browser window and then return to this terminal session to continue ..." -ForegroundColor Yellow
Start-Process "https://github.com/$($GitHubOrgAndRepoNameCombined)/actions" -ErrorAction Stop
Write-Host ''

$GitHubWorkflowPlatformToggleWorkflows = '.Platform - Toggle AVM workflows'
$GitHubWorkflowPlatformToggleWorkflowsFileName = 'platform.toggle-avm-workflows.yml'

do {
  Write-Host "Did you successfully enable the GitHub Actions/Workflows on your forked repository '$($GitHubOrgAndRepoNameCombined)'? Please enter 'y' or 'n'." -ForegroundColor Yellow
  $userInput = Read-Host
  $userInput = $userInput.ToLower()

  switch ($userInput) {
    'y' {
      Write-Host ''
      Write-Host "User Confirmed. Proceeding to trigger workflow of '$($GitHubWorkflowPlatformToggleWorkflows)' to disable all workflows as per: https://azure.github.io/Azure-Verified-Modules/contributing/bicep/bicep-contribution-flow/enable-or-disable-workflows/..." -ForegroundColor Green
      Write-Host ''
      break
    }
    'n' {
      Write-Host ''
      Write-Host 'User stated no. Ending script here. Please review and complete any of the steps you have not completed, likely just enabling GitHub Actions/Workflows on your forked repository and then disabling all workflows as per: https://azure.github.io/Azure-Verified-Modules/contributing/bicep/bicep-contribution-flow/enable-or-disable-workflows/' -ForegroundColor Yellow
      exit
    }
    default {
      Write-Host ''
      Write-Host "Invalid input. Please enter 'y' or 'n'." -ForegroundColor Red
      Write-Host ''
    }
  }
} while ($userInput -ne 'y' -and $userInput -ne 'n')

Write-Host "Setting Read/Write Workflow permissions on forked repository '$($GitHubOrgAndRepoNameCombined)' ..." -ForegroundColor Magenta
gh api --method PUT -H "Accept: application/vnd.github+json" -H "X-GitHub-Api-Version: 2022-11-28" "/repos/$($GitHubOrgAndRepoNameCombined)/actions/permissions/workflow" -f "default_workflow_permissions=write"
Write-Host ''

Write-Host "Triggering '$($GitHubWorkflowPlatformToggleWorkflows) on '$($GitHubOrgAndRepoNameCombined)' ..." -ForegroundColor Magenta
Write-Host ''
gh workflow run $GitHubWorkflowPlatformToggleWorkflows -R $GitHubOrgAndRepoNameCombined
Write-Host ''

Write-Host 'Starting 120 second sleep to allow the workflow run to complete ...' -ForegroundColor Yellow
Start-Sleep -Seconds 120
Write-Host ''

Write-Host "Workflow '$($GitHubWorkflowPlatformToggleWorkflows) on '$($GitHubOrgAndRepoNameCombined)' should have now completed, opening workflow in browser so you can check ..." -ForegroundColor Magenta
Start-Process "https://github.com/$($GitHubOrgAndRepoNameCombined)/actions/workflows/$($GitHubWorkflowPlatformToggleWorkflowsFileName)" -ErrorAction Stop
Write-Host ''

Write-Host "Script execution complete. Fork of '$($GitHubOrgAndRepoNameCombined)' created and configured and cloned to '$($ClonedRepoDirectoryLocation)' as per Bicep contribution guide: https://azure.github.io/Azure-Verified-Modules/contributing/bicep/bicep-contribution-flow/ you are now ready to proceed from step 4. Opening the Bicep Contribution Guide for you to review and continue..." -ForegroundColor Green
Start-Process 'https://azure.github.io/Azure-Verified-Modules/contributing/bicep/bicep-contribution-flow/'
1. Fork the module source repository
Tip
Checkout the PowerShell Helper Script that can do this step automatically for you! 👍
Note
Each time in the following sections we refer to ‘your xyz’, it is an indicator that you have to change something in your own environment.
Bicep AVM Modules (Resource, Pattern and Utility modules) are located in the /avm directory of the Azure/bicep-registry-modules repository, as per SNFR19.
Module owners are expected to fork the Azure/bicep-registry-modules repository and work on a branch from within their fork, before creating a Pull Request (PR) back into the Azure/bicep-registry-modules repository’s upstream main branch.
To do so, simply navigate to the Public Bicep Registry repository, select the 'Fork' button to the top right of the UI, select where the fork should be created (i.e., the owning organization) and finally click ‘Create fork’.
1.1 Create a GitHub environment
Create the avm-validation environment in your fork.
➕ How to: Create an environment in GitHub
Navigate to the repository’s Settings.
In the list of settings, expand Environments. You can create a new environment by selecting New environment on the top right.
In the opening view, provide avm-validation for the environment Name. Click on the Configure environment button.
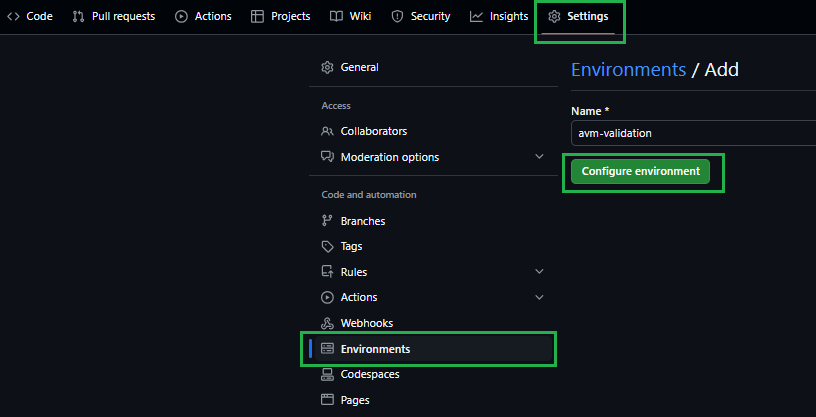

Please ref the following link for additional details: Creating an environment
AVM tests its modules via deployments in an Azure subscription. To do so, it requires a deployment identity with access to it.
Deprecating the Service Principal + Secret authentication method
Support for the ‘Service Principal + Secret’ authentication method has been deprecated and will be decommissioned in the future.
It is highly recommended to start leveraging Option 1 below to adopt OpenID Connect (OIDC) authentication and align with security best practices.
➕ Option 1 [Recommended]: OIDC - Configure a federated identity credential
Using a Managed Identity for OIDC
Make sure to use a Managed Identity for OIDC as instructed below, not a Service Principal. Azure access token issued by Managed Identities is expected to have an expiration of 24 hours by default. With Service Principal, instead, it would be only 1 hour - which is not sufficient for many deployment pipelines.
For more information, please refer to the official GitHub documentation.
Create a new or leverage an existing user-assigned managed identity with at least Contributor & User Access Administrator permissions on the Management-Group/Subscription you want to test the modules in. You may find creating an Owner role assignment is more efficient and avoids some validation failures for some modules. You might find the following links useful:


Additional roles
Some Azure resources may require additional roles to be assigned to the deployment identity. An example is the avm/res/aad/domain-service module, which requires the deployment identity to have the Domain Services Contributor Azure role to create the required Domain Services resources.
In those cases, for the first PR adding such modules to the public registry, we recommend the author to reach out to AVM maintainers or, alternatively, to create a CI environment GitHub issue in BRM, specifying the additional prerequisites. This ensures that the required additional roles get assigned in the upstream CI environment before the corresponding PR gets merged.
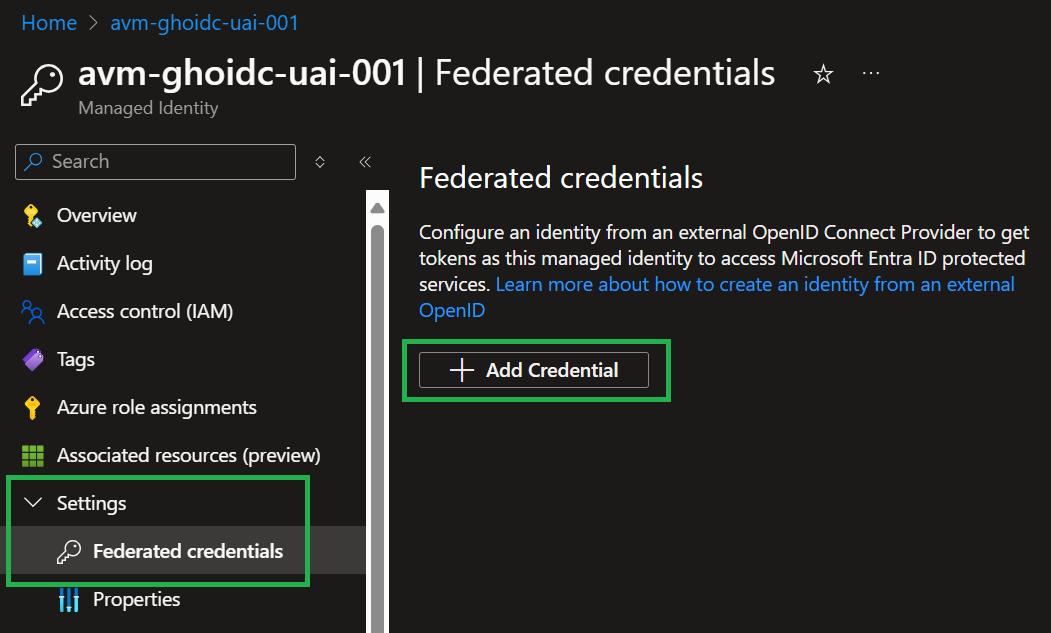
- Configure a federated identity credential on a user-assigned managed identity to trust tokens issued by GitHub Actions to your GitHub repository.
- In the Microsoft Entra admin center, navigate to the user-assigned managed identity you created. Under
Settings in the left nav bar, select Federated credentials and then Add Credential.

- In the Federated credential scenario dropdown box, select
GitHub Actions deploying Azure resources
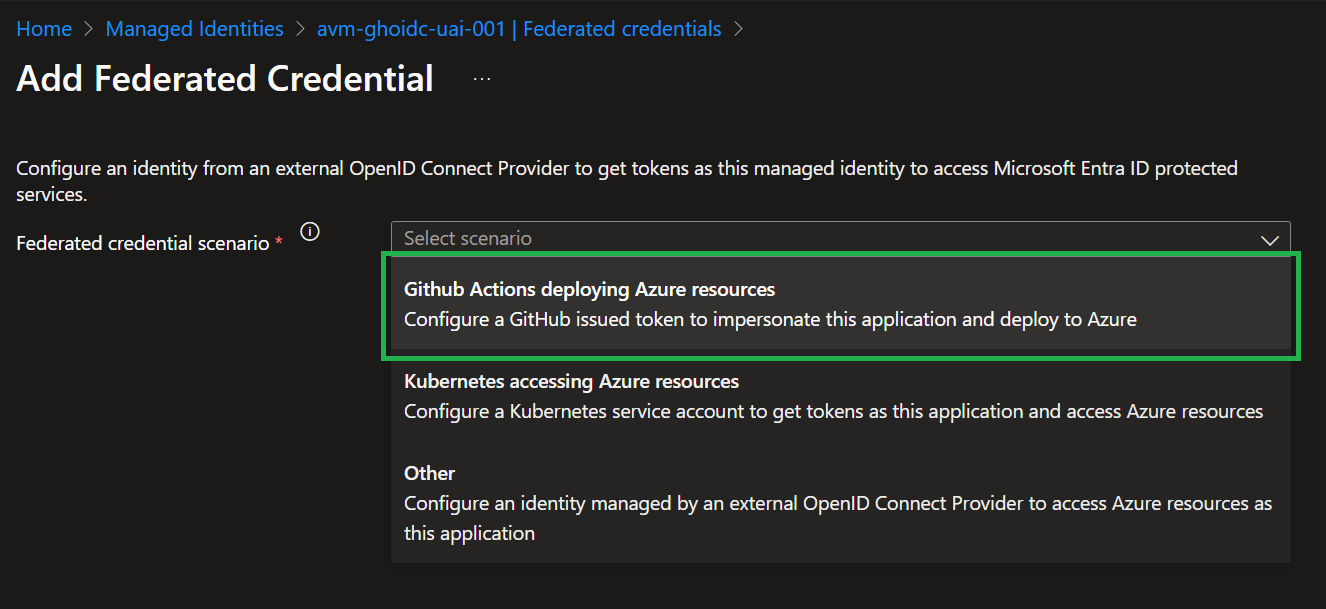

- For the
Organization, specify your GitHub organization name, for the Repository the value bicep-registry-modules. - For the
Entity type, select Environment and specify the value avm-validation. - Add a Name for the federated credential, for example,
avm-gh-env-validation. - The
Issuer, Audiences, and Subject identifier fields auto-populate based on the values you entered. - Select
Add to configure the federated credential.
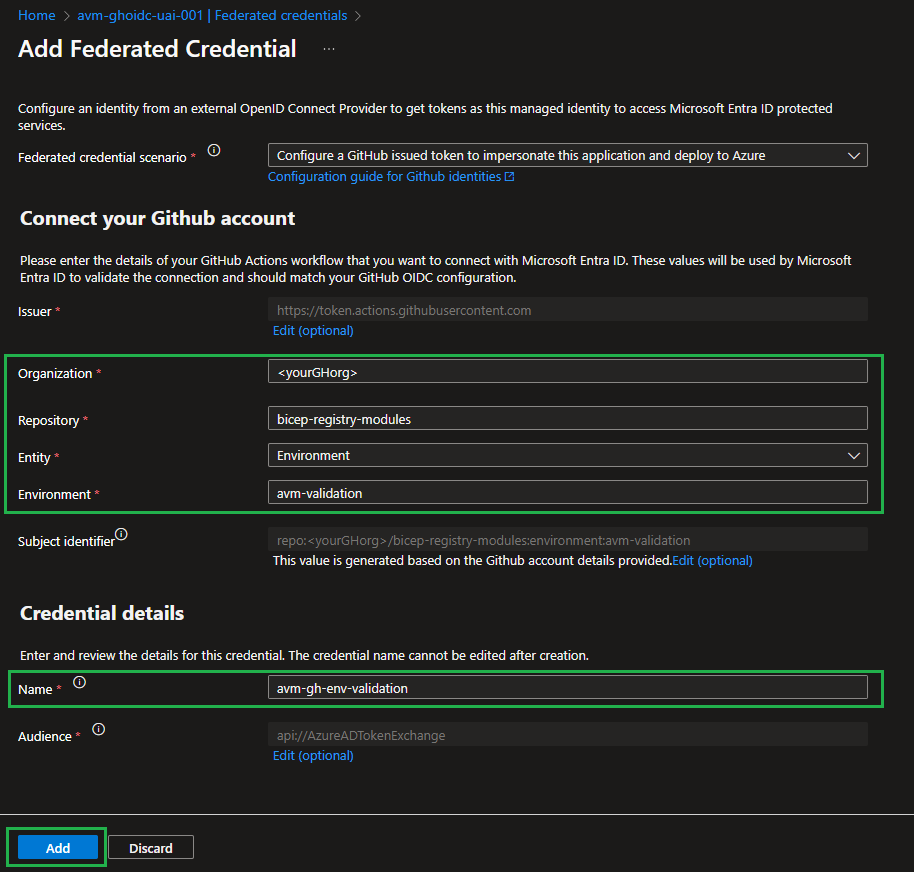

- You might find the following links & information useful:
- If configuring the federated credential via API (e.g. Bicep, PowerShell etc.), you will need the following information points that are configured automatically for you via the portal experience:
- Issuer =
https://token.actions.githubusercontent.com - Subject =
repo:<GitHub Org>/<GitHub Repo>:environment:avm-validation - Audience =
api://AzureADTokenExchange (although this is default in the API so not required to set)
- Configure a federated identity credential on a user-assigned managed identity
- Note down the following pieces of information
- Client ID
- Tenant ID
- Subscription ID
- Parent Management Group ID
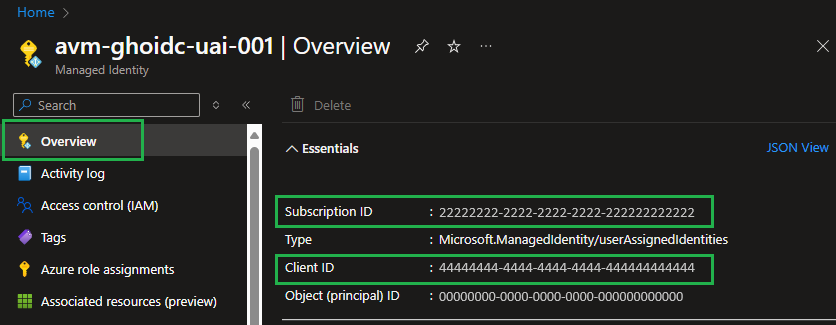

Additional references:
➕ Option 2 [Deprecated]: Configure Service Principal + Secret
- Create a new or leverage an existing Service Principal with at least
Contributor & User Access Administrator permissions on the Management-Group/Subscription you want to test the modules in. You may find creating an Owner role assignment is more efficient and avoids some validation failures for some modules. You might find the following links useful: - Note down the following pieces of information
- Application (Client) ID
- Service Principal Object ID (not the object ID of the application)
- Service Principal Secret (password)
- Tenant ID
- Subscription ID
- Parent Management Group ID
Tip
Checkout the PowerShell Helper Script that can do this step automatically for you! 👍
To configure the forked CI environment you have to perform several steps:
3.1. Set up secrets
3.1.1 Shared repository secrets
To use the Continuous Integration environment’s workflows you should set up the following repository secrets:
| Secret Name | Example | Description |
|---|
ARM_MGMTGROUP_ID | 11111111-1111-1111-1111-111111111111 | The group ID of the management group to test-deploy modules in. Is needed for resources that are deployed to the management group scope. |
ARM_SUBSCRIPTION_ID | 22222222-2222-2222-2222-222222222222 | The ID of the subscription to test-deploy modules in. Is needed for resources that are deployed to the subscription scope. Note: This repository secret will be deprecated in favor of the VALIDATE_SUBSCRIPTION_ID environment secret required by the OIDC authentication. |
ARM_TENANT_ID | 33333333-3333-3333-3333-333333333333 | The tenant ID of the Azure Active Directory tenant to test-deploy modules in. Is needed for resources that are deployed to the tenant scope. Note: This repository secret will be deprecated in favor of the VALIDATE_TENANT_ID environment secret required by the OIDC authentication. |
TOKEN_NAMEPREFIX | cntso | Required. A short (3-5 character length), unique string that should be included in any deployment to Azure. Usually, AVM Bicep test cases require this value to ensure no two contributors deploy resources with the same name - which is especially important for resources that require a globally unique name (e.g., Key Vault). These characters will be used as part of each resource’s name during deployment. For more information, see the [Special case: TOKEN_NAMEPREFIX] note below. |
Special case: TOKEN_NAMEPREFIX
To lower the barrier to entry and allow users to easily define their own naming conventions, we introduced a default ’name prefix’ for all deployed resources.
This prefix is only used by the CI environment you validate your modules in, and doesn’t affect the naming of any resources you deploy as part of any solutions (applications/workloads) based on the modules.
Each workflow in AVM deploying resources uses a logic that automatically replaces “tokens” (i.e., placeholders) in any module test file. These tokens are, for example, included in the resources names (e.g. 'name: kvlt-${namePrefix}'). Tokens are stored as repository secrets to facilitate maintenance.
➕ How to: Add a repository secret to GitHub
Navigate to the repository’s Settings.


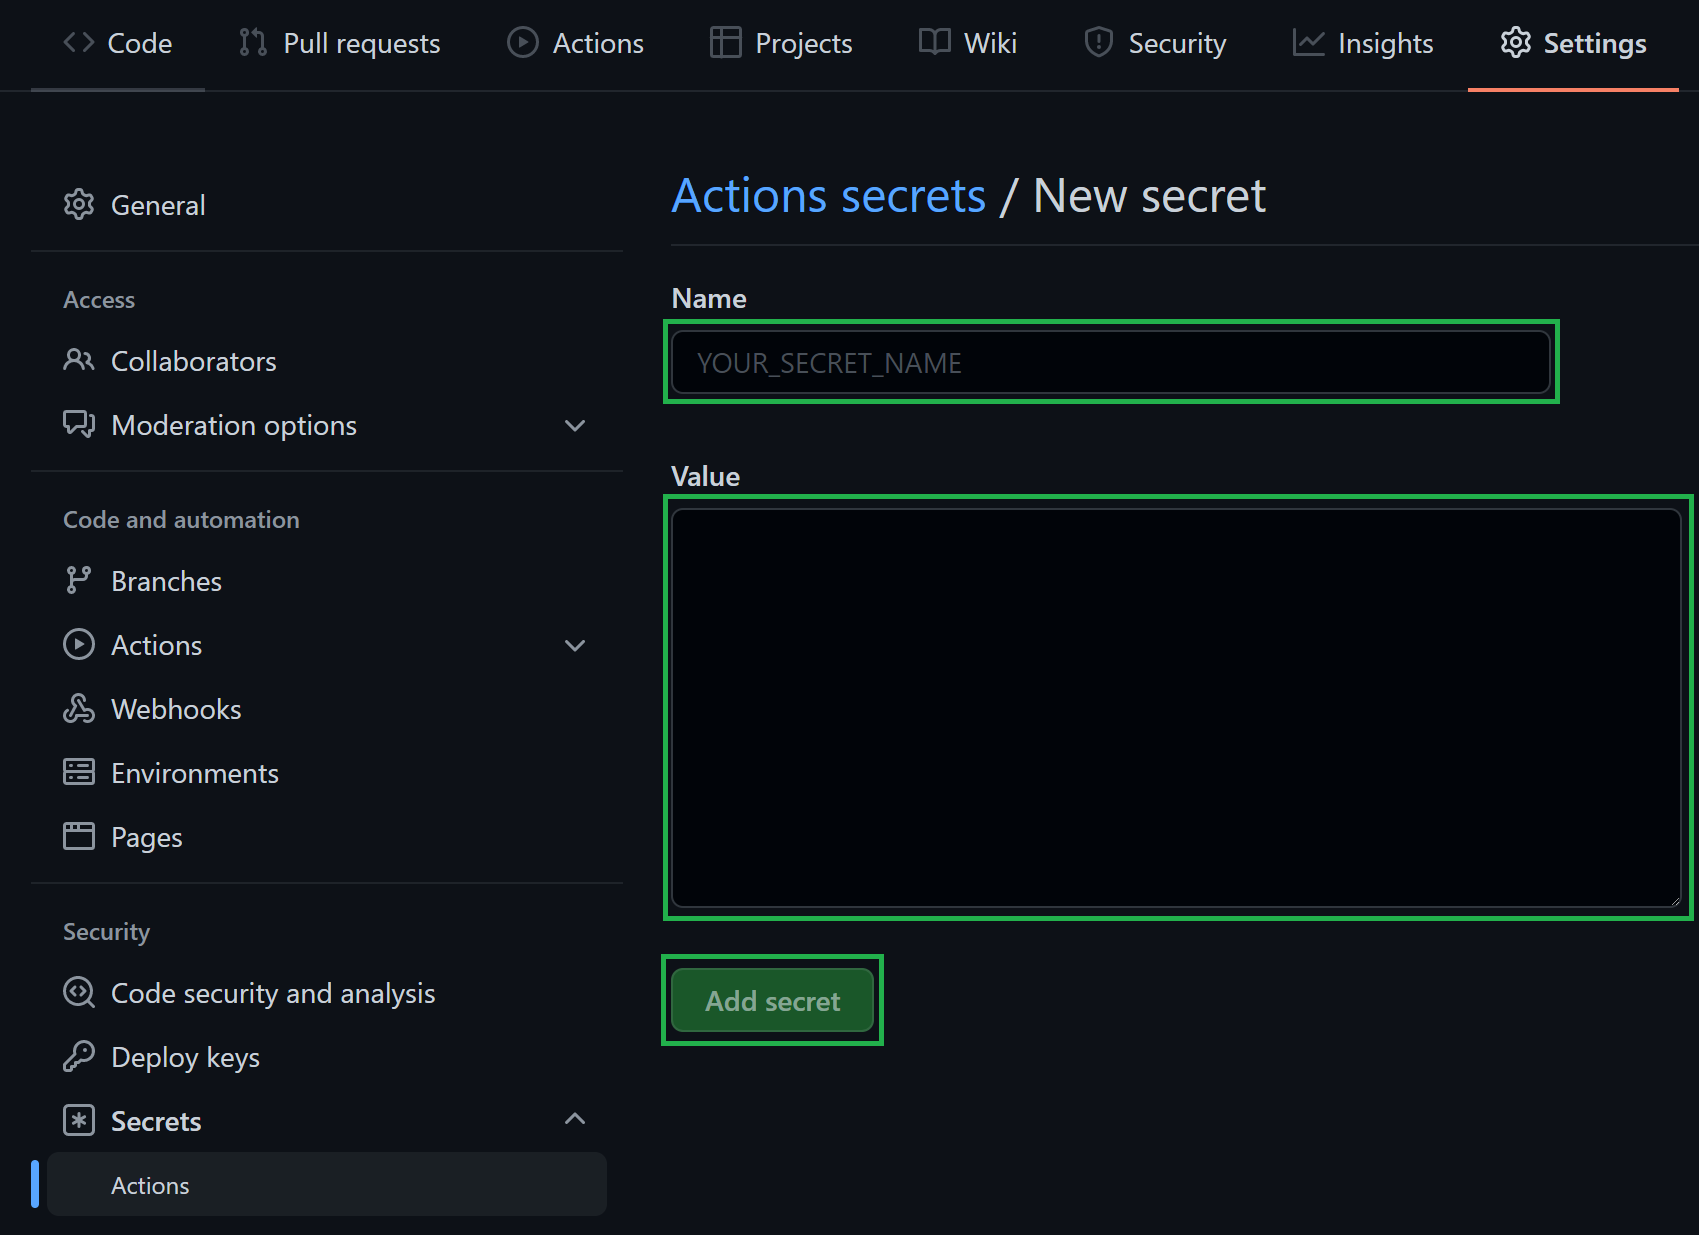
In the list of settings, expand Secrets and select Actions. You can create a new repository secret by selecting New repository secret on the top right.
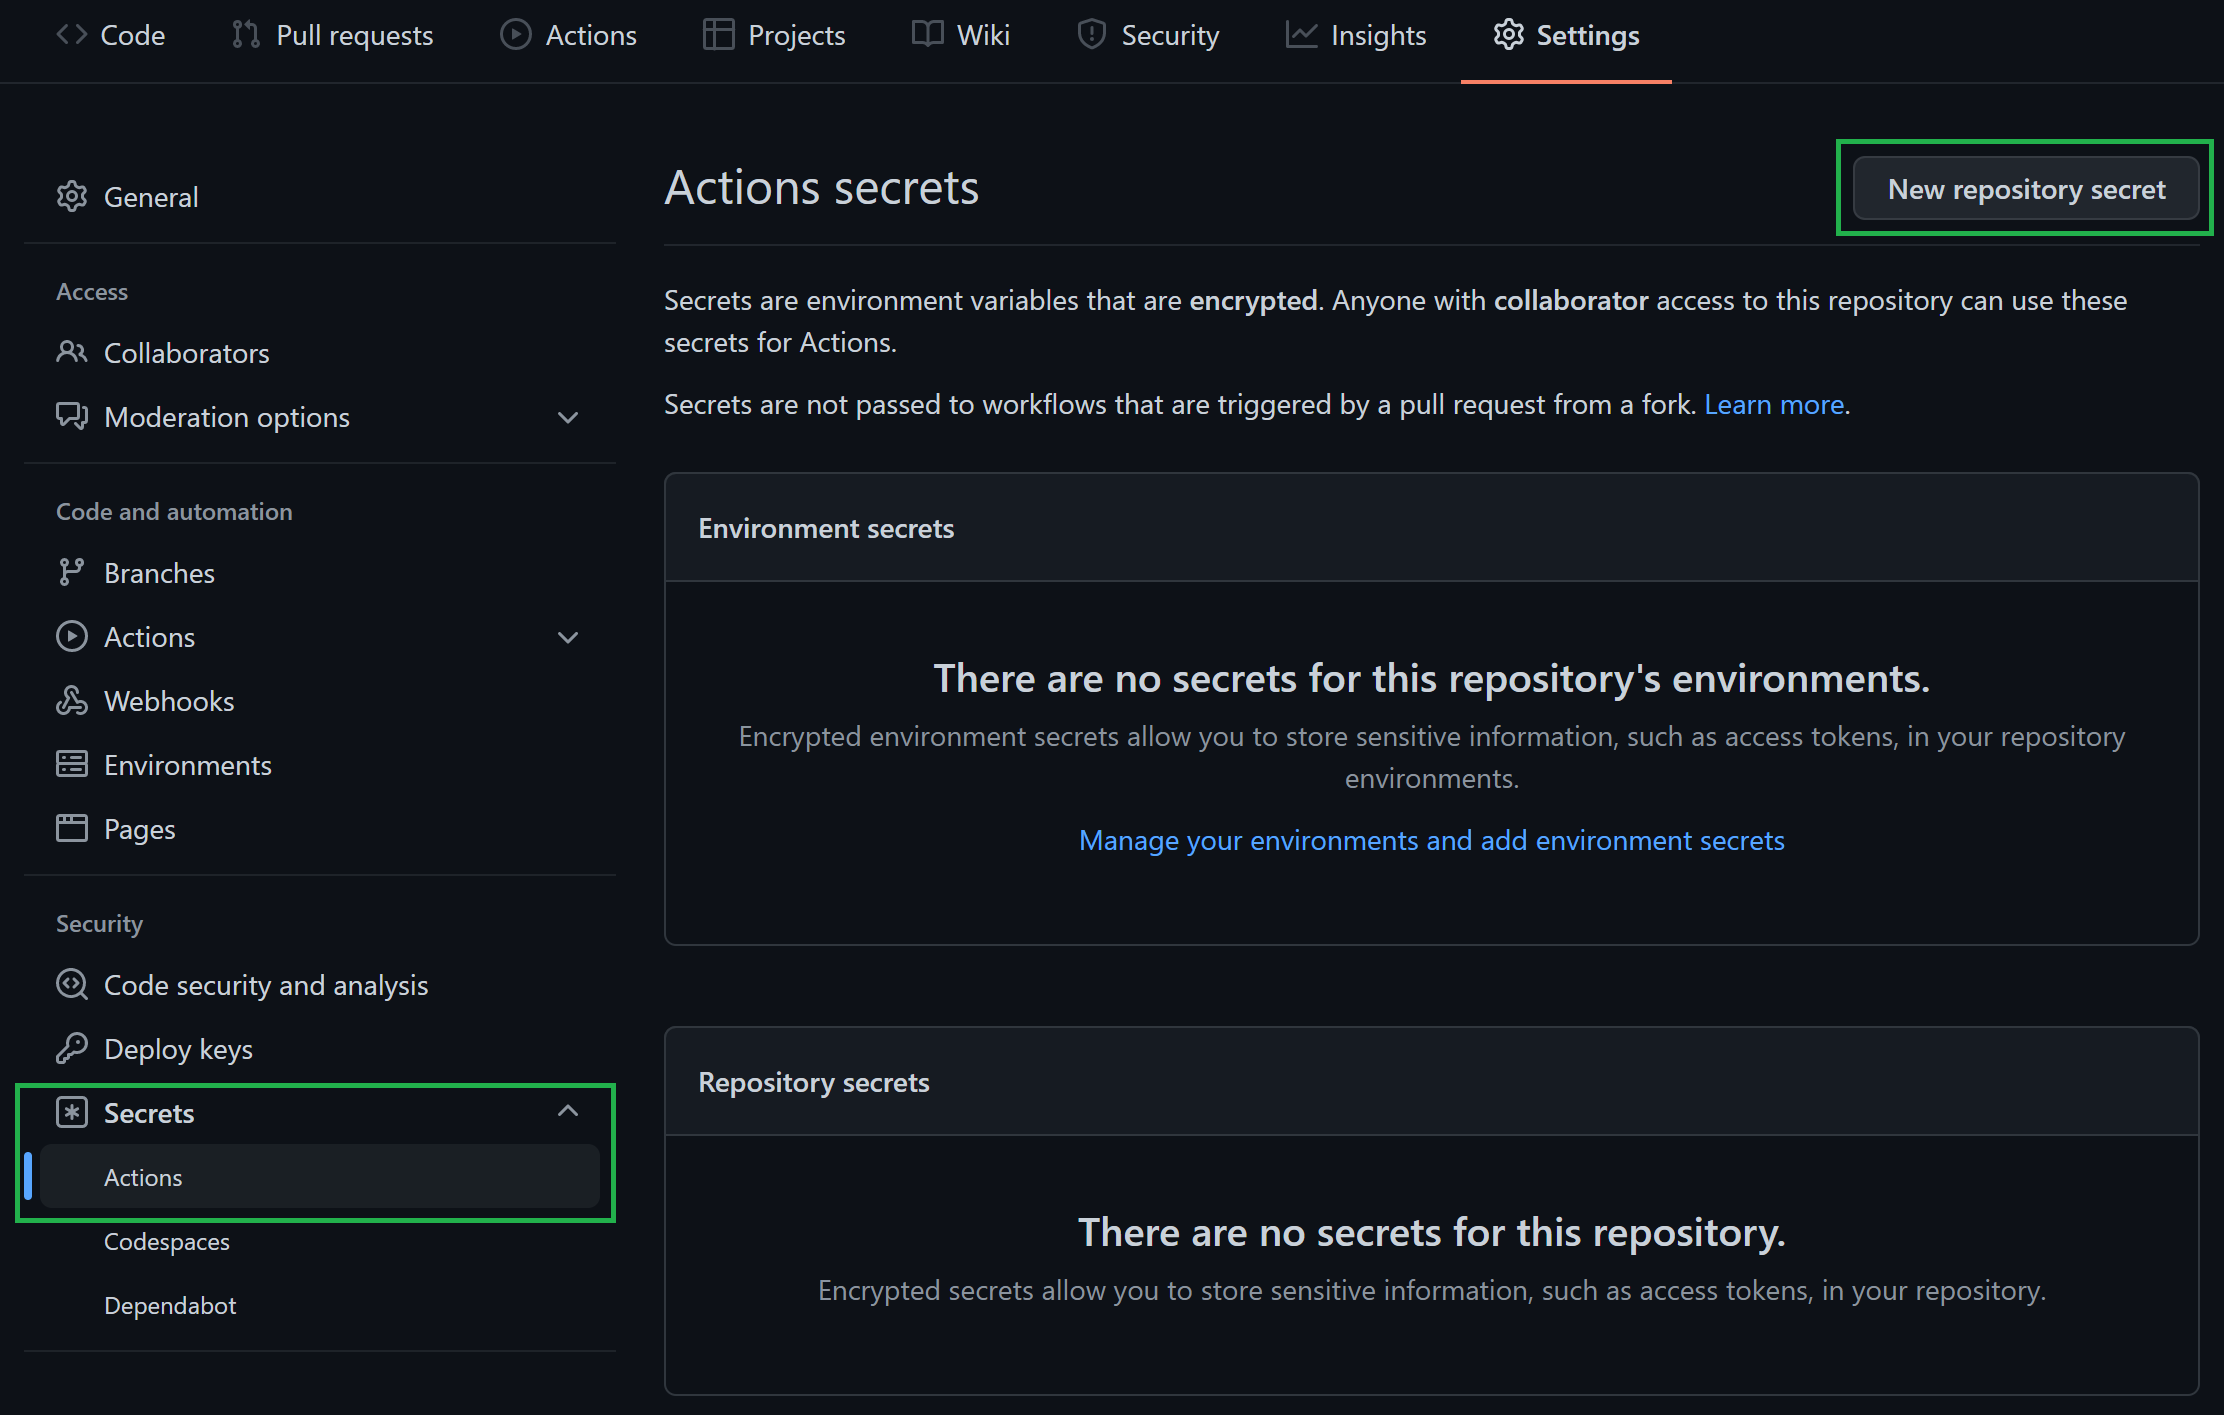

In the opening view, you can create a secret by providing a secret Name, a secret Value, followed by a click on the Add secret button.

3.1.2 Authentication secrets
In addition to shared repository secrets detailed above, additional GitHub secrets are required to allow the deploying identity to authenticate to Azure.
Expand and follow the option corresponding to the deployment identity setup chosen at Step 2 and use the information you gathered during that step.
➕ Option 1 [Recommended]: Authenticate via OIDC
Create the following environment secrets in the avm-validation GitHub environment created at Step 1
| Secret Name | Example | Description |
|---|
VALIDATE_CLIENT_ID | 44444444-4444-4444-4444-444444444444 | The login credentials of the deployment principal used to log into the target Azure environment to test in. The format is described here. |
VALIDATE_SUBSCRIPTION_ID | 22222222-2222-2222-2222-222222222222 | Same as the ARM_SUBSCRIPTION_ID repository secret set up above. The ID of the subscription to test-deploy modules in. Is needed for resources that are deployed to the subscription scope. |
VALIDATE_TENANT_ID | 33333333-3333-3333-3333-333333333333 | Same as the ARM_TENANT_ID repository secret set up above. The tenant ID of the Azure Active Directory tenant to test-deploy modules in. Is needed for resources that are deployed to the tenant scope. |
➕ How to: Add an environment secret to GitHub
Navigate to the repository’s Settings.


In the list of settings, select Environments. Click on the previously created avm-validation environment.
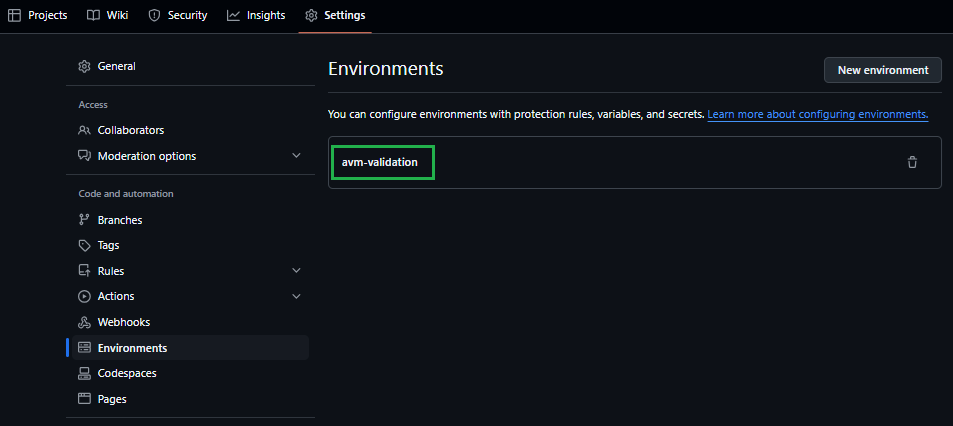

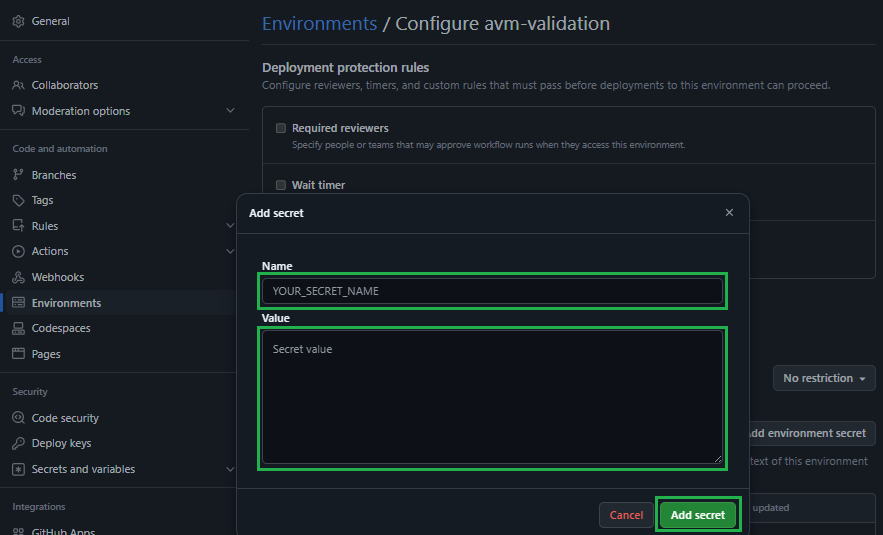
In the Environment secrets Section click on the Add environment secret button.


In the opening view, you can create a secret by providing a secret Name, a secret Value, followed by a click on the Add secret button.

➕ Option 2 [Deprecated]: Authenticate via Service Principal + Secret
Create the following environment repository secret:
| Secret Name | Example | Description |
|---|
AZURE_CREDENTIALS | {"clientId": "44444444-4444-4444-4444-444444444444", "clientSecret": "<placeholder>", "subscriptionId": "22222222-2222-2222-2222-222222222222", "tenantId": "33333333-3333-3333-3333-333333333333" } | The login credentials of the deployment principal used to log into the target Azure environment to test in. The format is described here. For more information, see the [Special case: AZURE_CREDENTIALS] note below. |
Special case: AZURE_CREDENTIALS
This secret represent the service connection to Azure, and its value is a compressed JSON object that must match the following format:
{"clientId": "<client_id>", "clientSecret": "<client_secret>", "subscriptionId": "<subscriptionId>", "tenantId": "<tenant_id>" }
Make sure you create this object as one continuous string as shown above - using the information you collected during Step 2. Failing to format the secret as above, causes GitHub to consider each line of the JSON object as a separate secret string. If you’re interested, you can find more information about this object here.
3.2. Enable actions
Finally, ‘GitHub Actions’ are disabled by default and hence, must be enabled first.
To do so, perform the following steps:
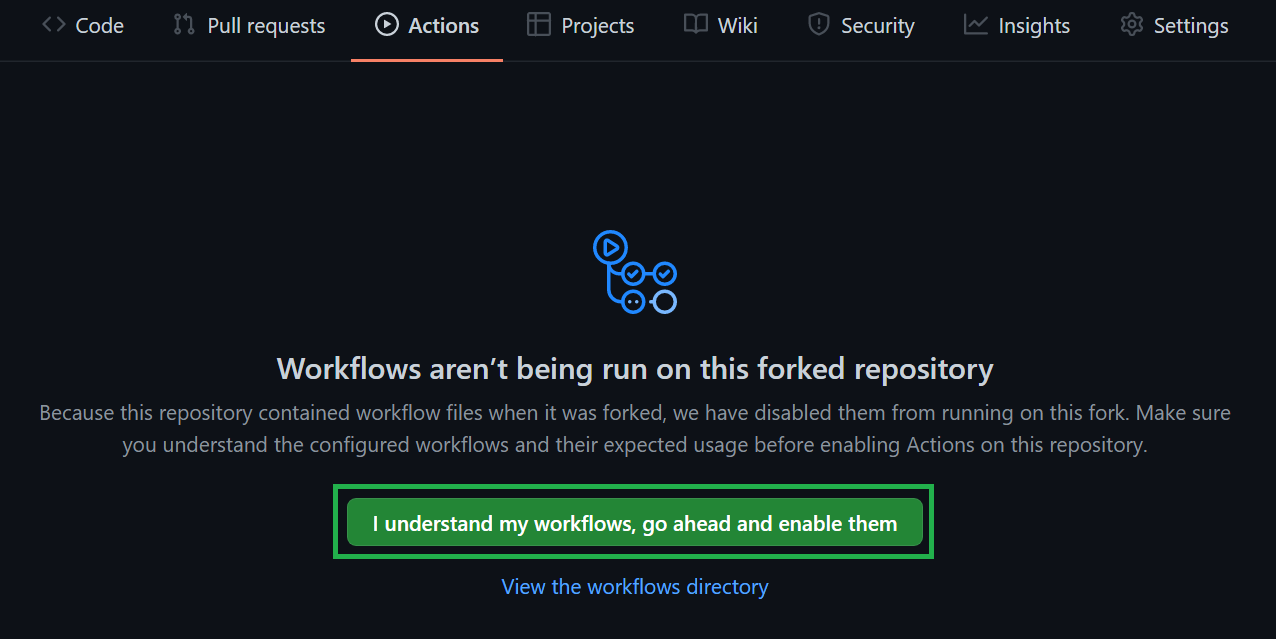
Navigate to the Actions tab on the top of the repository page.
Next, select ‘I understand my workflows, go ahead and enable them’.

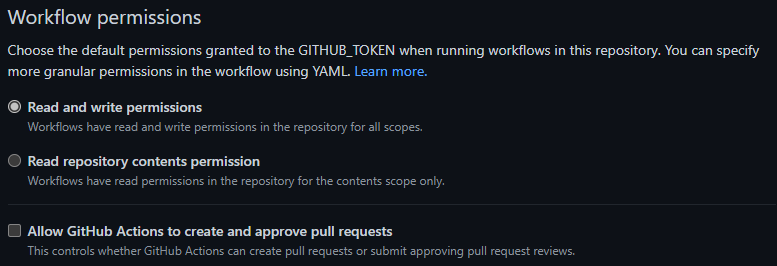
3.3. Set Read/Write Workflow permissions
To let the workflow engine publish their results into your repository, you have to enable the read / write access for the GitHub actions.
Navigate to the Settings tab on the top of your repository page.
Within the section Code and automation click on Actions and General
Make sure to enable Read and write permissions

Tip
Once you enabled the GitHub actions, your workflows will behave as they do in the upstream repository. This includes a scheduled trigger to continuously check that all modules are working and compliant with the latest tests. However, testing all modules can incur substantial costs with the target subscription. Therefore, we recommend disabling all workflows of modules you are not working on. To make this as easy as possible, we created a workflow that disables/enables workflows based on a selected toggle & naming pattern. For more information on how to use this workflow, please refer to the corresponding documentation.
4. Implement your contribution
To implement your contribution, we kindly ask you to first review the Bicep specifications and composition guidelines in particular to make sure your contribution complies with the repository’s design and principles.
If you’re working on a new module, we’d also ask you to create its corresponding workflow file. Each module has its own file, but only differs in very few details, such as its triggers and pipeline variables. As a result, you can either copy & update any other module workflow file (starting with 'avm.[res|ptn|utl].') or leverage the following template:
➕ Module workflow template
# >>> UPDATE to for example "avm.res.key-vault.vault" and remove this comment
name: "avm.[res|ptn|utl].[provider-namespace].[resource-type]"

on:
  workflow_dispatch:
    inputs:
      staticValidation:
        type: boolean
        description: "Execute static validation"
        required: false
        default: true
      deploymentValidation:
        type: boolean
        description: "Execute deployment validation"
        required: false
        default: true
      removeDeployment:
        type: boolean
        description: "Remove deployed module"
        required: false
        default: true
      customLocation:
        type: string
        description: "Default location overwrite (e.g., eastus)"
        required: false
  push:
    branches:
      - main
    paths:
      - ".github/actions/templates/avm-**"
      - ".github/workflows/avm.template.module.yml"
        # >>> UPDATE to for example ".github/workflows/avm.res.key-vault.vault.yml" and remove this comment
      - ".github/workflows/avm.[res|ptn|utl].[provider-namespace].[resource-type].yml"
        # >>> UPDATE to for example "avm/res/key-vault/vault/**" and remove this comment
      - "avm/[res|ptn|utl]/[provider-namespace]/[resource-type]/**"
      - "utilities/pipelines/**"
      - "!utilities/pipelines/platform/**"
      - "!*/**/README.md"

env:
  # >>> UPDATE to for example "avm/res/key-vault/vault" and remove this comment
  modulePath: "avm/[res|ptn|utl]/[provider-namespace]/[resource-type]"
  # >>> Update to for example ".github/workflows/avm.res.key-vault.vault.yml" and remove this comment
  workflowPath: ".github/workflows/avm.[res|ptn|utl].[provider-namespace].[resource-type].yml"

concurrency:
  group: ${{ github.workflow }}

jobs:
  ###########################
  #   Initialize pipeline   #
  ###########################
  job_initialize_pipeline:
    runs-on: ubuntu-latest
    name: "Initialize pipeline"
    if: ${{ !cancelled() && !(github.repository != 'Azure/bicep-registry-modules' && github.event_name != 'workflow_dispatch') }}
    steps:
      - name: "Checkout"
        uses: actions/checkout@v5
        with:
          fetch-depth: 0
      - name: "Set input parameters to output variables"
        id: get-workflow-param
        uses: ./.github/actions/templates/avm-getWorkflowInput
        with:
          workflowPath: "${{ env.workflowPath}}"
      - name: "Get module test file paths"
        id: get-module-test-file-paths
        uses: ./.github/actions/templates/avm-getModuleTestFiles
        with:
          modulePath: "${{ env.modulePath }}"
    outputs:
      workflowInput: ${{ steps.get-workflow-param.outputs.workflowInput }}
      moduleTestFilePaths: ${{ steps.get-module-test-file-paths.outputs.moduleTestFilePaths }}
      psRuleModuleTestFilePaths: ${{ steps.get-module-test-file-paths.outputs.psRuleModuleTestFilePaths }}
      modulePath: "${{ env.modulePath }}"

  ##############################
  #   Call reusable workflow   #
  ##############################
  call-workflow-passing-data:
    name: "Run"
    permissions:
      id-token: write # For OIDC
      contents: write # For release tags
    needs:
      - job_initialize_pipeline
    uses: ./.github/workflows/avm.template.module.yml
    with:
      workflowInput: "${{ needs.job_initialize_pipeline.outputs.workflowInput }}"
      moduleTestFilePaths: "${{ needs.job_initialize_pipeline.outputs.moduleTestFilePaths }}"
      psRuleModuleTestFilePaths: "${{ needs.job_initialize_pipeline.outputs.psRuleModuleTestFilePaths }}"
      modulePath: "${{ needs.job_initialize_pipeline.outputs.modulePath}}"
    secrets: inherit
Note
The workflow is configured to be triggered by any changes in the main branch of Upstream (i.e., Azure/bicep-registry-modules) that could affect the module or its validation. However, in a fork, the workflow is stopped immediately after being triggered due to the condition:
# Only run if not canceled and not in a fork, unless triggered by a workflow_dispatch event
if: ${{ !cancelled() && !(github.repository != 'Azure/bicep-registry-modules' && github.event_name != 'workflow_dispatch') }}
This condition prevents accidentally triggering a large amount of module workflows, e.g., when merging upstream changes into your fork.
In forks, workflow validation remains possible through explicit runs (that is, by using the workflow_dispatch event).
Tip
After any change to a module and before running tests, we highly recommend running the Set-AVMModule utility to update all module files that are auto-generated (e.g., the main.json & readme.md files).
5. Create/Update and run tests
Before opening a Pull Request to the Bicep Public Registry, ensure your module is ready for publishing, by validating that it meets all the Testing Specifications as per SNFR1, SNFR2, SNFR3, SNFR4, SNFR5, SNFR6, SNFR7.
For example, to meet SNFR2, ensure the updated module is deployable against a testing Azure subscription and compliant with the intended configuration.
Depending on the type of contribution you implemented (for example, a new resource module feature) we would kindly ask you to also update the e2e test run by the pipeline. For a new parameter this could mean to either add its usage to an existing test file, or to add an entirely new test as per BCPRMNFR1.
Once the contribution is implemented and the changes are pushed to your forked repository, we kindly ask you to validate your updates in your own cloud environment before requesting to merge them to the main repo. Test your code leveraging the forked AVM CI environment you configured before
Tip
In case your contribution involves changes to a module, you can also optionally leverage the Validate module locally utility to validate the updated module from your local host before validating it through its pipeline.
Creating end-to-end tests
As per BCPRMNFR1, a resource module must contain a minimum set of deployment test cases, while for pattern modules there is no restriction on the naming each deployment test must have.
In either case, you’re free to implement any additional, meaningful test that you see fit. Each test is implemented in its own test folder, containing at least a main.test.bicep and optionally any amount of extra deployment files that you may require (e.g., to deploy dependencies using a dependencies.bicep that you reference in the test template file).
To get started implementing your test in the main.test.bicep file, we recommend the following guidelines:
As per BCPNFR13, each main.test.bicep file should implement metadata to render the test more meaningful in the documentation
The main.test.bicep file should deploy any immediate dependencies (e.g., a resource group, if required) and invoke the module’s main template while providing all parameters for a given test scenario.
Parameters
Each file should define a parameter serviceShort. This parameter should be unique to this file (i.e, no two test files should share the same) as it is injected into all resource deployments, making them unique too and account for corresponding requirements.
As a reference you can create a identifier by combining a substring of the resource type and test scenario (e.g., in case of a Linux Virtual Machine Deployment: vmlin).
For the substring, we recommend to take the first character and subsequent ‘first’ character from the resource type identifier and combine them into one string. Following you can find a few examples for reference:
db-for-postgre-sql/flexible-server with a test folder default could be: dfpsfsdefstorage/storage-account with a test folder waf-aligned could be: ssawaf
💡 If the combination of the servicesShort with the rest of a resource name becomes too long, it may be necessary to bend the above recommendations and shorten the name.
This can especially happen when deploying resources such as Virtual Machines or Storage Accounts that only allow comparatively short names.
If the module deploys a resource-group-level resource, the template should further have a resourceGroupName parameter and subsequent resource deployment. As a reference for the default name you can use dep-<namePrefix><providerNamespace>.<resourceType>-${serviceShort}-rg.
Each file should also provide a location parameter that may default to the deployments default location
It is recommended to define all major resource names in the main.test.bicep file as it makes later maintenance easier. To implement this, make sure to pass all resource names to any referenced module (including any resource deployed in the dependencies.bicep).
Further, for any test file (including the dependencies.bicep file), the usage of variables should be reduced to the absolute minimum. In other words: You should only use variables if you must use them in more than one place. The idea is to keep the test files as simple as possible
References to dependencies should be implemented using resource references in combination with outputs. In other words: You should not hardcode any references into the module template’s deployment. Instead use references such as nestedDependencies.outputs.managedIdentityPrincipalId
Important
As per BCPNFR12 you must use the header module testDeployment '../.*main.bicep' = when invoking the module’s template.
Tip
Dependency file (dependencies.bicep) guidelines:
The dependencies.bicep should optionally be used if any additional dependencies must be deployed into a nested scope (e.g. into a deployed Resource Group).
Note that you can reuse many of the assets implemented in other modules. For example, there are many recurring implementations for Managed Identities, Key Vaults, Virtual Network deployments, etc.
A special case to point out is the implementation of Key Vaults that require purge protection (for example, for Customer Managed Keys). As this implies that we cannot fully clean up a test deployment, it is recommended to generate a new name for this resource upon each pipeline run using the output of the utcNow() function at the time.
Tip
Tip
📜 If your test case requires any value that you cannot / should not specify in the test file itself (e.g., tenant-specific object IDs or secrets), please refer to the Custom CI secrets feature.
Reusable assets
There are a number of additional scripts and utilities available here that may be of use to module owners/contributors. These contain both scripts and Bicep templates that you can re-use in your test files (e.g., to deploy standadized dependencies, or to generate keys using deployment scripts).
Example: Certificate creation script
If you need a Deployment Script to set additional non-template resources up (for example certificates/files, etc.), we recommend to store it as a file in the shared utilities/e2e-template-assets/scripts folder and load it using the template function loadTextContent() (for example: scriptContent: loadTextContent('../../../../../../utilities/e2e-template-assets/scripts/New-SSHKey.ps1')). This approach makes it easier to test & validate the logic and further allows reusing the same logic across multiple test cases.
Example: Diagnostic Settings dependencies
To test the numerous diagnostic settings targets (Log Analytics Workspace, Storage Account, Event Hub, etc.) the AVM core team have provided a dependencies .bicep file to help create all these pre-requisite targets that will be needed during test runs.
➕ Diagnostic Settings Dependencies - Bicep File
// ========== //
// Parameters //
// ========== //

@description('Required. The name of the storage account to create.')
@maxLength(24)
param storageAccountName string

@description('Required. The name of the log analytics workspace to create.')
param logAnalyticsWorkspaceName string

@description('Required. The name of the event hub namespace to create.')
param eventHubNamespaceName string

@description('Required. The name of the event hub to create inside the event hub namespace.')
param eventHubNamespaceEventHubName string

@description('Optional. The location to deploy resources to.')
param location string = resourceGroup().location

// ============ //
// Dependencies //
// ============ //

resource storageAccount 'Microsoft.Storage/storageAccounts@2021-08-01' = {
  name: storageAccountName
  location: location
  kind: 'StorageV2'
  sku: {
    name: 'Standard_LRS'
  }
  properties: {
    allowBlobPublicAccess: false
  }
}

resource logAnalyticsWorkspace 'Microsoft.OperationalInsights/workspaces@2021-12-01-preview' = {
  name: logAnalyticsWorkspaceName
  location: location
}

resource eventHubNamespace 'Microsoft.EventHub/namespaces@2021-11-01' = {
  name: eventHubNamespaceName
  location: location

  resource eventHub 'eventhubs@2021-11-01' = {
    name: eventHubNamespaceEventHubName
  }

  resource authorizationRule 'authorizationRules@2021-06-01-preview' = {
    name: 'RootManageSharedAccessKey'
    properties: {
      rights: [
        'Listen'
        'Manage'
        'Send'
      ]
    }
  }
}

// ======= //
// Outputs //
// ======= //

@description('The resource ID of the created Storage Account.')
output storageAccountResourceId string = storageAccount.id

@description('The resource ID of the created Log Analytics Workspace.')
output logAnalyticsWorkspaceResourceId string = logAnalyticsWorkspace.id

@description('The resource ID of the created Event Hub Namespace.')
output eventHubNamespaceResourceId string = eventHubNamespace.id

@description('The resource ID of the created Event Hub Namespace Authorization Rule.')
output eventHubAuthorizationRuleId string = eventHubNamespace::authorizationRule.id

@description('The name of the created Event Hub Namespace Event Hub.')
output eventHubNamespaceEventHubName string = eventHubNamespace::eventHub.name
6. Create a Pull Request to the Public Bicep Registry
Finally, once you are satisfied with your contribution and validated it, open a PR for the module owners or core team to review. Make sure you:
Provide a meaningful title in the form of feat: <module name> to align with the Semantic PR Check.
Provide a meaningful description.
Follow instructions you find in the PR template.
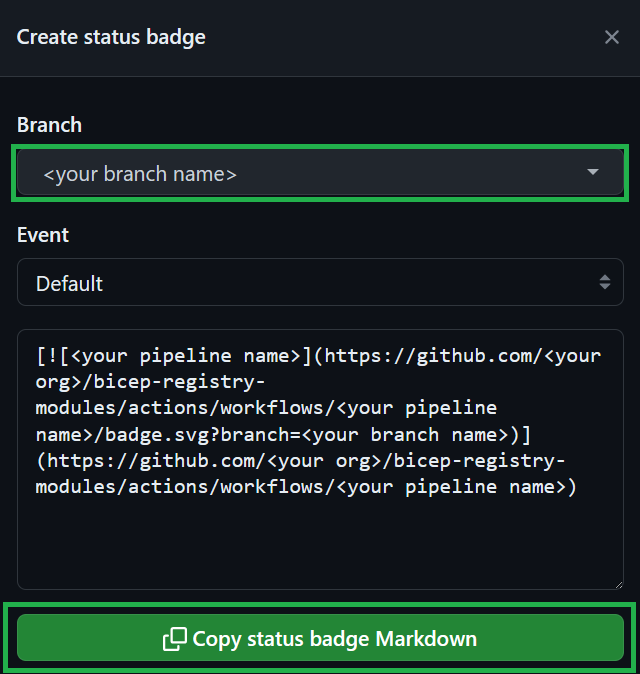
If applicable (i.e., a module is created/updated), please reference the badge status of your pipeline run. This badge will show the reviewer that the code changes were successfully validated & tested in your environment. To create a badge, first select the three dots (...) at the top right of the pipeline, and then chose the Create status badge option.


In the opening pop-up, you first need to select your branch and then click on the Copy status badge Markdown

Note
If you receive any comments for your pull request, please adhere to the following practices
- If it is a ‘suggestion’ that you agree with, you can directly commit it into your branch by selecting the ‘Apply suggestion’ button, auto-resolving the comment
- If it’s a regular comment that you agree with, please address its ask and leave a comment indicating the same. Do not resolve it yourself as this renders a re-review a lot harder for the reviewer.
Note
If you’re the sole owner of the module, the AVM core team must review and approve the PR. To indicate that your PR needs the core team’s attention, apply the Needs: Core Team 🧞 label on it!
7. Get your pull request approved
To publish a new module or a new version of an existing module, each Pull Request (PR) MUST be reviewed and approved before being merged and published in the Public Bicep Registry. A contributor (the submitter of the PR) cannot approve their own PR.
This behavior is assisted by policies, bots, through automatic assignment of the expected reviewer(s) and supporting labels.
Important
As part of the PR review process, the submitter (contributor) MUST address any comments raised by the reviewers and request a new review - and repeat this process until the PR is approved.
Once the PR is merged, the module owner MUST ensure that the related GitHub Actions workflow has successfully published the new version of the module.
7.1. Publishing a new module
When publishing a net new module for the first time ever, the PR MUST be reviewed and approved by a member of the core team.
7.2. Publishing a new version of an existing module
When publishing a new version of an existing module (i.e., anything that is not being published for the first time ever), the PR approval logic is the following:
| PR is submitted by a module owner | PR is submitted by anyone, other than the module owner |
| Module has a single module owner | AVM core team or in case of Terraform only, the owner of another module approves the PR | Module owner approves the PR |
| Module has multiple module owners | Another owner of the module (other than the submitter) approves the PR | One of the owners of the module approves the PR |
In case of Bicep modules, if the PR includes any changes outside of the “modules/” folder, it first needs the module related code changes need to be reviewed and approved as per the above table, and only then does the PR need to be approved by a member of the core team. This way the core team’s approval does not act as a bypass from the actual code review perspective.
Subsections of Contribution Flow
Child Module Publishing
Child resources are resources that exist only within the scope of another resource. For example, a virtual network subnet cannot exist without a virtual network. The subnet is a child resource of the virtual network.
In the context of AVM, particularly AVM Bicep resource modules, child modules are modules deploying child resources. They are implemented within the scope of their corresponding parent resource modules. For example, the module avm/res/network/virtual-network/subnet deploys a virtual network subnet and is a child module of its parent virtual network module avm/res/network/virtual-network.
By default, child modules are not published to the public bicep registry independently from their parents. They need to be explicitly enabled for publishing to be directly referenced from the registry.
This page covers step-by-step guidelines to publish a bicep child module.
Important
The child module publishing process is currently in a pilot/preview phase. This means it may not be as smooth as the general module publishing.
The core team is currently working on additional automation, with the goal of improving efficiency in addressing child module publishing requests.
Note
Child module publishing currently only applies to resource modules.
Supporting child module publishing for other module categories, such as pattern and utility modules, is not planned at this time.
Quick guide
Use this section for a fast overview on how to publish a child module.
For a step-by-step explanation with detailed instructions, refer to the following sections.
- Check prerequisites: Existing issue in AVM, telemetry ID prefix assigned in Bicep Module Index CSV, module registered in the MAR-file.
- Implement required changes in your fork:
- Allowed list: If not present, add child module to child-module-publish-allowed-list.json.
- Child module template: Add
enableTelemetry parameter and avmTelemetry deployment to child main.bicep template. - Parent module template: In the
main.bicep template of the child module direct parent, add a enableReferencedModulesTelemetry variable with a value of false, and pass it as the enableTelemetry value down to the child module deployment. - Version: Add the
version.json file to the child module folder and set version to 0.1. - Changelog: Add a new
CHANGELOG.md file to the child module folder and update the changelog of all its versioned parents with a new patch version, up to the top-level parent. - Set-AVMModule: Run the Set-AVMModule utility using the
-Recurse flag and the path to the top-level module, test your changes and raise a PR.
Prerequisites
Before jumping into the implementation, make sure the following prerequisites are in place:
Bicep Child Module Proposal issue
Ensure there is an AVM issue open already, proposing the child module to be published. If not, please create one using the Bicep Child Module Proposal issue template.
Note
Please understand the difference between publishing an existing child module and extending a parent module with a not yet implemented child module functionality.
The Bicep Child Module Proposal issue primarily intends to cover the former, i.e. to publish a child module already existing in the BRM (Bicep Registry Modules) repository source code. However, the same issue allows also to request the development of the child module functionality, although the best way to address new functionality is to raise a feature request via the the AVM Module issue.
Telemetry ID prefix assigned
Follow the below steps to check the child module telemetry ID prefix.
Note
If the Bicep Child Module Proposal issue was just created, please allow a few days for the telemetry ID prefix to be assigned before reaching out.
- Check the online Bicep resource module index source CSV file here.
- Search for the child module name in the
ModuleName field. - Verify if the corresponding value exists in the
TelemetryIdPrefix field. Note down the value as you will need it in the implementation phase. - If not found, please reach out to the core team, mentioning the
@Azure/avm-core-team-technical-bicep via the Bicep Child Module Proposal issue.
Module registered in the MAR-file
Ensure that the child module is registered in the MAR-file.
If not, please reach out to the core team, mentioning the @Azure/avm-core-team-technical-bicep via the Bicep Child Module Proposal issue.
Note
The MAR-file can only be accessed by Microsoft FTEs. If you are missing access, please reach out to the parent module owner for help.
Implementation
The quickest way to get the child module published is to enable it yourself, contributing via a pull request to the BRM repository.
Please follow the steps below:
- Make sure the child module name is listed in the publishing allowed list child-module-publish-allowed-list.json. If not, add it to the file, keeping an alphabetical order. This step is relevant until the process is in a pilot phase.
- Update the child module
main.bicep template to support telemetry, as per SFR4, SFR3 and BCPFR4- Add the
enableTelemetry parameter with a default value of true.@description('Optional. Enable/Disable usage telemetry for module.')
param enableTelemetry bool = true
- Add the
avmTelemetry deployment, referencing below template. Make sure to replace the <ReplaceWith-TelemetryIdPrefix> placeholder with the assigned telemetry ID prefix value that you noted down when checking prerequisites. #disable-next-line no-deployments-resources
resource avmTelemetry 'Microsoft.Resources/deployments@2025-04-01' = if (enableTelemetry) {
name: '<ReplaceWith-TelemetryIdPrefix>.${replace('-..--..-', '.', '-')}.${substring(uniqueString(deployment().name), 0, 4)}'
properties: {
mode: 'Incremental'
template: {
'$schema': 'https://schema.management.azure.com/schemas/2019-04-01/deploymentTemplate.json#'
contentVersion: '1.0.0.0'
resources: []
outputs: {
telemetry: {
type: 'String'
value: 'For more information, see https://aka.ms/avm/TelemetryInfo'
}
}
}
}
}
- Update the
main.bicep template of the child module direct parent, as per BCPFR7.- Add the
enableReferencedModulesTelemetry variable with a default value of false.var enableReferencedModulesTelemetry = false
- Pass the
enableReferencedModulesTelemetry variable as the enableTelemetry value down to the child module deployment.enableTelemetry: enableReferencedModulesTelemetry
- Add the
version.json file to the child module folder and set version to 0.1.{
"$schema": "https://aka.ms/bicep-registry-module-version-file-schema#",
"version": "0.1"
}
- Update Changelogs
- Add a new
CHANGELOG.md file to the child module folder, with the following sample content. Make sure to replace the <avm/res/path/to/child-module> placeholder with the name of the child module.# Changelog
The latest version of the changelog can be found [here](https://github.com/Azure/bicep-registry-modules/blob/main/<avm/res/path/to/child-module>/CHANGELOG.md).
## 0.1.0
### Changes
- Initial version
### Breaking Changes
- None
- Update the changelog of all the child module’s versioned parents with a new patch version, up to the top-level parent. Refer below for an example content section:
  ## <CurrentMajor>.<CurrentMinor>.<CurrentPatch+1>

  ### Changes

  - Enabling child module `<avm/res/path/to/child-module>` for publishing (added telemetry option)

  ### Breaking Changes

  - None
- As per the default pull request process, run the Set-AVMModule utility using the
-Recurse flag and top-level parent’s folder path. Then test your changes locally and/or via the top-level module pipeline, raise a PR and attach a status badge proving successful validation.
Tip
Reference This pull request as an example for proposing a child module for publishing.
Custom CI Secrets
When working on a module, and more specifically its e2e deployment validation test cases, it may be necessary to leverage tenant-specific information such as:
- Entra-ID-provided Enterprise Application object ids (e.g., Backup Management Service, Azure Databricks, etc.)
- (sensitive) principal credentials (e.g., a custom service principal’s application id and secret)
The challenge with the former is that the value would be different from the contributor’s test tenant compared to the Upstream AVM one. This requires the contributor to temporarily change the value to their own tenant’s value during the contribution’s creation & testing, and for the reviewer to make sure the value is changed back before merging a PR in.
The challenge with the later is more critical as it would require the contributor to store sensitive information in source control and as such publish it.
To mitigate this challenge, the AVM CI provides you with the feature to store any such information in a custom Azure Key Vault and automatically pass it into your test cases in a dynamic & secure way.
Important
Since all modules must pass the tests in the AVM environment, it is important that you inform the maintainers when you add a new custom secret. The same secret must then also be set up in the upstream environment before the pull request is merged.
To make this matter not too complicated, we would like to ask you to emphasize this requirement in the description of your PR, for example by adding a text similar to:
- [ ] @avm-core-team-technical-bicep TODO: Add custom secret 'mySecret' to AVM CI
Example use case
Let’s assume you need a tenant-specific value like the object id of Azure’s Backup Management Service Enterprise Application for one of your tests. As you want to avoid hardcoding and consequently changing its value each time you want to contribute from your Fork to the main AVM repository, you want to instead have it be automatically pulled into your test cases.
To do so, you create a new parameter in your test case’s main.test.bicep file that you call, for example,
@secure()
param backupManagementServiceEnterpriseApplicationObjectId string = ''
assuming that it would be provided with the correct value by the AVM CI. You consequently reference it in your test case as you would with any other Bicep parameter.
Next, you create a new secret of the same name with a prefix CI- in a previously created Azure Key Vault of your test subscription (e.g., CI-backupManagementServiceEnterpriseApplicationObjectId). Its value would be the object id the Enterprise Application has in the tenant of your test subscription.
Assuming that also the CI_KEY_VAULT_NAME GitHub Repository variable is configured correctly, you can now run your test pipeline and observe how the CI automatically pulls the secret and passes it into your test cases, IF, they have a parameter with a matching name.
Setup
Pre-Requisites
To use this feature, there are really only three prerequisites:
- Create an Azure Key Vault in your test subscription
- Grant the principal you use for testing in the CI at least `Key Vault Secrets User’ permissions on that Key Vault to enable it to pull secrets from it
- Configure the name of that Key Vault as a ‘Repository variable’
CI_KEY_VAULT_NAME in your Fork.
The above will enable the CI to identify your Key Vault, look for matching secrets in it, and pull their values as needed.


Configuring a secret
Building upon the prerequisites you only have to implement two actions per value to dynamically populate them during deployment validation:
- Create a
@secure() parameter in your test file (main.test.bicep) that you want to populate and use it as you see fit.
For example:
@description('Required. My parameter\'s description. This value is tenant-specific and must be stored in the CI Key Vault in a secret named \'CI-MySecret\'.')
@secure()
param mySecret string = ''
Important
It is mandatory to declare the parameter as secure() as Key Vault secrets will be pulled and passed into the deployment as SecureString values.
Also, it must have an empty default to be compatible with the PSRule scans that require a value for all parameters.
- Configure a secret of the same name, but with a
CI- prefix and corresponding value in the Azure Key Vault you set up as per the prerequisites.


How it works
Assuming you completed both the prerequisites & setup steps and triggered your module’s workflow, the CI will perform the following actions:
- When approaching the deployment validation steps, the workflow will lookup the
CI_KEY_VAULT_NAME repository variable - If it has a value, it will subsequently pull all available secret references (not their values!) from that Key Vault, filtered down to only the secrets that match the
CI- prefix - It will then loop through these secret references and check if any match a parameter in the targeted
test.main.bicep of the same name, but without the CI- prefix - Only for a match, the workflow with then pull the secret from the Key Vault and pass its value as a
SecureString as a parameter into the template deployment.
When reviewing the log during or after a run, you can see each matching and pulled secret is/was added as part of the AdditionalParameters object as seen in the following:
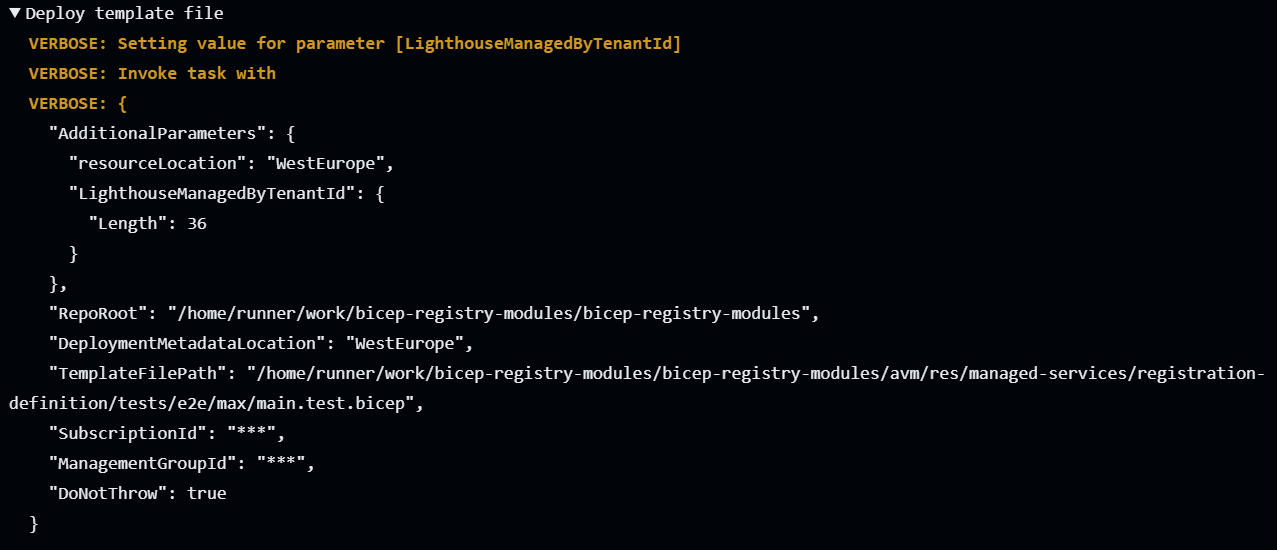

Background: Why not simply use GitHub secrets?
When reviewing the above, you may wonder why an Azure Key Vault was used as opposed to simple GitHub secrets.
While the simplicity of GitHub secrets would be preferred, it unfortunately turned out that they would not provide us with the level of flexibility we need for our purposes.
Most notably, GitHub secrets are not automatically available in referenced GitHub actions. Instead, you have to declare every secret you want to use explicitly in the workflow’s template, requiring the contributor to update both the module’s workflow template as well as test files each time a new value would be added.
This characteristic is not only unfortunate for our use case, but is also a lot more likely to lead to mistakes.
Further, with the use of OIDC via Managed Identities, the hurdle to bootstrap & populate an Azure Key Vault is significantly lowered.
Enable or Disable Workflows
When forking the BRM repository, all workflows from the CI environment are also part of your fork. In an earlier step it was explained, how to set them up correctly, to verify your module development.
Due to the trigger mechanism of the workflows, eventually all of them run at some point in time, creating and deleting resources on Azure in your environment. That will also happen for modules, you are not working on. This will create costs in your own subscription and it can also create a queue for workflow runs, due to the lack of enough free agents.
To limit those workflow runs, you can manually disable each pipeline you do not want to run. As this is a time consuming task, there is script in the BRM repository, to disable (or enable) pipelines in a batch process, that can also be run via a workflow. You can also use RegEx to specify which pipelines should be included and which should be excluded.
Location
You can find the script under utilities/pipelines/platform/Switch-WorkflowState.ps1)
You can find the workflow under .github/workflows/platform.toggle-avm-workflows.yml
How it works
Browse to Actions and select the workflow from the list
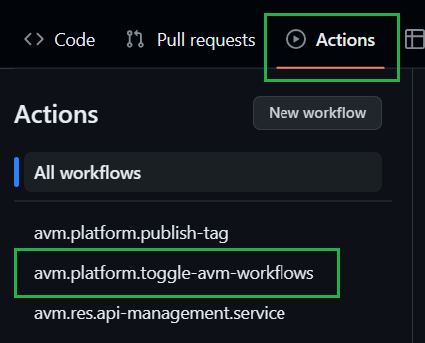

Run the workflow platform.toggle-avm-workflows and set the following settings:
Enable or disable workflows to enable or disable workflowsRegEx which workflows are included include a specific set of workflows, using a RegEx.RegEx which workflows are excluded exclude a specific set of workflows, using a RegEx.
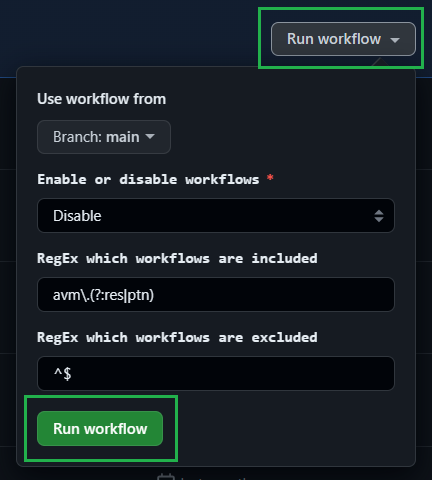

Typical use cases
Disable all but one workflow
Enable or disable workflows to DisableRegEx which workflows are included to avm\.(?:res|ptn|utl) (this is the default setting)RegEx which workflows are excluded to avm.res.compute.virtual-machine (use the name of your own workflow. This example uses the workflow for virtual machine)
Disable all but multiple workflows
Enable or disable workflows to DisableRegEx which workflows are included to avm\.(?:res|ptn|utl) (this is the default setting)RegEx which workflows are excluded to (?:avm.res.compute.virtual-machine|avm.res.compute.image|avm.res.compute.disk) (use the names of your own workflows. This example uses the workflows for virtual machine, image, and disk)
Enable all workflows
Enable or disable workflows to EnableRegEx which workflows are included to avm\.(?:res|ptn|utl) (this is the default setting)RegEx which workflows are excluded to ^$ (this is the default setting)
Limitations
Please keep in mind, that the workflow run disables all workflows that match the RegEx at that point in time. If you sync your fork with the original repository and new workflows are there, they will be synced to your repository and will be enabled by default. So you will need to run the workflow to disable the new ones again after the sync.
Important
The workflow can only be triggered in forks.
Owner Contribution Flow
This section describes the contribution flow for module owners who are responsible for creating and maintaining Bicep Modules.
Important
This contribution flow is for Module Owners only.
As a Bicep Module Owner you need to be aware of the AVM Contribution Process Overview, Bicep specifications (including Bicep Interfaces) as these need to be followed during pull request reviews for the modules you own. The purpose of this Owner Contribution Flow is to simplify and list the most important activities of an owner and to help you understand your responsibilities as an owner.
Note
Additional internal content for ongoing module maintenance available for Microsoft FTEs, here.
1. Owner Activities and Responsibilities
Familiarise yourself with the responsibilities as Module Owner outlined in Team Definitions & RACI and Module Owner Responsibilities in the BRM Issue Triage.
Create a GitHub team as outlined in SNFR20 and add it to the respective parent team:
Naming convention:
avm-res-<RP>-<modulename>-module-owners-bicep
Example:
avm-res-compute-virtualmachine-module-owners-bicep and added avm-technical-reviewers-bicep as parent.
If a secondary or any additional owner is required, add them to the avm-res-<RP>-<modulename>-module-owners-bicep team.
Only fulltime Microsoft employees can be added at this time.
Info
Once the team have been created the AVM Core Team will review the team name and parent team membership for accuracy. A notification will automatically be sent to the AVM Core Team to inform them that their review needs to be completed.
Add the -owners- team to CODEOWNERS file as outlined in SNFR20.
Ensure your module has been tested before raising a PR. You can do this your own or in another module contributor’s environment - if any. Also, once a PR is raised, a GitHub workflow pipeline is required to be run successfully before the PR can be merged. This is to ensure that the module is working as expected and is compliant with the AVM specifications.
Note
If you’re the sole owner of the module, the AVM core team must review and approve the PR. To indicate that your PR needs the core team’s attention, apply the Needs: Core Team 🧞 label on it!
Ensure that the module(s) you own are compliant with the AVM Bicep specifications and are working as expected.
Watch Pull Request (PR) activity for your module(s) in the BRM repository (Bicep Registry Modules repository - where all Bicep AVM modules are published) and ensure that PRs are reviewed and merged in a timely manner as outlined in SNFR11.
Watch AVM module issue and AVM question/feedback activity for your module(s) in the BRM repository.
2. Module Handover Activities
Under certain circumstances, you may find yourself unable to continue as the module owner. In such cases, it is advisable to designate a new module owner. The following steps outline this transition:
- Leave a comment on the original module proposal, indicating that you’d like to hand the ownership over to somebody else. Mention the person who originally helped triage the issue or the
@Azure/avm-core-team-technical-bicep team. You must wait for someone from the AVM Core Team to respond first, as the module index must be updated before you can continue handing over the ownership. - Add the new owner’s GitHub account as a “maintainer” on your modules GitHub team.
- Remove your GitHub account from your module’s GitHub team.
If a new module owner cannot be identified then the module will need to be “Orphaned”. Please follow the step outlined when-a-module-becomes-orphaned.
3. Adopting an Orphaned Module
When adopting an orphaned module the when-a-new-owner-is-identified steps must be followed.
4. GitHub Notification Settings
As a module owner, it’s important that you receive notifications when any of your AVM modules experience activity or when you or any groups you belong to are explicitly mentioned (using the @ operator). This document describes how to configure your GitHub and Email settings to ensure you receive email notifications for these types of scenarios within GitHub.
Enable Global GitHub Notifications
Visit the GitHub Notifications Settings Page while logged in with your GitHub account.
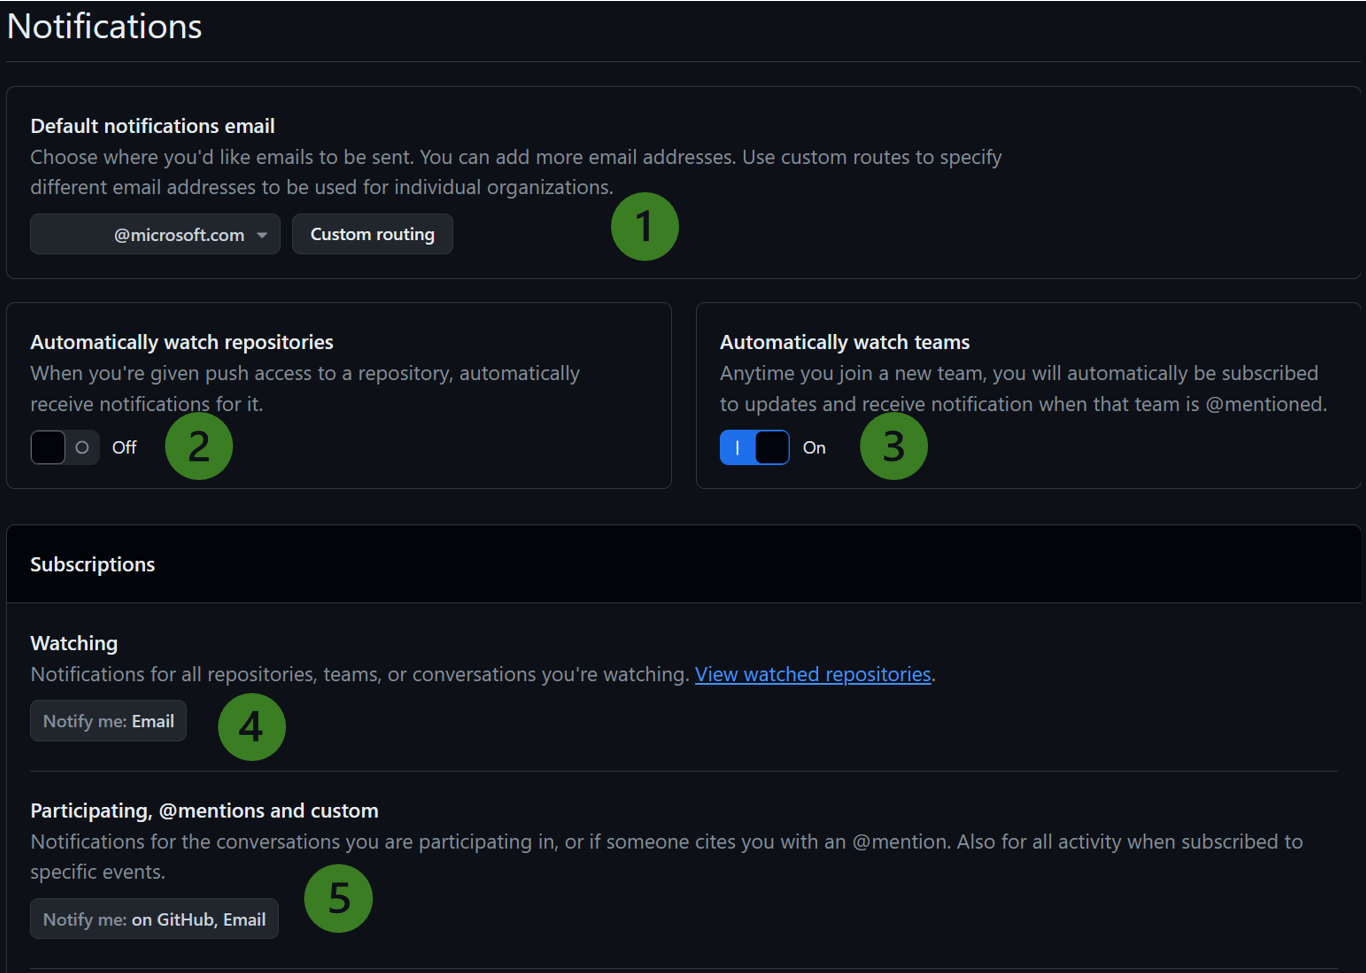

- Ensure your Default Notifications Email address is set to the email address you intend to use.
- (Optional) If you would like to automatically watch repositories that you are active in, ensure Automatically watch repositories is set to “On.”
- (Required) If you would like to automatically subscribe to team-level notifications whenever you join a new team, ensure Automatically watch teams is set to “On.”
- (Required) To receive notifications whenever a change is made to a repository or conversation that you are Watching, ensure the Notify Me setting has at least Email enabled.
- (Required)To receive notifications whenever you or a group you belong to are @mentioned, ensure the Notify Me setting has at least Email enabled.
Watch a Repository
Optionally, you may consider “watching” (following most or all activities in) an entire repository. The primary repository that owners should watch is the Bicep-Registry-Modules (BRM) repository. Notifications from this repository will notify you of issues concerning your module and any direct or team @mentions. It is important that you read and react to these messages.
To watch the BRM repository, visit Bicep-Registry-Modules, click the Watch button in the top-right of the page, then select Participating and @mentions. Optionally, if you would like to be notified for all activity within the repository, you can select All Activity.
Note
Enabling All Activity will result in a lot of notifications! If you choose to go this route, you should set up filters within your email client. See Configure Email Inbox Notification Filters.
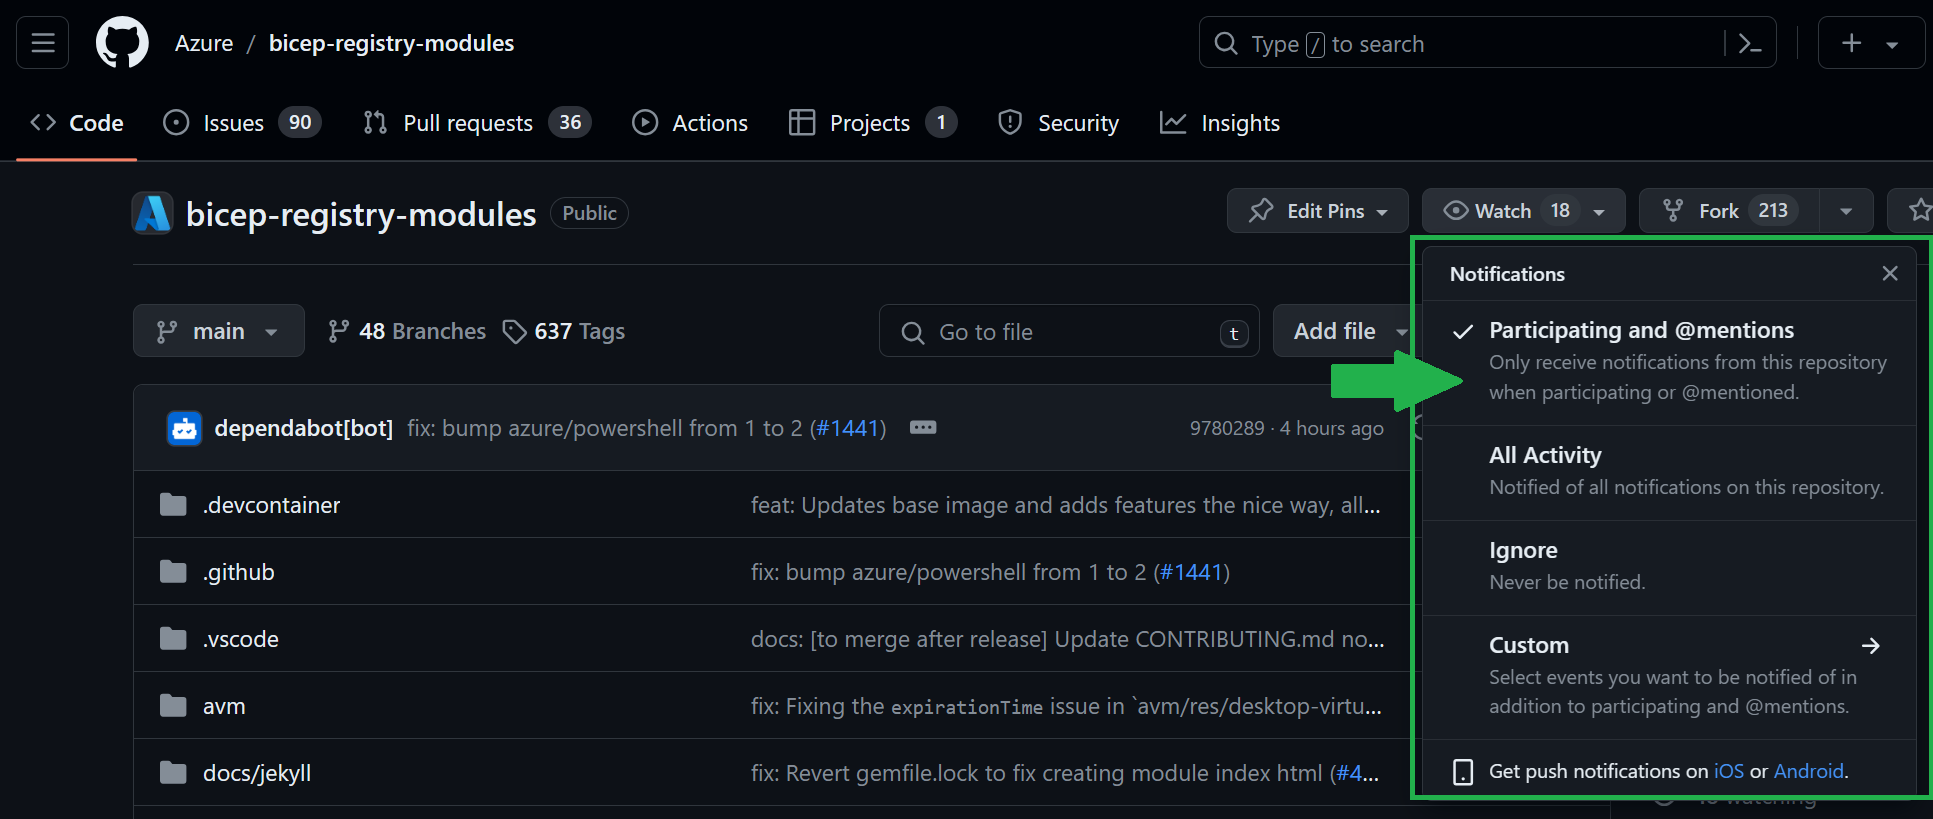

GitHub uses a unique email address sender for each type of notification it sends. This allows us to set up filters within our email client to sort our inboxes depending on the type of notifications that was sent. The table below lists all of the relevant email addresses that may be useful for filtering notifications from GitHub.
Info
GitHub will use the following email addresses to Cc you if you’re subscribed to a conversation. The second Cc email address matches the notification reason.
For a full list of GitHub notification types, see Filtering Email Notifications.
5. Contribution Checklist
This checklist can be used in the development of AVM Bicep Modules.
Before beginning any work a new module a valid Issue: New AVM Module Proposal needs to be created. Instructions for creating the module proposal are outlined in the issue template. Pay particular attention to the questions and associated links to fill out the proposal accurately. Please do not start work on your proposed module until you receive a notification that your proposal has been accepted.
Fork the bicep-registry-modules BRM repository. If you use an existing fork, ensure it’s up to date with origin/BRM.
- Ensure all workflows are disabled by default once you forked the BRM repo, to prevent any accidental deployments into your Azure test environment resulted by an automated deployment.
Create a new branch from your forked repository to develop your module.
If you’re working on a new module you have to create its corresponding workflow file (see here).
- In order to run your e2e tests in your fork, this workflow file has to be put into the
main branch first, so it can be run against your feature branch (GitHub Workflows can only be run on feature branches when they are already present in the main branch). - Since all workflows are disabled by default you have to enable your module’s specific GitHub workflow to run your e2e tests.
Implement your contribution.
Create, update, and run tests.
- In addition to testing your module via GitHub pipeline, you can also test-locally. The following helper script facilitates local testing.
➕ Local Test Helper Script
# Start pwsh if not started yet

pwsh

# Set default directory
$folder = "<your directory>/bicep-registry-modules"

# Dot source functions

. $folder/utilities/tools/Set-AVMModule.ps1
. $folder/utilities/tools/Test-ModuleLocally.ps1

# Variables

$modules = @(
    # "service-fabric/cluster", # Replace with your module
    "network/private-endpoint"  # Replace with your module
)

# Generate Readme

foreach ($module in $modules) {
    Write-Output "Generating ReadMe for module $module"
    Set-AVMModule -ModuleFolderPath "$folder/avm/res/$module" -Recurse

    # Set up test settings

    $testcases = "waf-aligned", "max", "defaults"

    $TestModuleLocallyInput = @{
        TemplateFilePath           = "$folder/avm/res/$module/main.bicep"
        ModuleTestFilePath         = "$folder/avm/res/$module/tests/e2e/max/main.test.bicep"
        PesterTest                 = $true
        ValidationTest             = $false
        DeploymentTest             = $false
        ValidateOrDeployParameters = @{
            Location         = '<your location>'
            SubscriptionId   = '<your subscriptionId>'
            RemoveDeployment = $true
        }
        AdditionalTokens           = @{
            namePrefix = '<your prefix>'
            TenantId   = '<your tenantId>'
        }
    }

    # Run tests

    foreach ($testcase in $testcases) {
        Write-Output "Running test case $testcase on module $module"
        $TestModuleLocallyInput.ModuleTestFilePath = "$folder/avm/res/$module/tests/e2e/$testcase/main.test.bicep"
        Test-ModuleLocally @TestModuleLocallyInput
    }
}
Create a PR and reference the status badge of your pipeline run - see here.
Note
If you’re the sole owner of the module, the AVM core team must review and approve the PR. To indicate that your PR needs the core team’s attention, apply the Needs: Core Team 🧞 label on it!
After a pull request has been created, it is important to update the AVM module proposal issue associated with your module, with a link to the pull request you created in BRM and mention the person who helped triage your module or the @Azure/avm-core-team-technical-bicep team.
Once your BRM pull request has been approved and merged into main update the AVM module proposal issue associated with your module, with a Merged comment and mention the person who helped triage your module, or the @Azure/avm-core-team-technical-bicep team.
Generate Bicep Module Files
As per the module design structure (BCPNFR23), every module in the AVM library requires
- a up-to-date ReadMe markdown (
readme.md) file documenting the set of deployable resource types, input and output parameters and a set of relevant template references from the official Azure Resource Reference documentation - an up-to-date compiled template (
main.json) file
The Set-AVMModule utility aims to simplify contributing to the AVM library, as it supports
- idempotently generating the AVM folder structure for a module (including any child resource)
- generating the module’s ReadMe file from scratch or updating it
- compiling/building the module template
To ease maintenance, you can run the utility with a Recurse flag from the root of your folder to update all files automatically.
Location
You can find the script under utilities/tools/Set-AVMModule.ps1
How it works
Using the provided template path, the script
- validates the module’s folder structure
- To do so, it searches for any required folder path / file missing and adds them. For several files, it will also provide some default content to get you started. The sources files for this action can be found here
- compiles its bicep template
- updates the readme (recursively, specified)
- If the intended readMe file does not yet exist in the expected path, it is generated with a skeleton (with e.g., a generated header name)
- The script then goes through all sections defined as
SectionsToRefresh (by default all) and refreshes the sections’ content (for example, for the Parameters) based on the values in the ARM/JSON Template. It detects sections by their header and always regenerates the full section. - Once all are refreshed, the current ReadMe file is overwritten. Note: The script can be invoked combining the
WhatIf and Verbose switches to just receive an console-output of the updated content.
How to use it
For details on how to use the function, please refer to the script’s local documentation.
Note
The script must be loaded (’dot-sourced’) before the function can be invoked.
. 'C:/dev/Set-AVMModule.ps1'
Set-AVMModule (...)
Tip
For modules that require the generation of files on multiple-levels (for example, a module with child modules such as the ‘Key Vault’ module with its ‘Secret’ child module) it is highly recommended to make use of the -Recurse parameter.
This parameter will ensure that the script not only generates the files for the provided module folder path, but also all its nested module folder paths.
Tip
While readme files are always generated from scratch, you can add custom content is specific places that the script will preserve:
- The module’s description in the
main.bicep file’s metadata - The description of parameters & outputs
- A section with the header
## Notes
If the utility finds a section with the heading ## Notes, it temporarily saves this content when it regenerates the readme file and then re-inserts (i.e. appends) the section towards the end of the readme file. This section may contain images, which must be stored in a subfolder /src in the root directory of the module.
Both for the text & images, please make sure to only add what provides tangible value as the content must be manually maintained and should not run stale. Further, for images, please make sure to only store them with an appropriate resolution & size to keep their impact on the repository’s size manageable.
Validate Module Locally
Use this script to test a module from your PC locally, without a CI environment. You can use it to run only the static validation (Pester tests), a deployment validation (dryRun) or an actual deployment to Azure. In the latter cases the script also takes care to replace placeholder tokens in the used module test & template files for you.
Location
You can find the script under utilities/tools/Test-ModuleLocally.ps1
How it works
If the switch for Pester tests (-PesterTest) is provided the script will
- Invoke the module test for the provided template file path and run all tests for it.
If the switch for either the validation test (-ValidationTest) or deployment test (-DeploymentTest) is provided alongside a HashTable for the token replacement (-ValidateOrDeployParameters), the script will
- Either fetch all module test files of the module’s
tests folder (default) or you can specify a single module test file by leveraging the -ModuleTestFilePath parameter instead. - Create a dictionary to replace all tokens in these module test files with actual values. This dictionary will consist
- of the subscriptionID & managementGroupID of the provided
ValidateOrDeployParameters object, - add all key-value pairs of the
-AdditionalTokens object to it, - and optionally also add all key-value pairs specified in the
settings.yml, under the ’local tokens settings'.
- If the
-ValidationTest parameter was set, it runs a deployment validation using the Test-TemplateDeployment script. - If the
-DeploymentTest parameter was set, it runs a deployment using the New-TemplateDeployment script (with no retries). - As a final step, it rolls the module test files back to their original state if either the
-ValidationTest or -DeploymentTest parameters were provided.
How to use it
For details on how to use the function, please refer to the script’s local documentation.
Note
The script must be loaded (’dot-sourced’) before the function can be invoked.
. 'C:/dev/Test-ModuleLocally.ps1'
Test-ModuleLocally (...)
Important
Important: As the script emulates the testing logic of the CI environment, also tokens such as #_namePrefix_# are replaced by the script. However, in addition to the CI environment, it also reverses the token replacement to recover the files’ original state. As such, ensure that you use a namePrefix value that is unlikely to overlap with any string value in module folder you want to test.
For example, do not use avm, as the reverse token replacement would incorrectly replace the deployment name avmTelemetry found in each module to #_namePrefix_#Telemetry.


