Netflix Eureka on App Service
Netflix Eureka is a REST based middleware designed for discovery and load balancing of web applications. For those who already have a Netflix Eureka app, this article explains the configurations required to get a Netflix Eureka based app running correctly in App Service. For readers starting from scratch, we have prepared a demo project with a working example of Netflix Eureka based services working together on Azure App Service.
Configure Netflix Eureka for App Service
In Azure, there are several configurations that must be performed on Eureka clients to get them working correctly in App Service. These settings can be included in an application.yml file, application.properties file, or as arguments to the JVM in the JAVA_OPTS app setting.
Note: These configurations are for Windows Web Apps. For configuration on Linux, see Linux Configuration
Example configuration files
If you are using .properties files, the required configurations are below.
spring.application.name=example-client
eureka.client.serviceUrl.defaultZone=https://example-server.azurewebsites.com:443/eureka
eureka.instance.hostname=example-client.azurewebsites.com
eureka.instance.secure-port-enabled=true
eureka.instance.nonsecure-port-enabled=false
eureka.instance.nonSecurePort=80
eureka.instance.securePort=443
management.server.port=${server.port}
eureka.instance.instanceId=${eureka.instance.hostname}:${spring.application.name}:443
eureka.instance.statusPageUrl=https://${eureka.hostname}:443/actuator/info
eureka.instance.healthCheckUrl=https://${eureka.hostname}:443/actuator/health
eureka.instance.secureHealthCheckUrl=https://${eureka.hostname}:443/actuator/health
Here are the same configurations for YAML users.
spring:
  application:
    name: example-server
management:
  server:
    port: ${server.port}
eureka:
  client:
    serviceUrl:
      defaultZone: https://example-server.azurewebsites.com:443/eureka
eureka:
  instance:
    hostname: example-client.azurewebsites.com
    secure-port-enabled: true
    nonsecure-port-enabled: false
    nonSecurePort: 80
    securePort: 443
    instanceId: ${eureka.instance.hostname}:${spring.application.name}:443
    statusPageUrl: https://${eureka.hostname}:443/actuator/info
    healthCheckUrl: https://${eureka.hostname}:443/actuator/health
    secureHealthCheckUrl: https://${eureka.hostname}:443/actuator/health
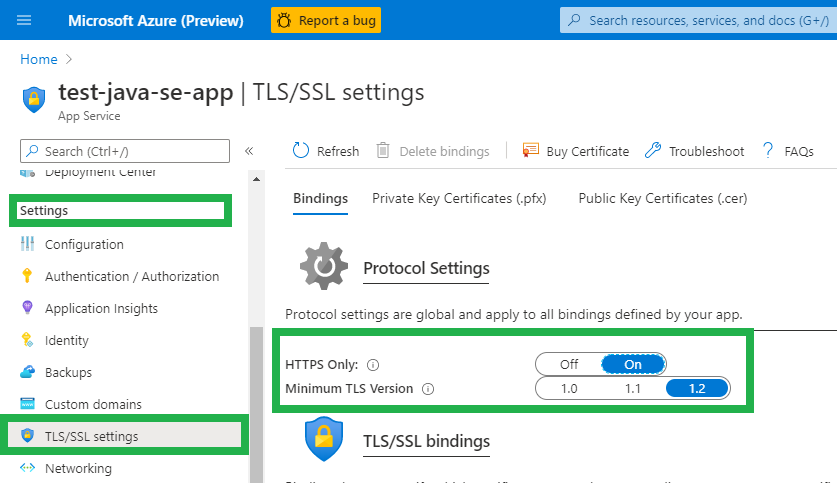
Enable HTTPS Only
Configure your web app to only accept HTTPS traffic.
- Go to your App Service in the Azure Portal
- Find Settings on the left-side navigation menu
- Click TLS/SSL settings
- Toggle HTTPS only to “On”
Explanation of Properties
spring.application.name=[YOUR APP NAME]
Setting the application name is important for discovery by other services, which will look for the app by spring.application.name. For a Spring Boot based Netflix Eureka app, this is spring.application.name
eureka.client.serviceUrl.defaultZone=https://[YOUR SERVER HOSTNAME]:443/eureka
This is the default server the client will broadcast to, allowing communication between the client, server, and discovery of all services known by the server. In App Service, the server URL might look like: my-eureka-server.azurewebsites.net.
eureka.instance.hostname=[YOUR CLIENT HOSTNAME]
The url of the client itself. This should look like my-eureka-client.azurewebsites.net
eureka.instance.secure-port-enabled=true
eureka.instance.nonsecure-port-enabled=false
eureka.instance.nonSecurePort=80
eureka.instance.securePort=443
It is recommended to use secure communication (HTTPS). In the case you do not want to use secure communication, set eureka.instance.secure-port-enabled to false and eureka.instance.nonsecure-port-enabled=true. If you do that, ensure that HTTPS Only setting (under TLS/SSL settings) is set to “Off”.
management.server.port=${server.port}
eureka.instance.instanceId=${eureka.instance.hostname}:${spring.application.name}:443
eureka.instance.statusPageUrl=https://${eureka.hostname}:443/actuator/info
eureka.instance.healthCheckUrl=https://${eureka.hostname}:443/actuator/health
eureka.instance.secureHealthCheckUrl=https://${eureka.hostname}:443/actuator/health
If using a service such as Spring Actuator, the management server port must be defined as the same port as server.port. This is because the platform assigns a random port to server.port, which the platform then exposes as port 80 and port 443. As such, the Actuator must also communicate on the port which is chosen by the platform to be exposed to the internet.
Server Configuration
In Eureka, applications can be clients, servers, or both. In the case where an application is just a server and not a client, add the following configuration in application.properties.
eureka.client.register-with-eureka=false
eureka.client.fetch-registry=false
Linux Configuration
If you are planning on hosting your Netflix Eureka application as a Linux Web App, the port information specified in Windows Web Apps is not required. This is because Windows Web Apps can only expose port 80 and port 443 externally, whereas a Linux Web App can expose other ports.
An example application.properties file for a Netflix Eureka client on a Linux Web App:
spring.application.name=example-client
eureka.client.serviceUrl.defaultZone=https://example-server.azurewebsites.com:443/eureka
eureka.instance.hostname=example-client.azurewebsites.com
eureka.instance.secure-port-enabled=true
eureka.instance.nonsecure-port-enabled=false
By default the ports 80 and 443 are used for http and https traffic respectively. Notably, management.server.port can be set to any arbitrary port. This may be useful for security or administrative purposes.
management.server.port=888
Tutorial
If you do not have a Netflix Eureka project, you can get the example project files here and follow the instructions below to get started.
If you prefer to use Linux App Service Plans, the example project for Linux is available here. The instructions for the Linux project are the same.
NOTE: the Linux version of this project will be hosted on premium (P1v2) App Service Plans, which may incur costs.
Prerequisites
Building and deploying the example project will require the following technologies.
You will also need an active Azure Subscription to create the web apps.
An Overview of the Project
The project is composed of the following four web apps.
- 2 services which provide data: ratings-data-service, movie-info-service
- 1 service which consumes data from the others: movie-catalog-service
- 1 discovery server to allow the services discover each other: discovery-server
The utility of Netflix Eureka for discovery is showcased in the catalog service, which consumes the ratings data and movie info in this block. The discovery server handles registering the movie info service and ratings data service such that they can be hosted on many machines at many URLS and be consumed by name. As you can see, the code simply calls the services by their app names: ratings-data-service and movie-info-service.
@RequestMapping("/catalog/{userId}")
public List<CatalogItem> getCatalog(@PathVariable("userId") String userId) {

    UserRating userRating = restTemplate.getForObject("http://ratings-data-service/ratingsdata/user/" + userId, UserRating.class);

    return userRating.getRatings().stream()
      .map(rating -> {
        Movie movie = restTemplate.getForObject("http://movie-info-service/movies/" + rating.getMovieId(), Movie.class);
        return new CatalogItem(movie.getName(), movie.getDescription(), rating.getRating());
      })
      .collect(Collectors.toList());

}
Building
Run mvn clean prepare-package package -DskipTests from the root of the project directory to build the applications.
Deploying
Deploying is similar to deploying a Spring Boot application using Maven. Make sure you are authenticated on the Azure CLI and have the correct subscription set.
Then, run mvn azure-webapp:deploy -Dprefix=yourPrefix, replacing yourPrefix with a string that is unique to you or your organization. The domain names on App Service must be unique, so this prevents name collisions with other applications. If a prefix is not set this way, a timestamp will used as the prefix.
The
application.propertiesfile of each of the services is generated based onclient.application.properties.template. Theapplication.propertiesfile of the discovery server is generated fromserver.application.properties.template. This is to apply the prefix and ensure each application has the same properties. This happens in theprepare-packagestep of the build process.
To build and run the project in one command, use:
mvn clean prepare-package package azure-webapp:deploy -Dprefix=yourPrefix -DskipTests
The Services
After deployment, the project will be hosted on four Azure web apps. The individual apps are at the following four URLs, where “yourPrefix” is the string you provided in the previous step.
- http://yourPrefix-discovery-server.azurewebsites.net/
- http://yourPrefix-movie-catalog-service.azurewebsites.net/
- http://yourPrefix-movie-info-service.azurewebsites.net/
- http://yourPrefix-ratings-data-service.azurewebsites.net/
Your URLS are in output of the Maven command, and in the Azure Portal in the auto-generated resource group, yourPrefix-example-netflix-eureka-rg.
By default, this project is configured to use a free tier App Service Plan. These app service plans are not “always on” by default, which means they must be visited after deployment to start up. Additionally, they will stop after 20 minutes of inactivity.
Ensure that you visit the discovery server first. This allows the services register with it and discover each other. Then visit the movie info and ratings data services before the movie catalog service. This is because the movie catalog service requires data from the movie info service and ratings data service. Querying the movie catalog service before the movie info and ratings data services results in a 500 error.
A PowerShell script which performs the requests in correct order:
#Replace with your prefix
$prefix=microsoft-example

Invoke-Webrequest -URI https://$prefix-discovery-server.azurewebsites.net
Invoke-Webrequest -URI https://$prefix-movie-info-service.azurewebsites.net
Invoke-Webrequest -URI https://$prefix-ratings-data-service.azurewebsites.net
Invoke-Webrequest -URI https://$prefix-movie-catalog-service.azurewebsites.net
The same can be done on bash using curl:
#Replace with your prefix
$prefix=microsoft-example

curl -s https://$prefix-discovery-server.azurewebsites.net
curl -s https://$prefix-movie-info-service.azurewebsites.net
curl -s https://$prefix-ratings-data-service.azurewebsites.net
curl -s https://$prefix-movie-catalog-service.azurewebsites.net
Querying the Services
Data from the services can be accessed directly on each site. Data can also be retrieved as PowerShell objects through the Invoke-RestMethod command:
#Replace with your prefix
$prefix=microsoft-example

Invoke-RestMethod -URI https://$prefix-movie-info-service.azurewebsites.net/movies/12 -ContentType "application/json"
Invoke-RestMethod -URI https://$prefix-ratings-data-service.azurewebsites.net/ratingsdata/movies/12 -ContentType "application/json"
Invoke-RestMethod -URI https://$prefix-movie-catalog-service.azurewebsites.net/catalog/12 -ContentType "application/json"
Or in bash:
#Replace with your prefix
$prefix=microsoft-example

curl -s https://$prefix-discovery-server.azurewebsites.net
curl -s https://$prefix-movie-info-service.azurewebsites.net/movies/12
curl -s https://$prefix-ratings-data-service.azurewebsites.net/ratingsdata/movies/12
curl -s https://$prefix-movie-catalog-service.azurewebsites.net/catalog/12
Querying the Discovery Server
The discovery server can be queried to provide information about the services registered with it. The following command gets the applications registered with the discovery server:
$response = Invoke-RestMethod -URI https://$prefix-discovery-server.azurewebsites.net/eureka/apps -ContentType "application/json"

$response.applications

versions__delta apps__hashcode application
--------------- -------------- -----------
1               UP_3_          {MOVIE-INFO-SERVICE, RATINGS-DATA-SERVICE, MOVIE-CATALOG-SERVICE}
An individual service can then be queried as a PowerShell object:
$catalogService = $response.applications.application | Where-Object {$_.name -eq "MOVIE-CATALOG-SERVICE"}

$catalogService.instance

instanceId                    : example-movie-catalog-service.azurewebsites.net:movie-catalog-service:443
hostName                      : example-movie-catalog-service.azurewebsites.net
app                           : MOVIE-CATALOG-SERVICE
ipAddr                        : 10.0.5.129
status                        : UP
overriddenstatus              : UNKNOWN
port                          : port
securePort                    : securePort
countryId                     : 1
dataCenterInfo                : dataCenterInfo
leaseInfo                     : leaseInfo
metadata                      : metadata
homePageUrl                   : http://example-movie-catalog-service.azurewebsites.net:80/
statusPageUrl                 : https://example-movie-catalog-service.azurewebsites.net:443/actuator/info
healthCheckUrl                : http://example-movie-catalog-service.azurewebsites.net:443/actuator/health
secureHealthCheckUrl          : https://example-movie-catalog-service.azurewebsites.net:443/actuator/health
vipAddress                    : movie-catalog-service
secureVipAddress              : movie-catalog-service
isCoordinatingDiscoveryServer : false
lastUpdatedTimestamp          : 1596156385669
lastDirtyTimestamp            : 1596156385326
actionType                    : ADDED
This means that services and discovery servers hosted on Azure can be accessed and consumed by other Eureka servers, including those hosted on other cloud service providers and local servers. While Netflix Eureka is designed for Java, it is possible to use this data to implement a Netflix Eureka client in any language.
Securing Eureka
Without requiring authorization, any user can access the discovery server. This means that a malicious user has all of the information about every service and server registered, and can register their own malicious applications to your discovery server, potentially accessing sensitive information.
Basic Auth
Since our example application is based on Spring Boot, it can use Spring Boot’s security to require credentials from clients before registering them.
-
In the
pom.xmlof the discovery server project, add this dependency:<dependency> <groupId>org.springframework.boot</groupId> <artifactId>spring-boot-starter-security</artifactId> </dependency> -
In the
application.propertiesof the discovery server, add the following:spring.security.user.name=your-eureka-user spring.security.user.password=your-eureka-passwordNote: if you are adding this to the example project, add the above properties to
server.application.properties.templateas well. -
Define a class in the discovery server project that extends WebSecurityConfigurerAdapter and overrides the
configure()methodpackage io.javabrains.discoveryserver; //Package of the example project, replace with yours import org.springframework.context.annotation.Configuration; import org.springframework.security.config.annotation.web.builders.HttpSecurity; import org.springframework.security.config.annotation.web.configuration.WebSecurityConfigurerAdapter; @Configuration public class SecurityConfig extends WebSecurityConfigurerAdapter { @Override protected void configure(HttpSecurity http) throws Exception { http.csrf().disable().authorizeRequests().anyRequest().authenticated().and().httpBasic(); } }When you run the discovery server and navigate to it, there should now be a pop-up requesting a username and password.
-
Modify the
application.propertiesfile of the client to include the username and password in the discovery server URLeureka.client.serviceUrl.defaultZone=https://discovery-server.azurewebsites.net:443/eurekaShould now be:
eureka.client.serviceUrl.defaultZone=https://username:password@discovery-server.azurewebsites.net:443/eurekaNote:: if you’re adding this to the example project, add the username and password to
client.application.properties.template
The client will now be able to successfully register with the Eureka server.
Security Options for Azure and Spring Boot
Azure App Service provides built-in authentication and authorization support, so you can sign in users and access data by writing minimal or no code in your web app. This feature, EasyAuth, allows Azure Web Apps to authenticate though identity providers, including Azure Active Directory, Google, Microsoft Account, Facebook, Twitter, and OpenID Connect.
You can read more about EasyAuth and Authentication and Authorization in Azure here
The Spring Boot Starter for Azure provides auto-configuration for a number of Azure Services. These include Azure Active Directory, an authorization and identity service, and Key Vault, a service for storing and retrieving secrets securely across Azure.
You can read more about Spring Boot Starters for Azure here
Aside from Basic Auth, our example application can use the security features of Spring Security for other types of authorization (Including OAuth2) and protection from exploits such as CSRF attacks.