Continuous Deployment for Windows Containers with GitHub Actions
Github Actions enables you to easily automate any part of your development workflow. GitHub Actions are defined as YAML files in the .github/workflows directory of your repository. The workflows are triggered by an event, such as a push to a specific branch, a commit or comment on a pull request, or on a CRON schedule.
In this article, we will use GitHub Actions for Azure to deploy a Windows Container application to App Service. The sample application is already configured to be used in a Windows Container, pushed to a registry, and deployed to App Service. Of course, you can use this guide to add the correct deployment tasks to work with your own applications.
Sample Application
If you would like to get started with your own application, you can skip to the next section.
The sample application is a simple task-tracking app built with .NET Framework using Azure SQL for storage. The project has a workflow file, main.yaml, that is set up for continuous deployment. You have your choice of using Azure Container Registry (ACR) or Docker Hub for your registry needs (the difference in syntax will be explained below).
Find the full repository samples for .NET Framework and .NET Core at these highlighted links.
Create Resources
Create the following resources. You will need information from each resource that will be used in the file and stored in your secrets. Create your choice of registry (Azure Container Registry or Docker Hub) first since you will need information from there before you can create your App Service.
- Azure Container Registry OR Docker Hub repository
- App Service (Web App for Container)
- .NET Framework application with supporting dockerfile in a GitHub repository
- Azure SQL Database (Optional)
Create a Service Principal (optional) or use Publish Profile
In this step you have the choice of using a Service Principal or Publish Profile for authentication. If you would like to use your publish profile credentials instead, please skip this section and see Deploy to Azure App Service to see how. To use a Service Principal, please continue here:
Our workflow will use a Service Principal to authenticate with Azure when deploying the container to App Service. A service principal is an Active Directory Identity created for use with automation scenarios, such as GitHub Actions.
-
Run the following command in Azure CLI in powershell to get the credentials needed to run the login action. The output of this command will be a collection of key value pairs that you’ll need to add to your GitHub secrets.
az ad sp create-for-rbac --name "<appservice-name>" --role contributor \ --scopes /subscriptions/{subscription-id}/resourceGroups/{resource-group} \ --sdk-auth -
Copy the output into your GitHub secrets to use as your
AZURE_CREDENTIALSsecret.{ "clientId": "<GUID>", "clientSecret": "<GUID>", "subscriptionId": "<GUID>", "tenantId": "<GUID>" }
Secure Secrets
Since we are using sensitive information that you don’t want others to access, we will use GitHub secrets to protect our information. Create a secret by following the directions here. Add the github secrets variables below with your own secrets appropriate from each resource.
APP_NAME: web-app-nameAZURE_CREDENTIALS: the JSON output of theaz ad sp create-for-rbaccommandPUBLISH_PROFILE: content of your publish profile (optional)IMAGE_NAME: name-of-imageCONTAINER_REGISTRY_USERNAME: Your container registry usernameCONTAINER_REGISTRY_PASSWORD: Your container registry passwordCONTAINER_NAME: The hostname of the container registry (ACR only)AZURE_SQL_CONNECTION_STRING: database-connection-stringDATABASE_SERVER_NAME: server-name
The Dockerfile
The samples below explain the associated Dockerfiles for the .NET Framework and .NET Core sample applications linked above. If creating your own application, use the appropriate Dockerfile below and replace the directory paths to match your application.
.NET Framework
.NET Framework applications will work best with a multi-stage build. This example copies over the necessary project files and packages before it creates the publish files for deployment to Azure.
# Set the base image
FROM mcr.microsoft.com/dotnet/framework/sdk:4.8 as build
WORKDIR "/src"

# Copy packages to your image and restore them
COPY taskapp/taskapp.sln .
COPY taskapp/taskapp/taskapp.csproj taskapp/taskapp/taskapp.csproj
COPY taskapp/taskapp/packages.config taskapp/taskapp/packages.config
RUN nuget restore taskapp/taskapp/packages.config -PackagesDirectory taskapp/packages

# Add files from source to the current directory and publish the deployment files to the folder profile
COPY . .
WORKDIR /src/taskapp/taskapp
RUN msbuild taskapp.csproj /p:Configuration=Release /m /p:DeployOnBuild=true /p:PublishProfile=FolderProfile

# Layer the production runtime image
FROM mcr.microsoft.com/dotnet/framework/aspnet:4.8-windowsservercore-ltsc2019 as deploy

# Add the publish files into the right directory
WORKDIR /inetpub/wwwroot
COPY --from=build /src/taskapp/taskapp/bin/Release/Publish .
.NET Core
For .NET Core, the nano server base image must be “1809” to be compatible with what Azure currently supports. Keep in mind this may change in the future.
# Set the base image
FROM mcr.microsoft.com/dotnet/core/aspnet:3.1-nanoserver-1809 AS base
WORKDIR /app
EXPOSE 80

# Add the sdk so you can run the dotnet restore and build commands
FROM mcr.microsoft.com/dotnet/core/sdk:3.1-nanoserver-1809 AS build
WORKDIR /src
COPY *.csproj ./
RUN dotnet restore "taskapp.csproj"
COPY . .
WORKDIR "/src"
RUN dotnet build "taskapp.csproj" -c Release -o /app/build

# Create the publish files
FROM build AS publish
RUN dotnet publish "taskapp.csproj" -c Release -o /app/publish

# Copy the publish files into the container
FROM base AS final
WORKDIR /app
COPY --from=publish /app/publish .
ENTRYPOINT ["dotnet", "taskapp.dll"]
Create the GitHub Workflow
Now that we have our resources created, secrets secured, and dockerfile in order we can start building our workflow file for continuous deployment. The workflow file is a yaml file in .github/workflows/. It contains a collection of actions that run when triggered. Add the workflow file by going to the Actions tab in your repository and click Set up a workflow yourself.
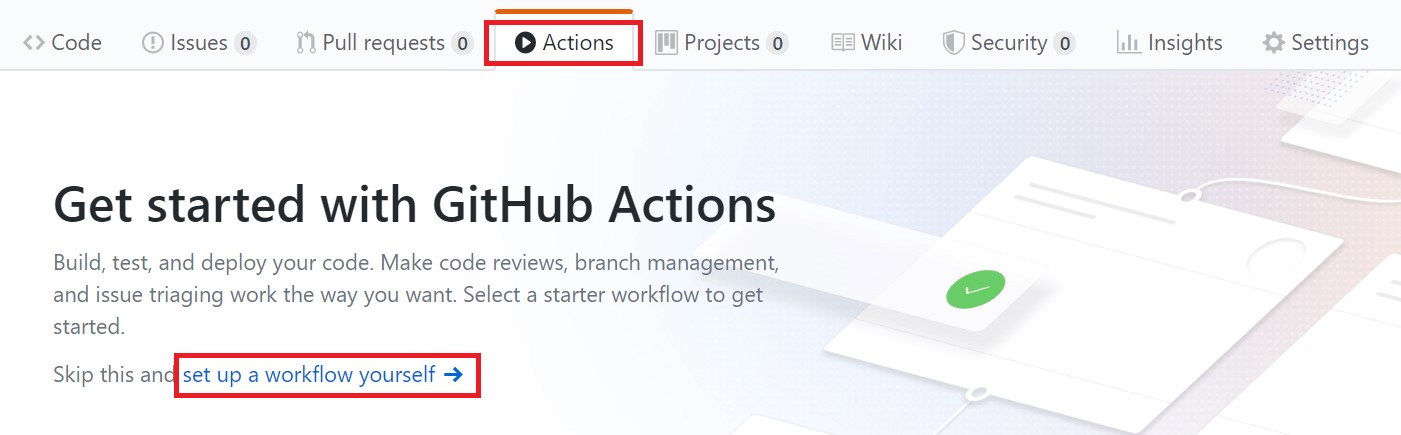
After choosing this option, you will see a starter worklfow that explains how GitHub Actions work. If you are new to this I recommend you read the comments, but we won’t be needing any of the starting code so you can remove it.
Add the workflow trigger
First, specify the trigger that starts the workflow. For our example, we are simply triggering the build whenever there is a push into the master branch If you would like to change this behavior, there are many other triggers for Github Actions.
name: Build and Deploy Windows Container App to Azure App Service

# Trigger the build on commits into the master branch
on:
  push:
    branches:
      - master

# Starts jobs and sets the type of runner (Windows) they will run on
jobs:
  build-and-deploy-to-azure:
    runs-on: windows-latest

    steps:

    # Checks out repository so your workflow can access it
    - uses: actions/checkout@v1
Log into your container registry
In order for the workflow to access our registry, we need to add our Docker login action. This action can login to both Azure Container Registry or Docker Hub. If logging into Docker Hub, you can get away with not using the login-server parameter. If using ACR, you can grab the server name, username, and password from the Access Keys tab in your Azure Container Registry Resource.
Add the following secrets if you have not already:
CONTAINER_REGISTRY_USERNAME: Your container registry usernameCONTAINER_REGISTRY_PASSWORD: Your container registry password-
CONTAINER_NAME: The hostname of the container registry (ACR only)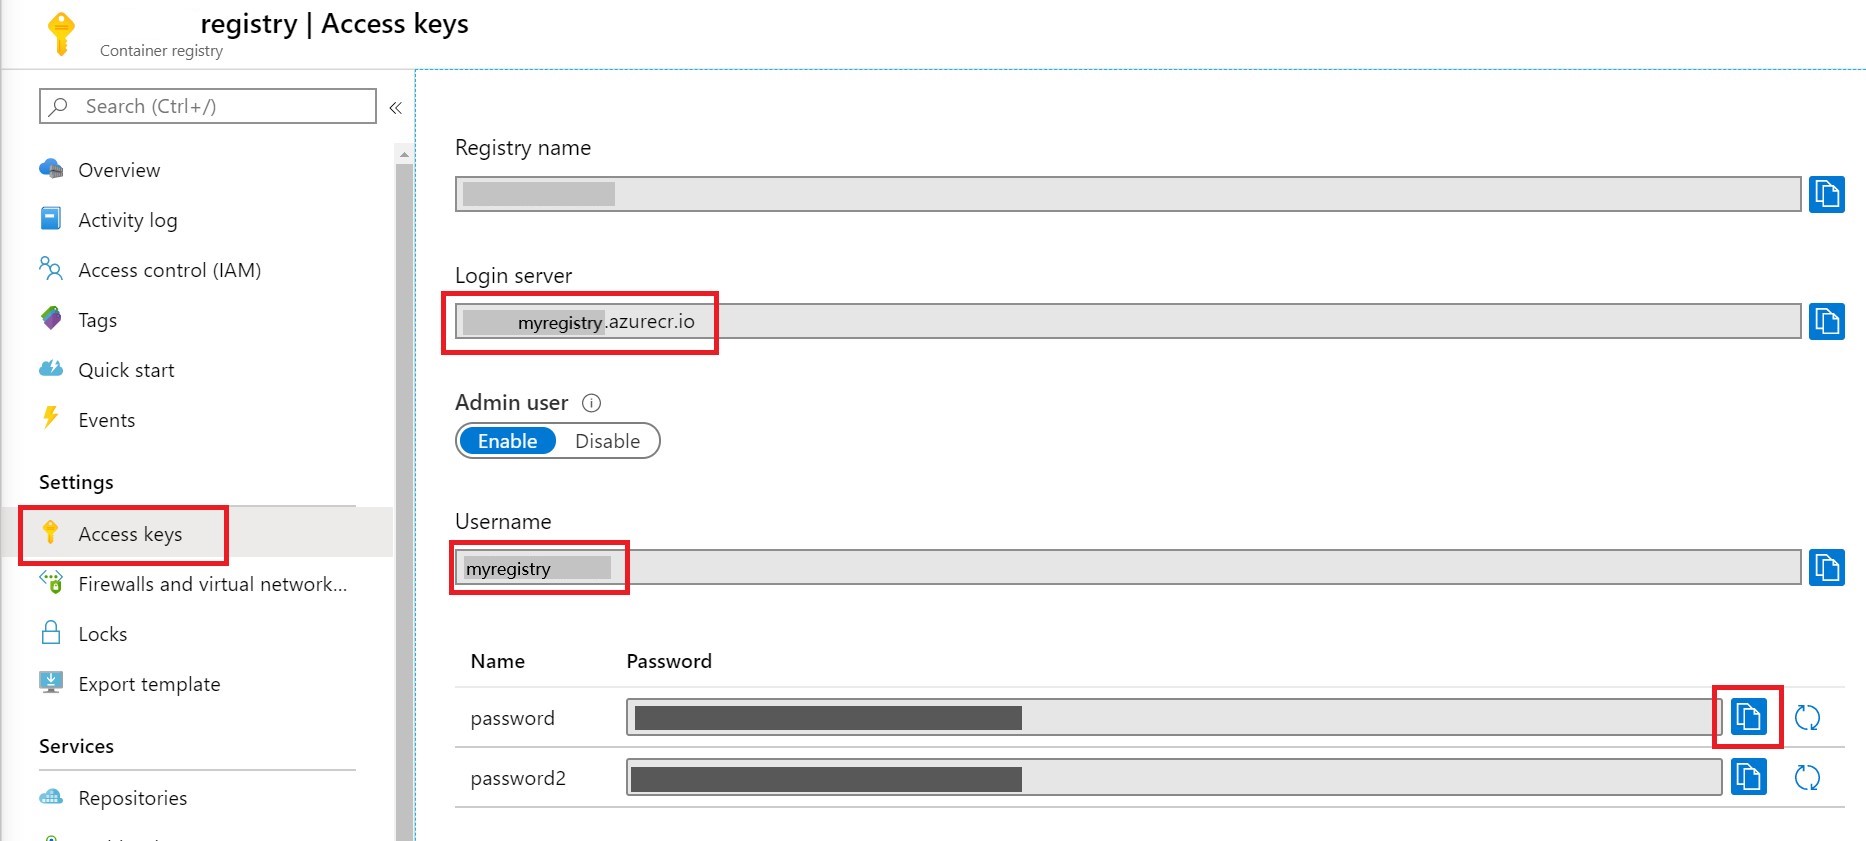
Azure Container Registry
# Use docker login to log into ACR
- name: Docker login to ACR
  uses: azure/docker-login@v1
  with:
    login-server: ${{ secrets.CONTAINER_REGISTRY_NAME }}
    username: ${{ secrets.CONTAINER_REGISTRY_USERNAME }}
    password: ${{ secrets.CONTAINER_REGISTRY_PASSWORD }}
Docker Hub
# Use docker login
- name: Docker Hub login
  uses: azure/docker-login@v1
  with:
    username: ${{ secrets.CONTAINER_REGISTRY_USERNAME }}
    password: ${{ secrets.CONTAINER_REGISTRY_PASSWORD }}
Build and Push Image to Registry
Next, we will add a command to build and push the container image to the registry. We are using the $ to tag the container with the commit id. This makes it easy to track what each image contains.
Add the following secrets if you have not already:
IMAGE_NAME: The name of the image (can be any name)CONTAINER_REGISTRY_NAME: The hostname of the container registry (ACR only)
# Build and push the image to Container Registry
- name: Build and Push container to registry
  run: |
    docker build --file=taskapp/taskapp/Dockerfile -t ${{ secrets.CONTAINER_REGISTRY_NAME }}/${{ secrets.IMAGE_NAME }}:${{ github.sha }} .
    docker push ${{ secrets.CONTAINER_REGISTRY_NAME }}/${{ secrets.IMAGE_NAME }}:${{ github.sha }}
Authenticate with Azure
In the earlier section you created an Azure Service Principal and added it as a GitHub Secret. You can now add the Azure login action to the workflow. This action will use the Service Principal to authenticate with Azure. If you are using a publish profile to deploy your application instead of using a Service Principal, please skip this section.
Add the following secrets if you have not already:
AZURE_CREDENTIALS: The output of the earlier command that generated the Service Principal
- name: Azure Service Principal Authentication
  uses: azure/login@v1
  with:
      creds: ${{ secrets.AZURE_CREDENTIALS }}
Deploy to Azure App Service
If you haven’t already created your App Service, now is the time to do so before you can proceed. Remember that Windows Containers deployment is only available on the Premium tier App Service Plans. Be mindful of the tier capacity, as you may need to scale up if your container is too large.
The final step to setting up the continuous deployment is to add the webapps container deploy action.
Add the following secrets if you have not already:
APP_NAME: The webapp nameCONTAINER_REGISTRY_NAME: The container registry nameIMAGE_NAME: The name of the container imagePUBLISH_PROFILE: content of your publish profile
- name: Deploy Container to Azure App Service
  uses: azure/webapps-container-deploy@v1
  with:
    app-name: ${{ secrets.APP_NAME }}
    images: ${{ secrets.CONTAINER_REGISTRY_NAME }}/${{ secrets.IMAGE_NAME }}:${{ github.sha }}
If you would like to deploy using your publish profile instead of using a Service Principal add the publish-profile line:
 - name: Deploy container to Azure App Service
      uses: Azure/webapps-deploy@v2
      with:
        app-name: ${{ secrets.APP_NAME }}
        publish-profile: ${{ secrets.PUBLISH_PROFILE }}
        images: ${{ secrets.REGISTRY_USERNAME }}.azurecr.io/${{ secrets.IMAGE_NAME }}:${{ github.sha }}
To obtain the contents of your publish profile:
- Go to the Overview page of your web app
- Click on the Get publish profile tab to download your publish profile
- Copy the entire contents of the xml file and add it to your GitHub secret
PUBLISH-PROFILE
See this documentation for an example.
Deploy to Azure SQL Database (Optional)
Adding Azure SQL to the workflow is optional of course, as you might have other plans for storage. To deploy your SQL database to Azure, you will use a dacpac file or SQL scripts, and a connection string. The connection string can be found in the overview page of your Azure SQL database and you can create your dacpac by extracting the data using something like SQL Server Object Explorer in Visual Studio.
Add the following secrets if you have not already:
DATABASE_SERVER_NAME: The resource name of the database-
AZURE_SQL_CONNECTION_STRING: The full connection string for the database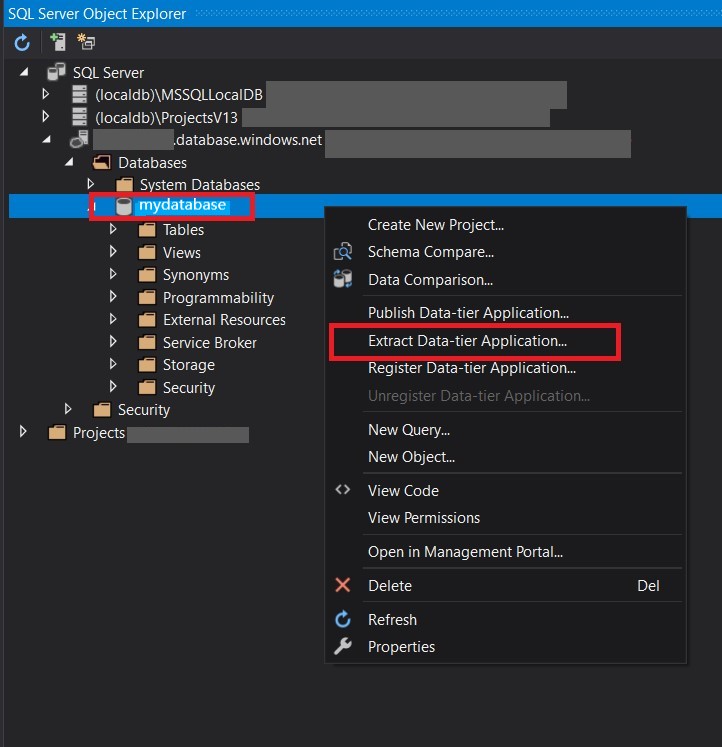
Both your server name and connection string are found in the Azure database resource in the portal. Copy the connection string, making sure your password and user ID are correct, and paste into your GitHub secrets.
Create a dacpac file in your project
As mentioned before, you’ll need to use either a dacpac file or set of SQL scripts to deploy your database schema. If you are using Visual Studio, it’s easy to create and add the needed dacpac file to run the action.
- Connect your SQL Azure Database to Visual Studio
- Right-click the data base and choose Extract Data-tier application
-
On the following window, choose the location at the same level of your github workflow file and click create.
# Deploy a dacpac file to a pre-provisioned Azure SQL Server
- name: Azure SQL Deploy
  uses: Azure/sql-action@v1
  with:
    server-name: ${{ secrets.DATABASE_SERVER_NAME }}.database.windows.net
    connection-string: ${{ secrets.AZURE_SQL_CONNECTION_STRING }}
    dacpac-package: './data.dacpac'
Your dacpac file should have been created and added to your project. The action finds your file under the dacpac-package parameter seen above.
Summary
From here you are setup to continuously build your Windows Container application through github actions. Below you’ll see the final result of the workflow yaml file.
Full workflow file
The previous sections showed how to assemble the workflow step-by-step. The full main.yaml is below.
name: Build and Deploy Windows Container App to Azure App Service

# Trigger the build on commits into the master branch
on:
  push:
    branches:
      - master

# Starts jobs and sets the type of runner (Windows) they will run on
jobs:
  build-and-deploy-to-azure:
    runs-on: windows-latest

    steps:

    # Checks out repository so your workflow can access it
    - uses: actions/checkout@v1

    # Authenticate a Service Principal to deploy to your Web App
    - name: Azure Service Principal Authentication
      uses: azure/login@v1
      with:
          creds: ${{ secrets.AZURE_CREDENTIALS }}

    # Use docker login to log into ACR
    - name: Docker login to ACR
      uses: azure/docker-login@v1
      with:
       # comment out the login-server parameter if using docker hub
        login-server: ${{ secrets.CONTAINER_REGISTRY_NAME }}
        username: ${{ secrets.CONTAINER_REGISTRY_USERNAME }}
        password: ${{ secrets.CONTAINER_REGISTRY_PASSWORD }}

    # Build and push your image to Azure Container Registry
    - name: Build and Push container to ACR
      run: |
        docker build --file=taskapp/taskapp/Dockerfile -t ${{ secrets.CONTAINER_REGISTRY_NAME }}/${{ secrets.IMAGE_NAME }}:${{ github.sha }} .
        docker push ${{ secrets.CONTAINER_REGISTRY_NAME }}/${{ secrets.IMAGE_NAME }}:${{ github.sha }}

    # Deploy your container to App Service
    - name: Deploy Container to Azure App Service
      uses: azure/webapps-container-deploy@v1
      with:
        app-name: ${{ secrets.APP_NAME }}
        images: ${{ secrets.CONTAINER_REGISTRY_NAME }}/${{ secrets.IMAGE_NAME }}:${{ github.sha }}

    # Deploy a dacpac file to your SQL server
    - name: Azure SQL Deploy
      uses: Azure/sql-action@v1
      with:
        server-name: ${{ secrets.DATABASE_SERVER_NAME }}
        connection-string: ${{ secrets.AZURE_SQL_CONNECTION_STRING }}
        dacpac-package: './data.dacpac'